


Crypto Cipher Newsroom
7 Essential Tips for Reverb

7 Essential Tips for Reverb
Reverbs are an important part of mixing. We often hear people refer to a signal as dry or wet, referring to the type of reverb. Shorter reverbs can sound dry as they are perceived, rather than heard. Longer reverbs are audible in the mix and they are often referred to as a wet sounding. In this article, we will look at a few techniques of using reverb as an effective mixing tool.
1. Using Your Reverb Post-EQ
Producers use reverbs both as inserts and returns. EQing our signal before it comes to our reverb has a lot of benefits. We can use a low cut or low shelf to reduce the amount of reverb applied on the lower frequencies to prevent unwanted muddiness in the low mids. Similarly, a high cut or high shelf to reduce the reverb on some sibilant frequencies so that they are not amplified in the mix. Always use your ears and check how your signal sounds with and without the EQ. Another important point to consider is that nothing is stopping you from EQ the signal after the reverb as well. Although we are using an EQ to sculpt our signal into the reverb effect, it does not mean that other problems will not be introduced in the areas reverb is being applied. You can use a separate EQ for this role or you can also use your Reverb's own EQ, provided it has that feature, to sculpt your input signal for the reverb.

In the image above we are using the Reverb on a return track. We are sending a drum loop to our return and creating a room sound for it. We are using an EQ before our reverb in the return to control the amount of reverb applied on the kick and frequencies above 7000Hz.
2. Compressing the Reverb Tail
When using longer decay times on a reverb plugin to create lush soundscapes, we run the risk of drowning important musical phrases in a performance. It can create a lack of clarity when used on quick vocals or melodic runs. Compressing the reverb tail gives us greater control over the decay so that it ducks whenever our lead sound is playing. In our example, we will use the sidechain function on our compressor to duck the reverb tail according to our sidechain input.
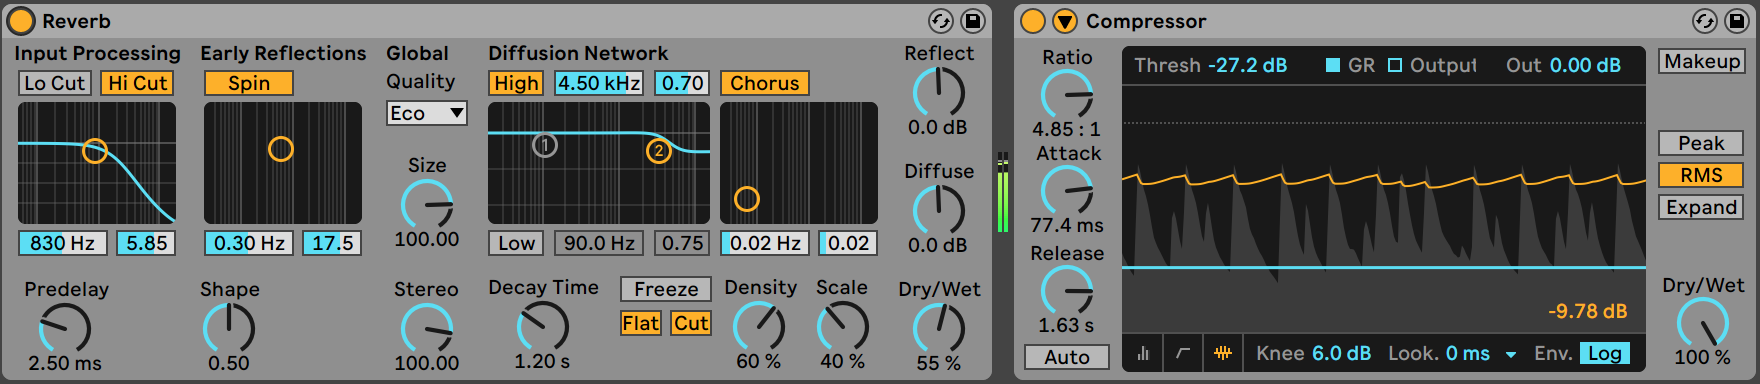
As you can see in the image above we have selected the Vocal Chop track for our sidechain input so that our reverb ducks down every time the vocals cross the threshold we have set. We are also using the release time of the compressor to shape the recovery of the reverb signal after our vocal chop has ended temporarily.
3. Avoiding too many Different Reverbs
Reverbs essentially refers to the space in which your mix exists. If you want an intimate feel in your sound, then you should stick to shorter room reverb. If we suddenly add another sound with a lush hall reverb, then it might mess up our mix's focus in a lot of cases. It is important to think of reverb as an effect that adds context to the mix. It makes the listener feel like they have been transported to a certain environment meant, the music is being performed. This should not sway you away from using multiple reverbs if your intention is to create a certain vibe or effect. A lot of producers use two reverbs for their mixing session, a shorter one to add body and depth, and a longer one to add some wetness to an otherwise dry sound. Always visualize the space the listener would feel they are in. If we are applying Reverb to a snare drum then we have to think would it should be like it's being played in a church or perhaps a warehouse or any other space. This pattern of thinking will help us make better decisions during our mix.
4. Creating Stereo Width with Reverb
We can use reverbs to enhance the stereo field of a mix. A common technique is to keep the main sound in the center while the reverb is panned back and forth by automation. This can be used to create some stereo detail in our mix to make sounds stand out from the rest. Another way reverb panning can be helpful is in those situations where there is panned sound but our reverb is centered, thus not giving a sense of space to our main sound. We can pan our reverb in this case to the position of our main sound so that we can reinforce the panning. We can also create our own wide stereo Reverb by sending a signal into two return tracks with similar-sounding reverbs and panning one hard right and hard left. The main sound will remain in the center creating a pleasant ambiance.
5. Automating Reverb Parameters
Most often producers dial in their desired reverb setting and leave them static throughout the mix. This can lead to a boring mix. To elevate our mixes it is important to obsess over the details. A common pitfall of using longer delays is sometimes one phrase will have its reverb tail overlapping on the next phase in the performance resulting in dissonance. This can also happen when we are transition from one section of a song to another, while the reverb tail from the preceding section continues to sustain. An easy fix is to automate our dry and wet settings so we can create clearer transitions between musical phrases and song sections. You can also automate your reverb to create swells and impacts in your mix. Always use your ears to see where the reverb tail is creating problems and address them immediately.
6. Less is More
Overuse of reverbs can notoriously lead to muddy mixes. The presets or samples we use often have reverb built into the sound from the plugin itself. It is useful to think about whether we require that reverb if we are going to create our own spatial location with our own reverb settings anyways. There is no creativity in drowning the details of performance with the overuse of reverb. On a lot of occasions, it is more beneficial to be conservative with our reverb to avoid any undesirable fogginess. If we let a set reverb tail color every section of our mix, then chances are it will not sound as good in certain sections as it does in other sections.
7. Having our Reverb Decay Time Synced With the Project BPM
It is important to remember that reverb is a function of space. So the size of your space or environment determines the decay time of your reverb. The decay time of a small room reverb will be considerably shorter than that of a chamber reverb. To make our mixes sound tighter, we like to have our reverb decay time match the BPM of the song. This lets us dial in the exact number of note duration we want our reverb tail to sustain. You can use a Reverb and Delay Time Calculator on the internet to calculate what decay time setting will be ideal for your project tempo. You will simply have to enter your project BPM and let the calculator do the work. There is also a small hack for calculating the time manually. If we divide the value 60,000 by our project BPM, then it will give us the decay time for 1/4 note duration in that BPM. So now we can manipulate this number depending on what kind of ambiance we want. If we want the decay to sustain a full bar then multiply your result by four. If we take 100 BPM as an example, then 600ms (60000/100) will be the decay time for a 1/4 note in 100 BPM. Now if we want our tail to last a full bar in 100BPM, then our timing will be 2.4 seconds (600 x 4 = 2400ms = 2.4s). Now we have a clear idea as to how long our reverb will sustain in the mix.
