


In this article we will focus on the Chords, Leads and Basses used in the drop section, take a look at the music theory and explore a few tips that can make the process of coming up with melodies or chord progressions easier.
In case you have missed Part 1 of this series, we recommend that you read that first and then come back to this article.
Chord Progression
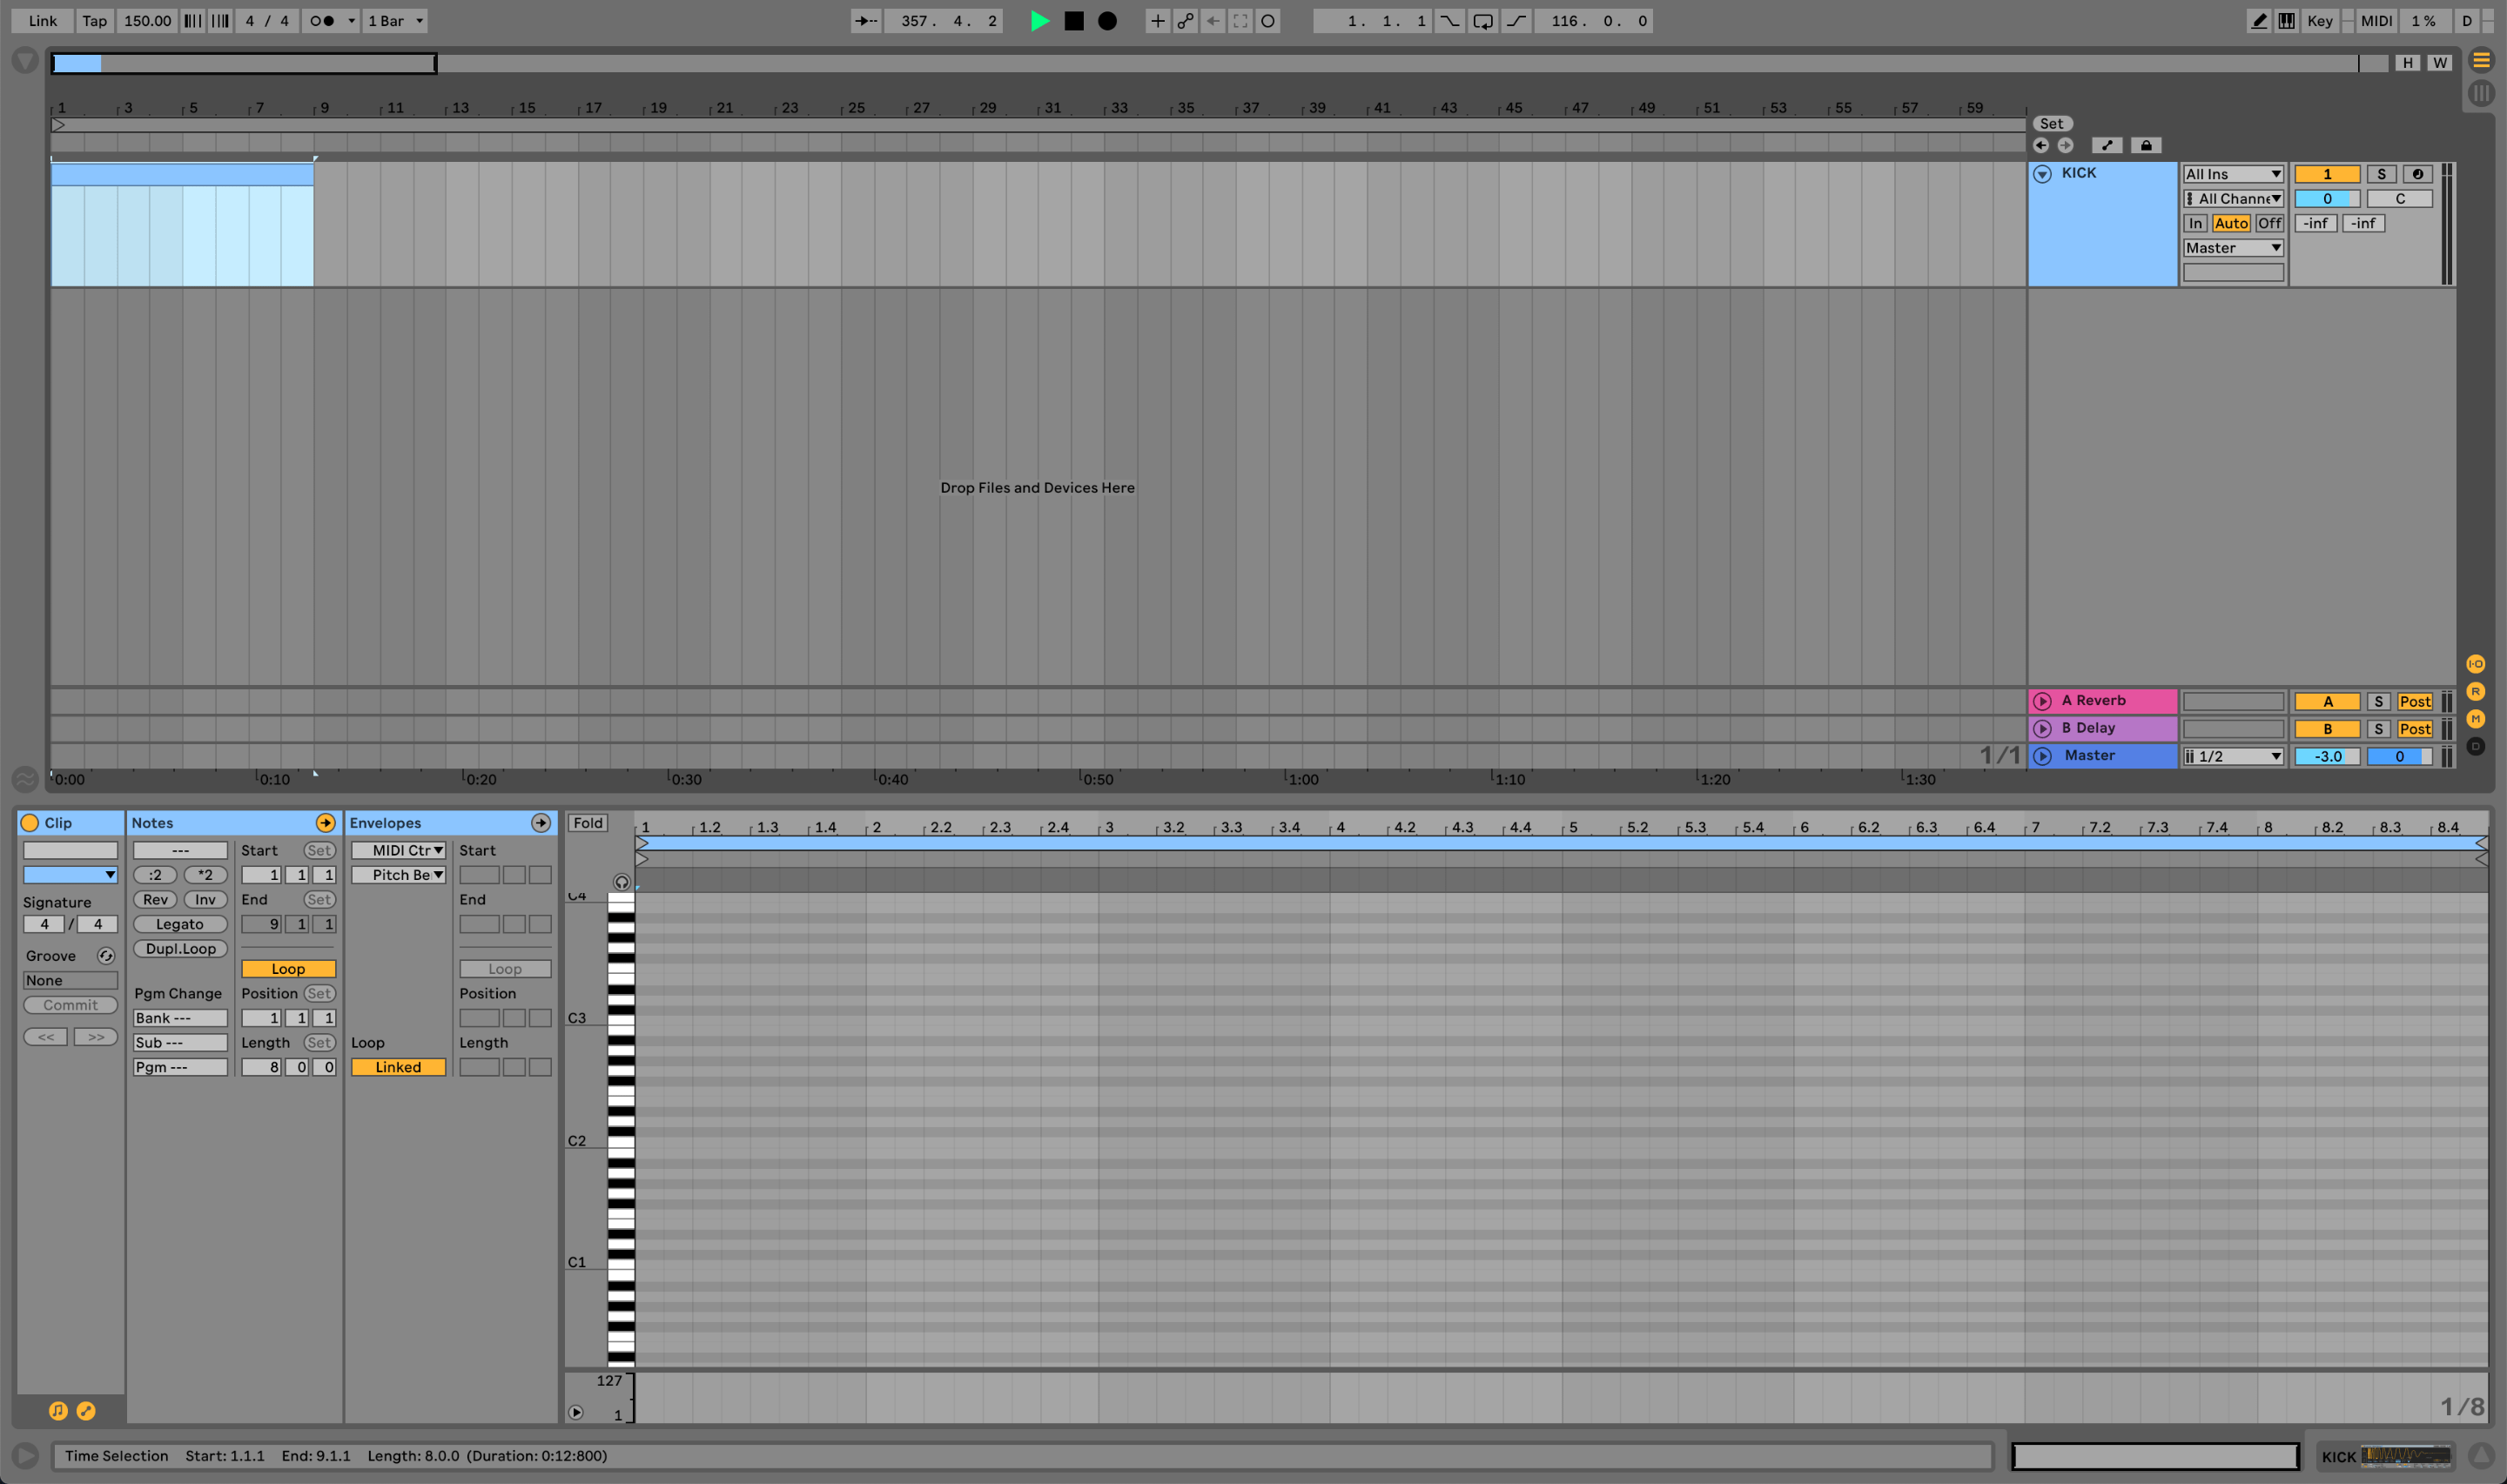
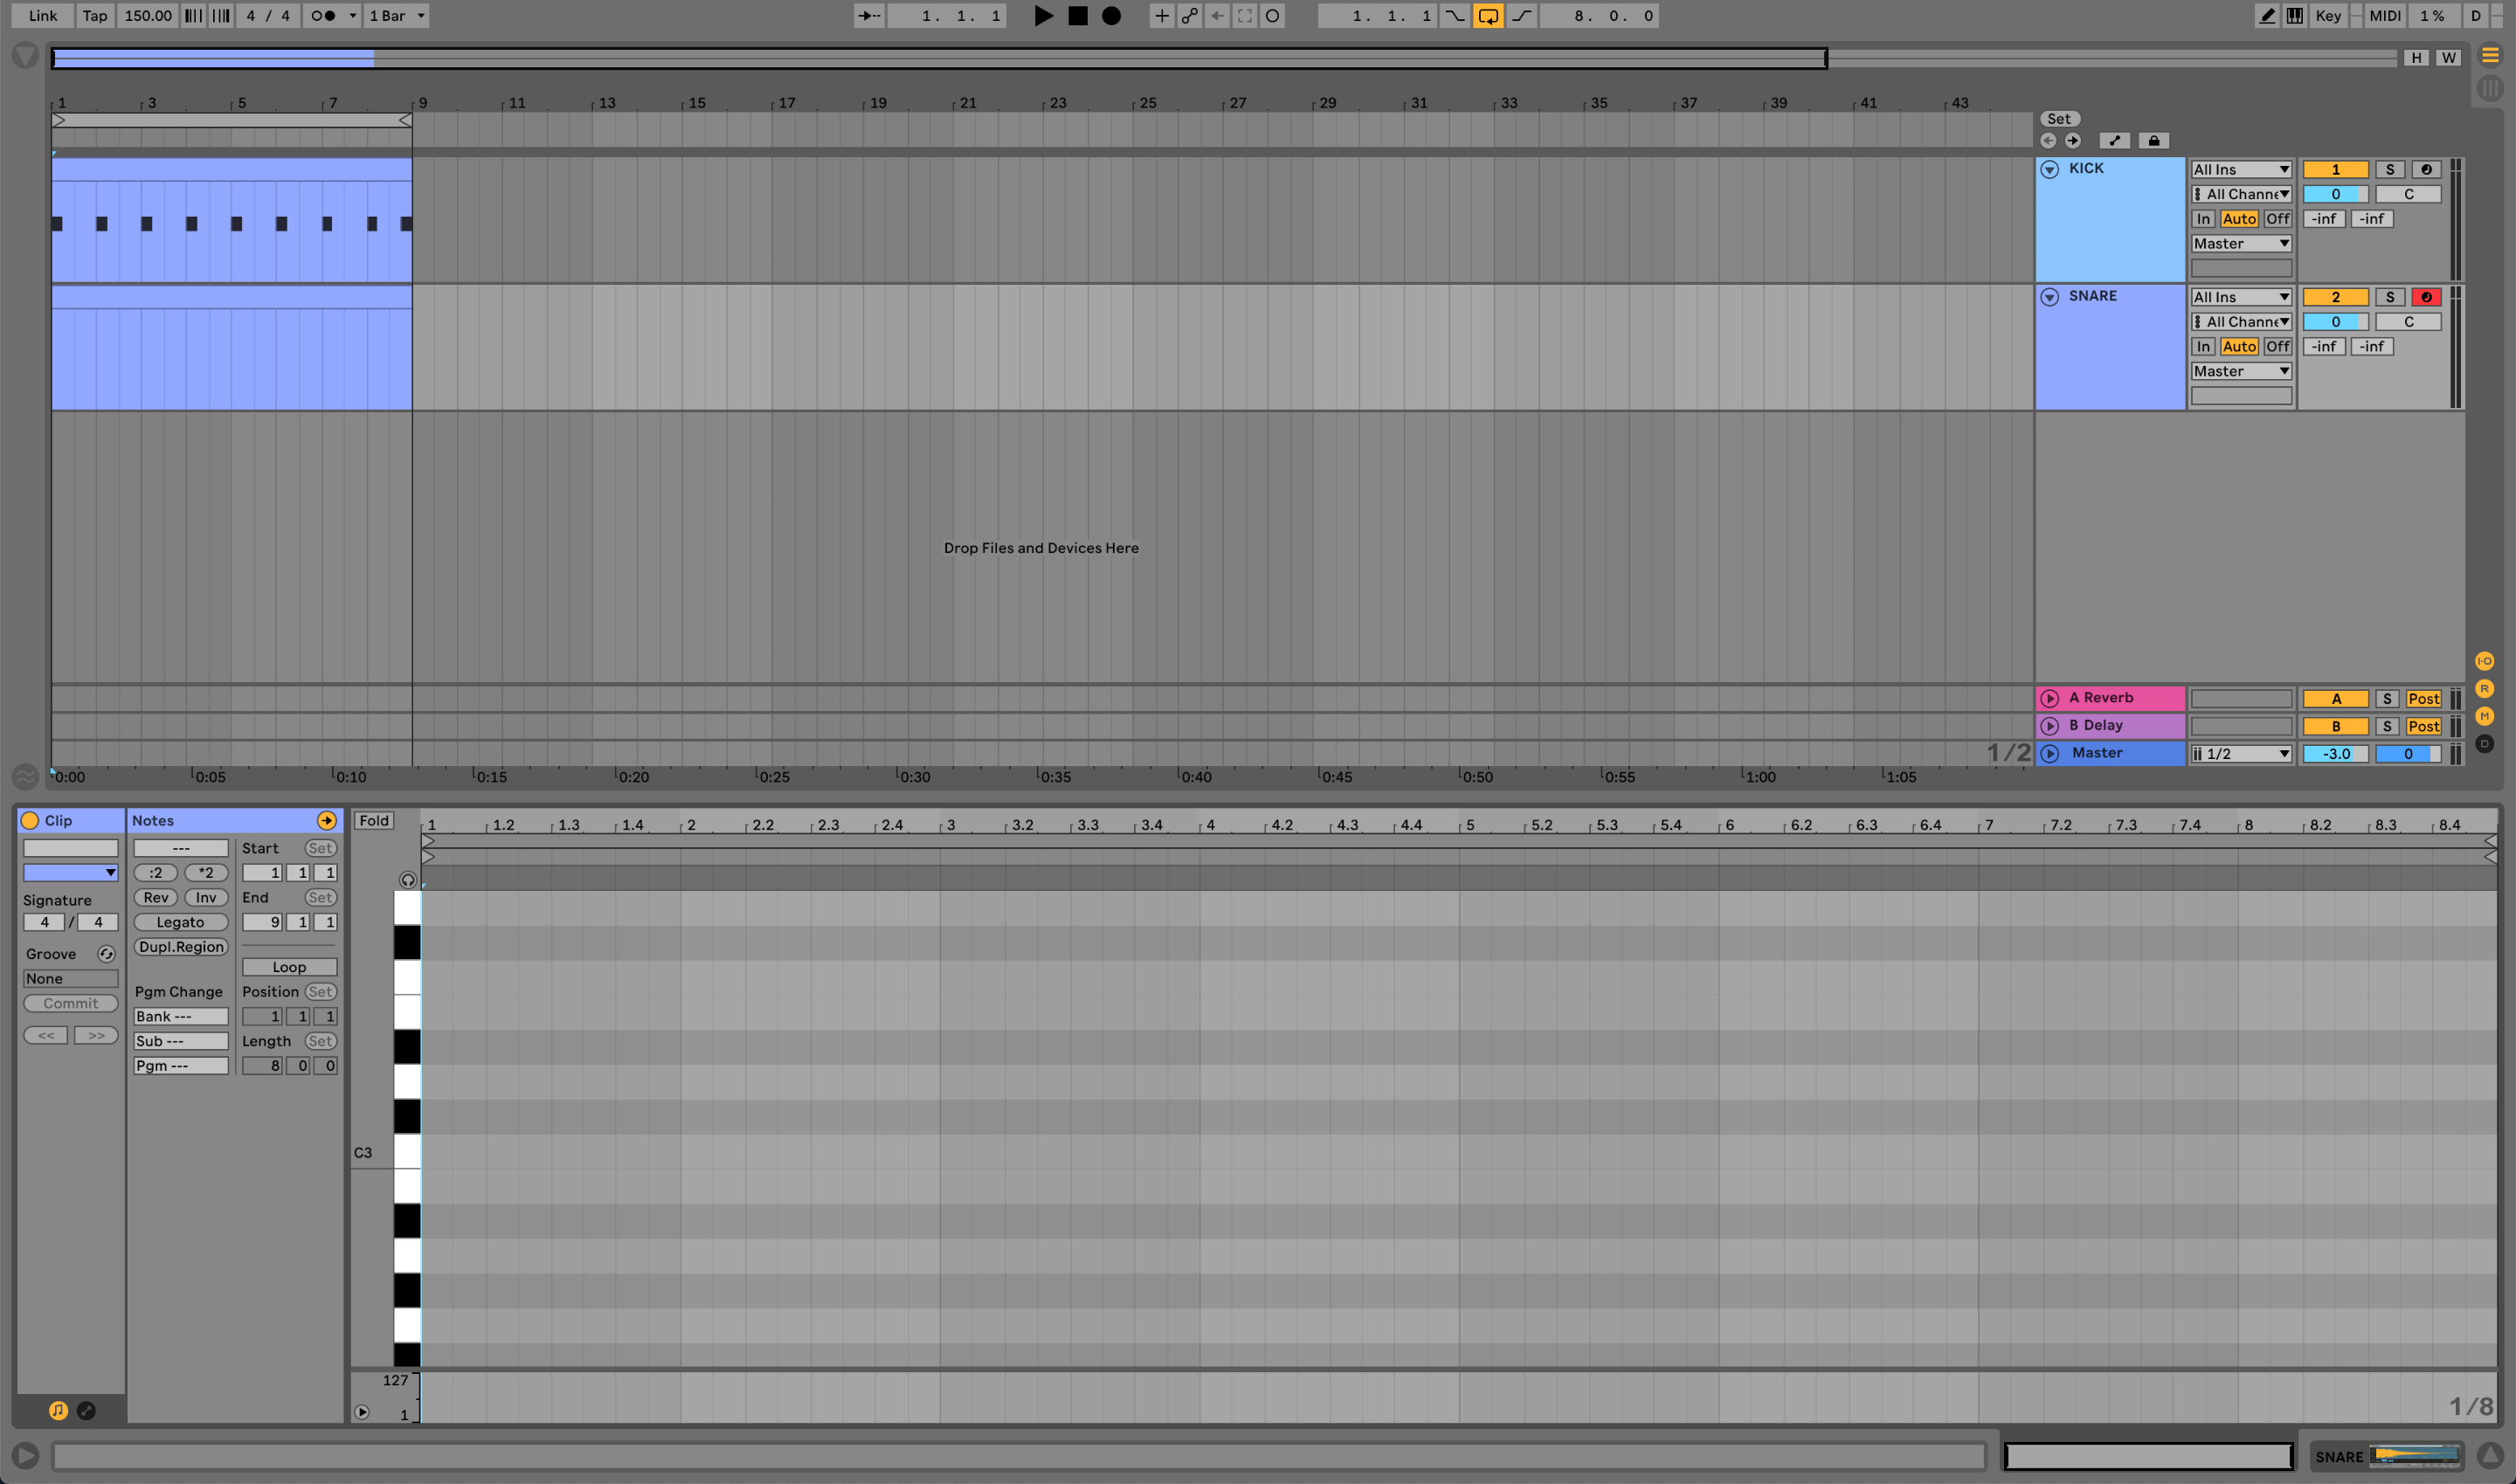
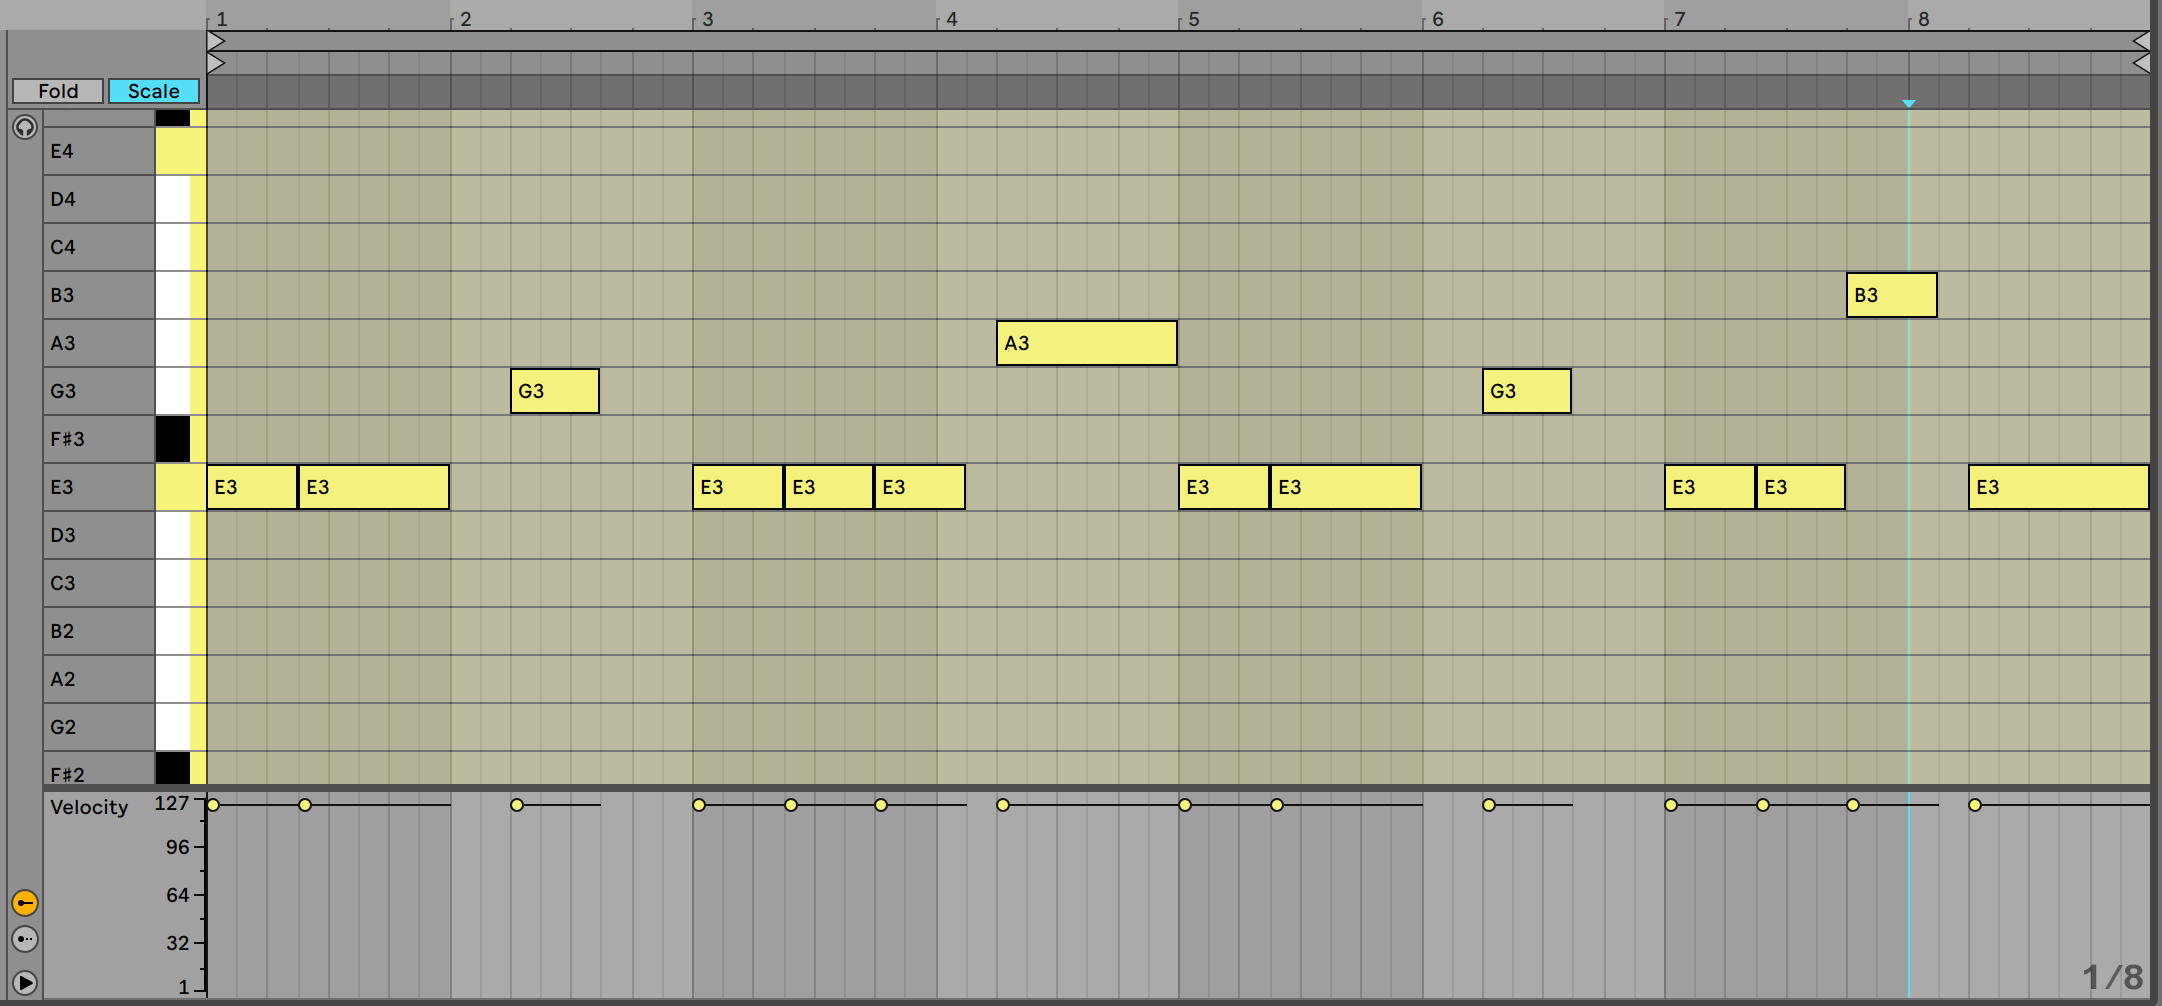
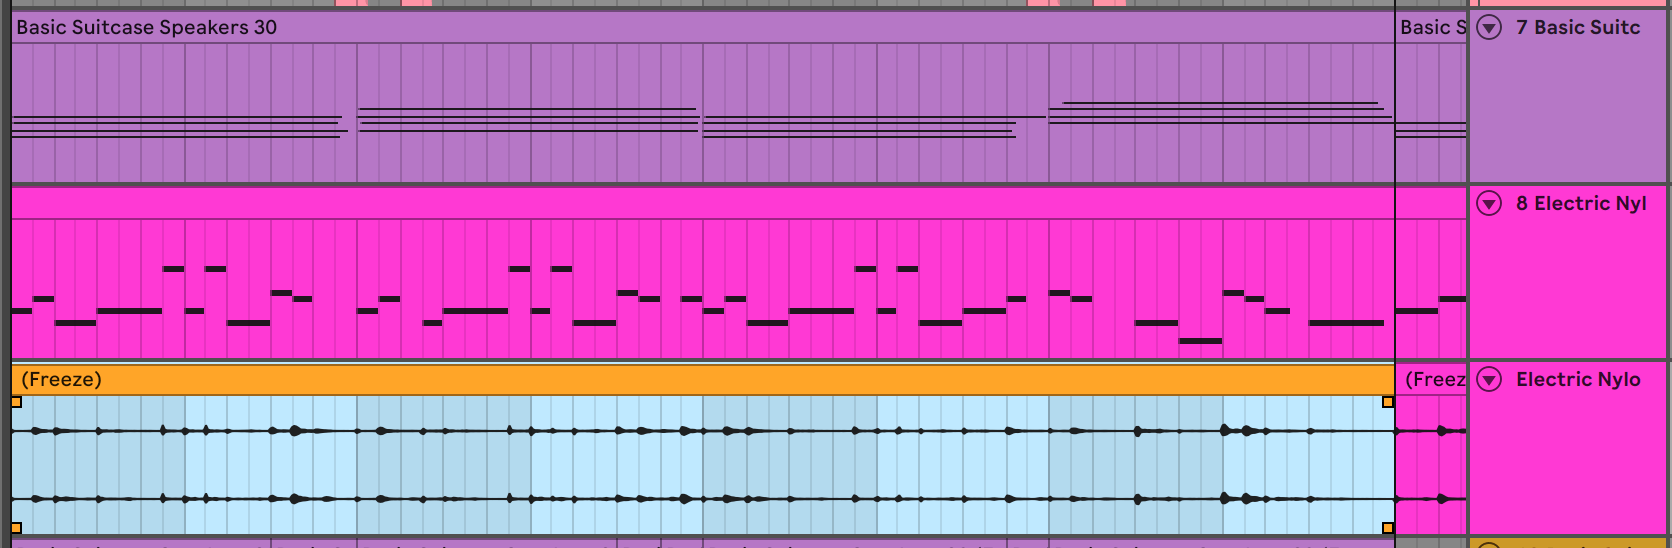
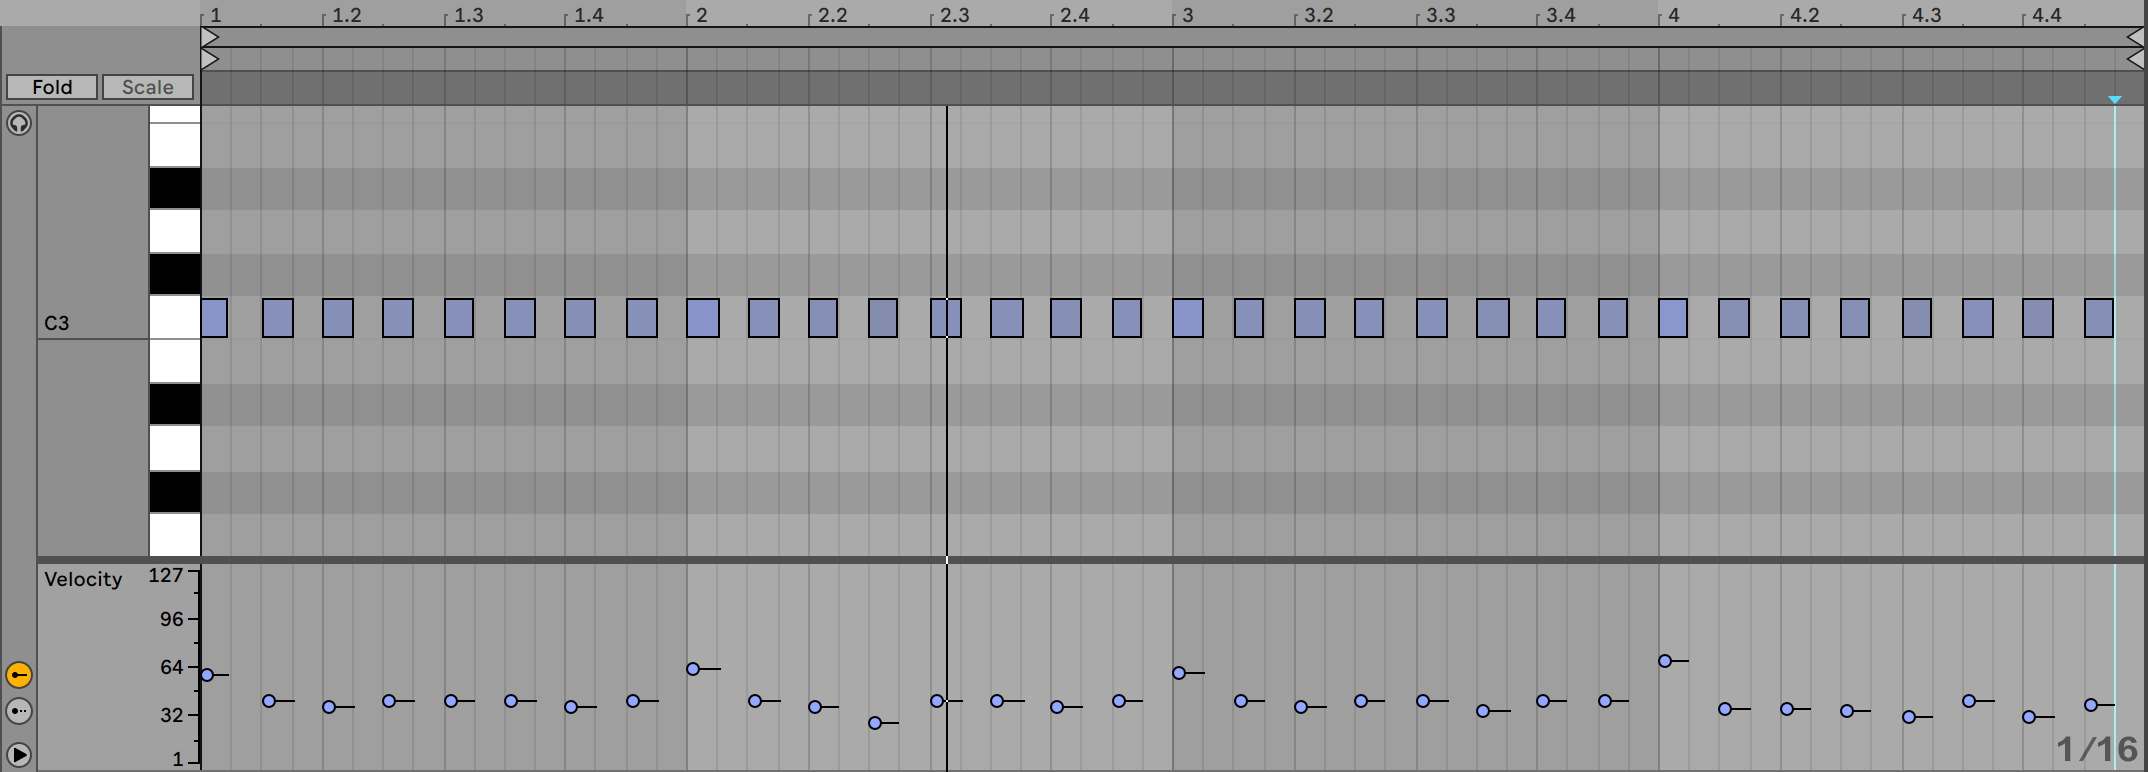
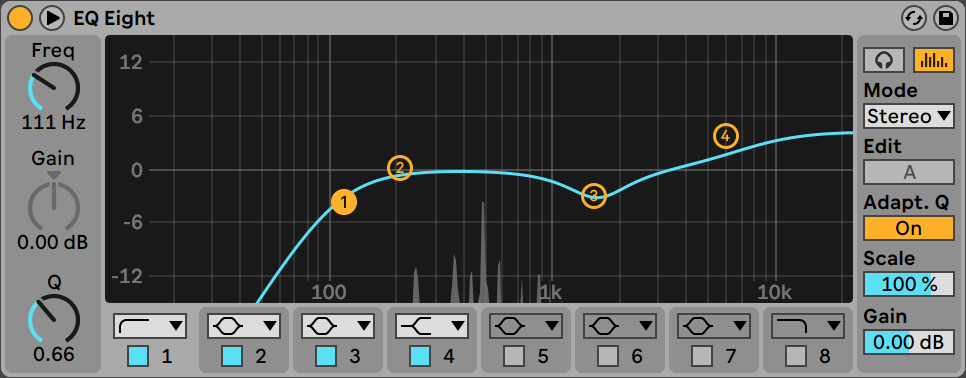
We will be making our drop in G Major Scale so go ahead and turn on the scale function within your DAW. You may also want to fold the piano roll of your DAW to the selected scale (shown in the image below).

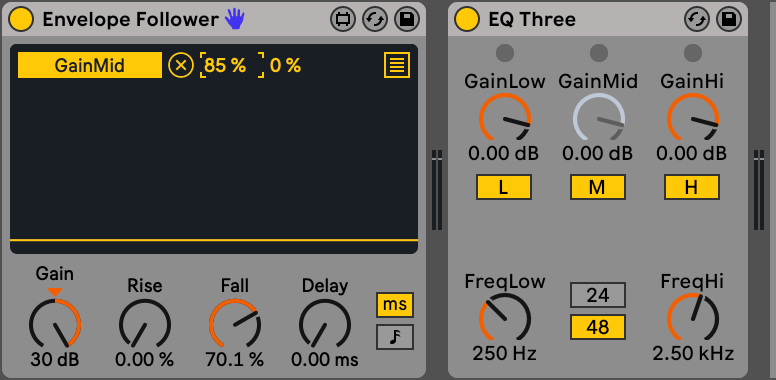
Major 7th and minor 7th chords are used frequently in Future Bass. Extended chords like Add 9th chords are also quite common. For our track we will be using the Chord Progression:
|| G Major 7th | G add 9 | B minor 7th | D add 9 ||
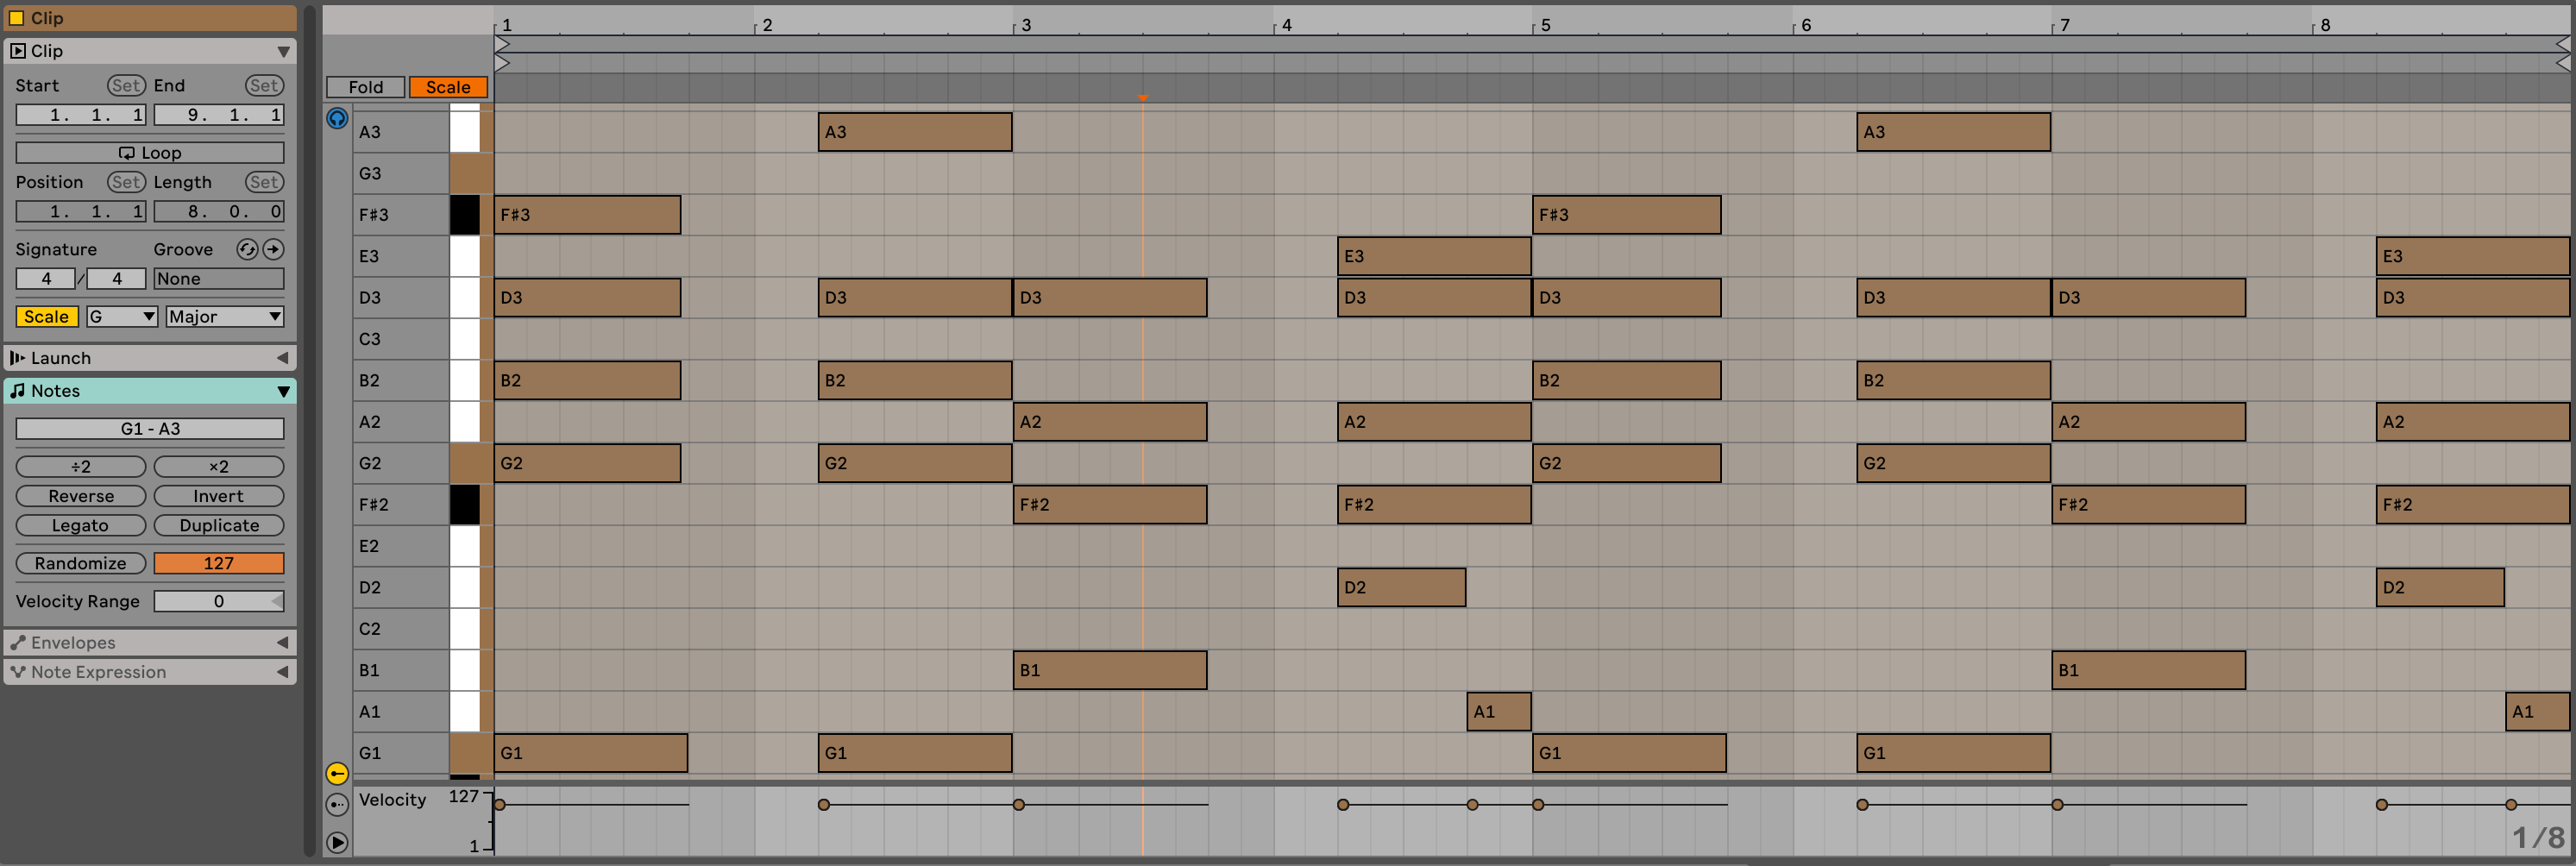
As you can see in the image above we have altered the standard voicing of the chords to make them sound better. As long as we stay in the selected scale, we can experiment with these voicings till we get the right feel for our chord progression.
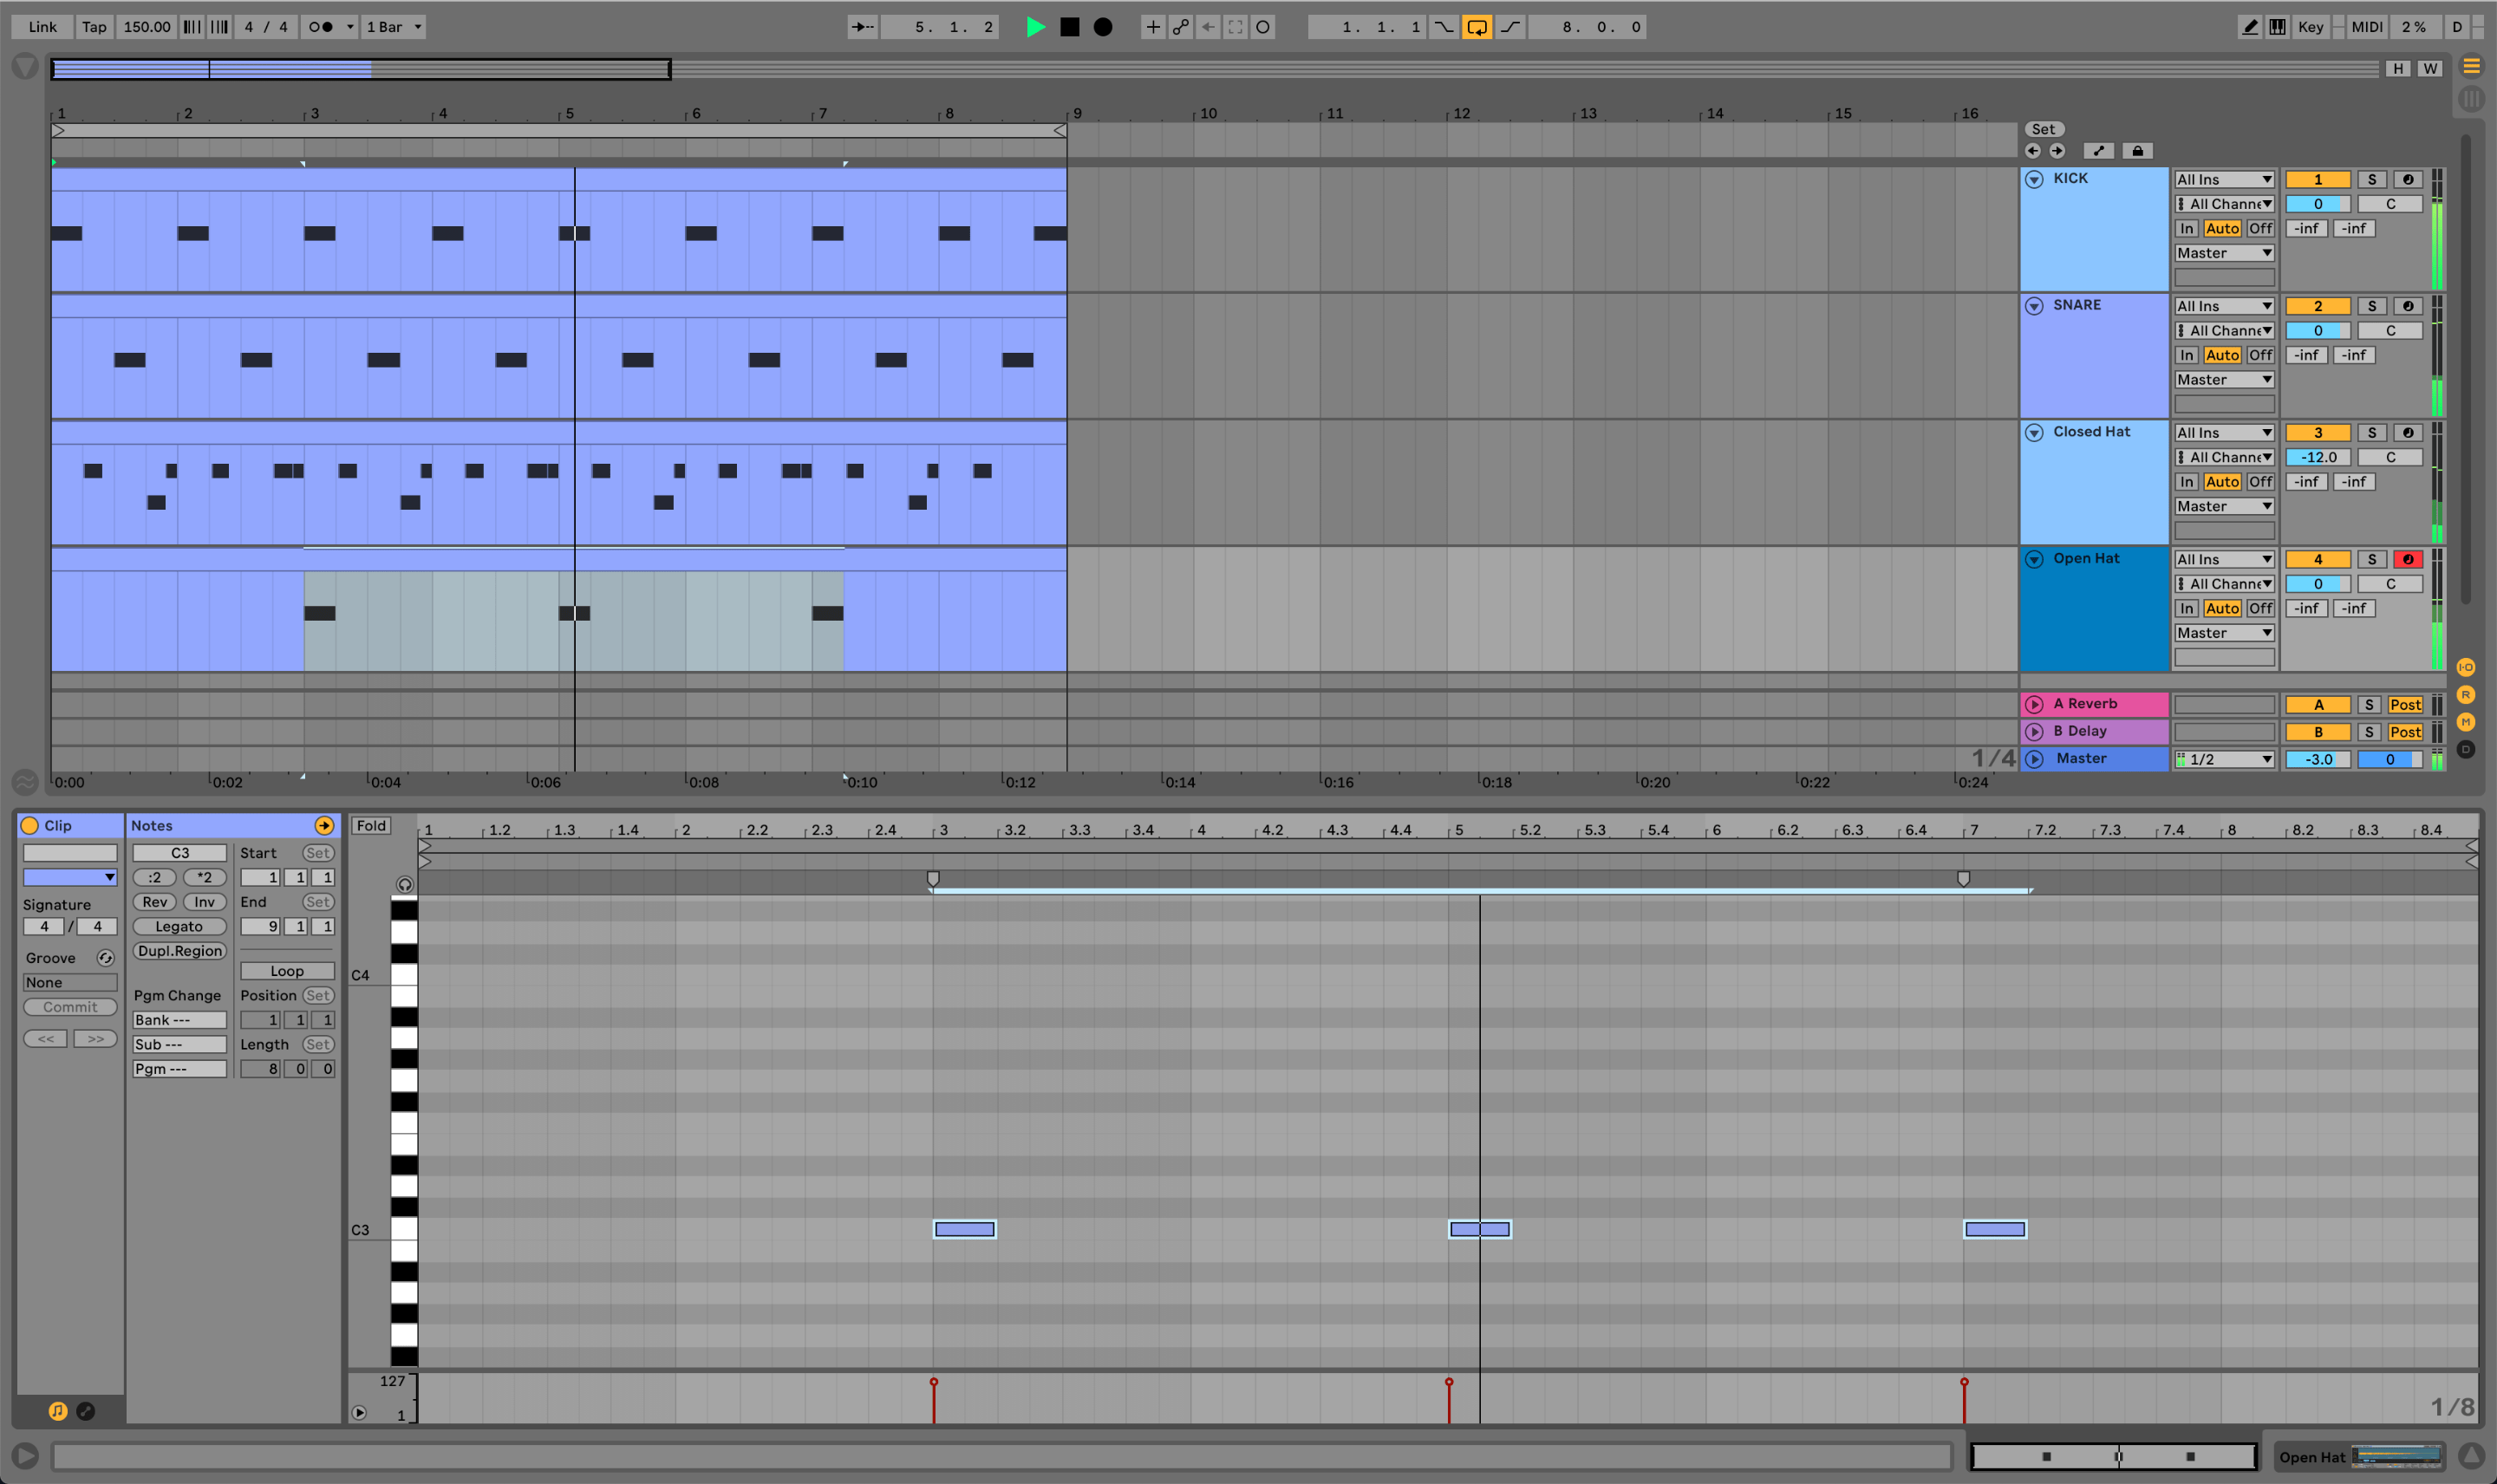
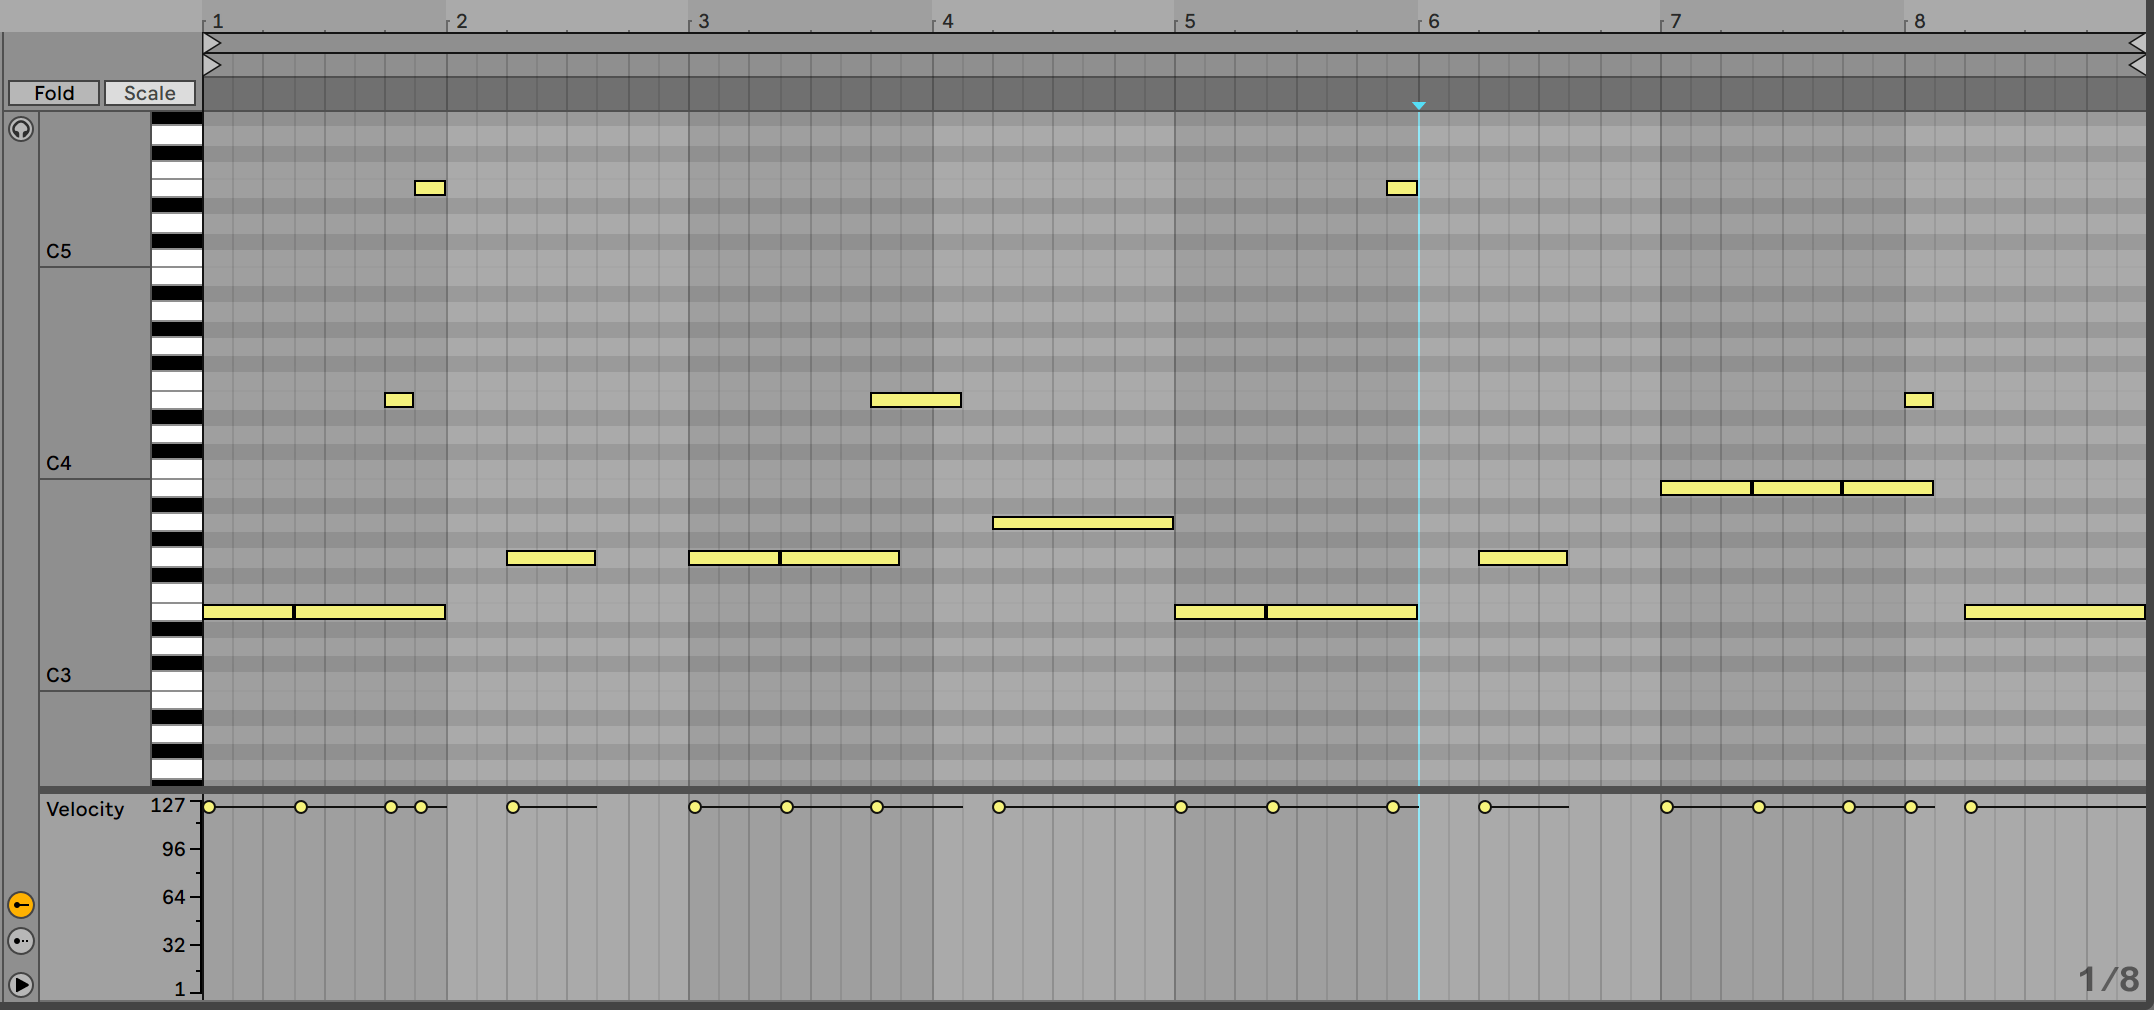
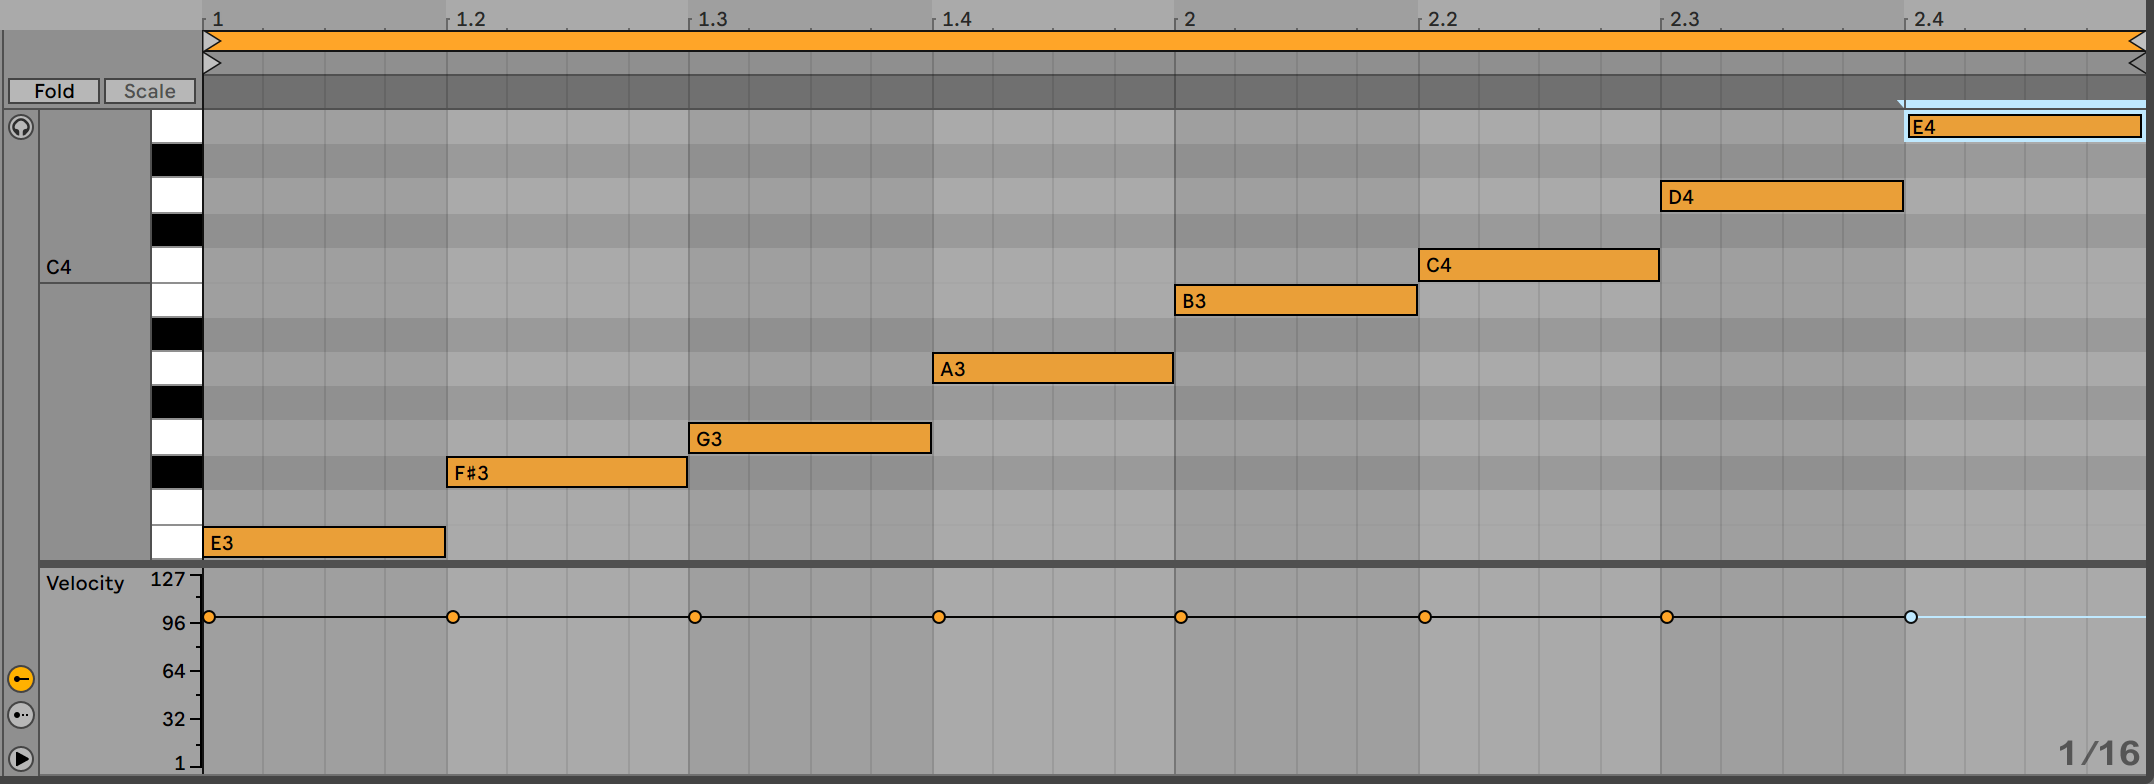
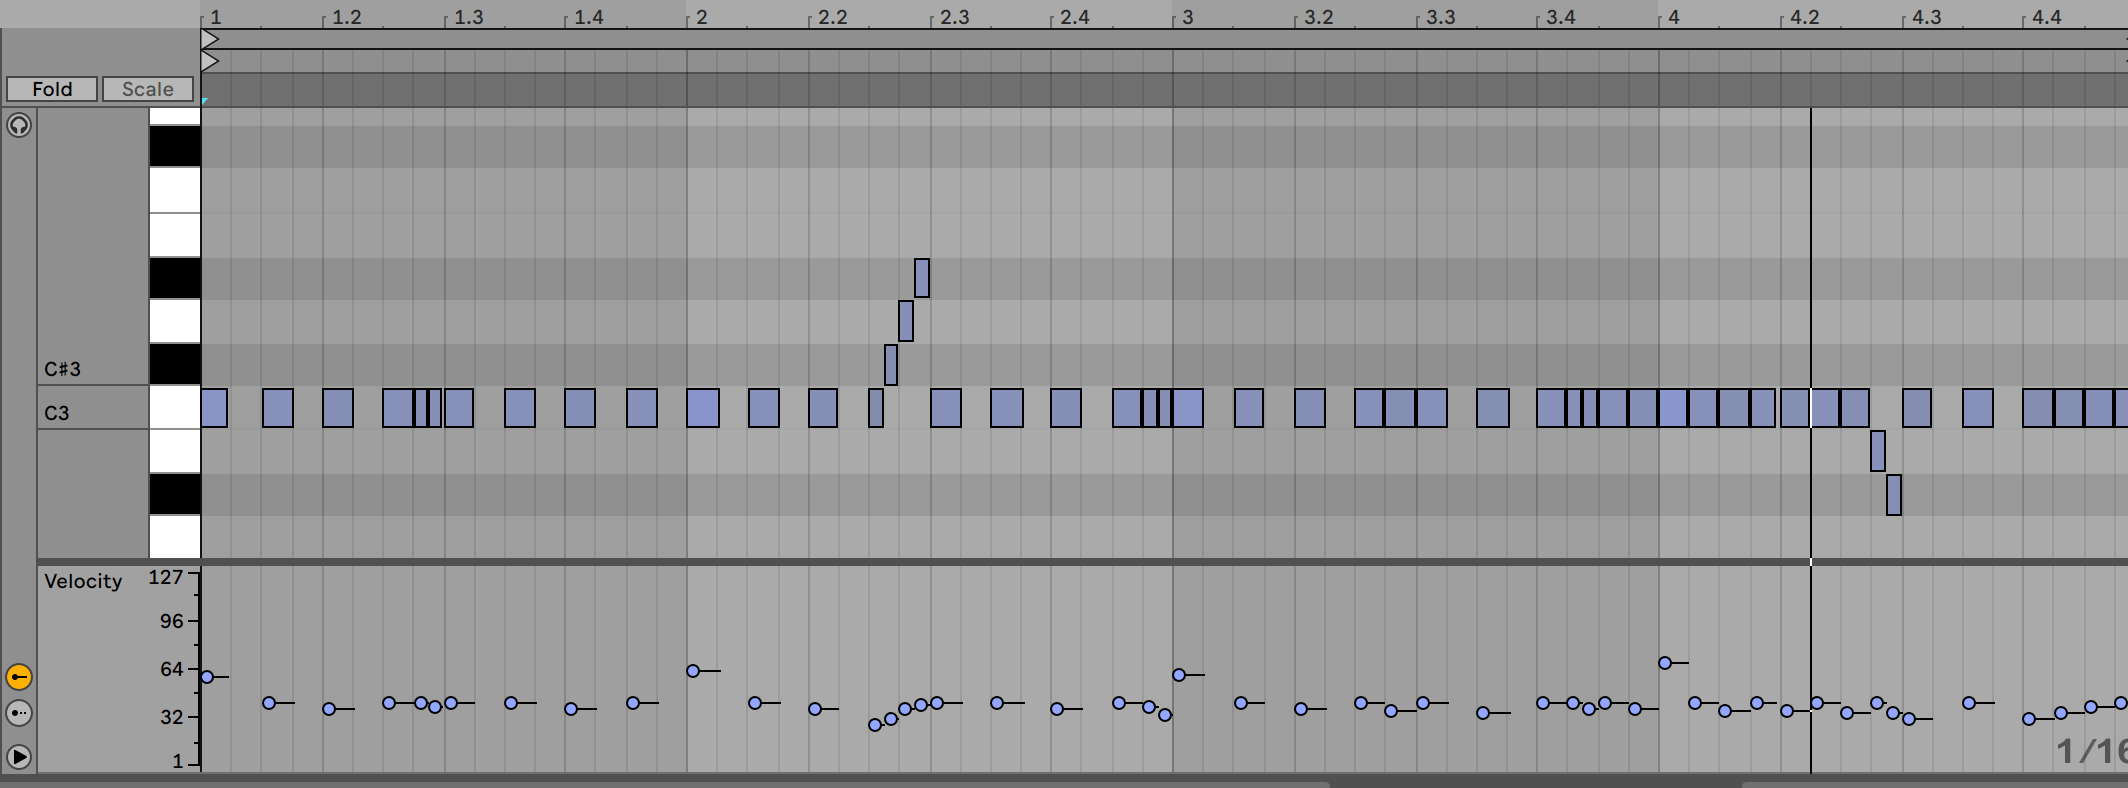
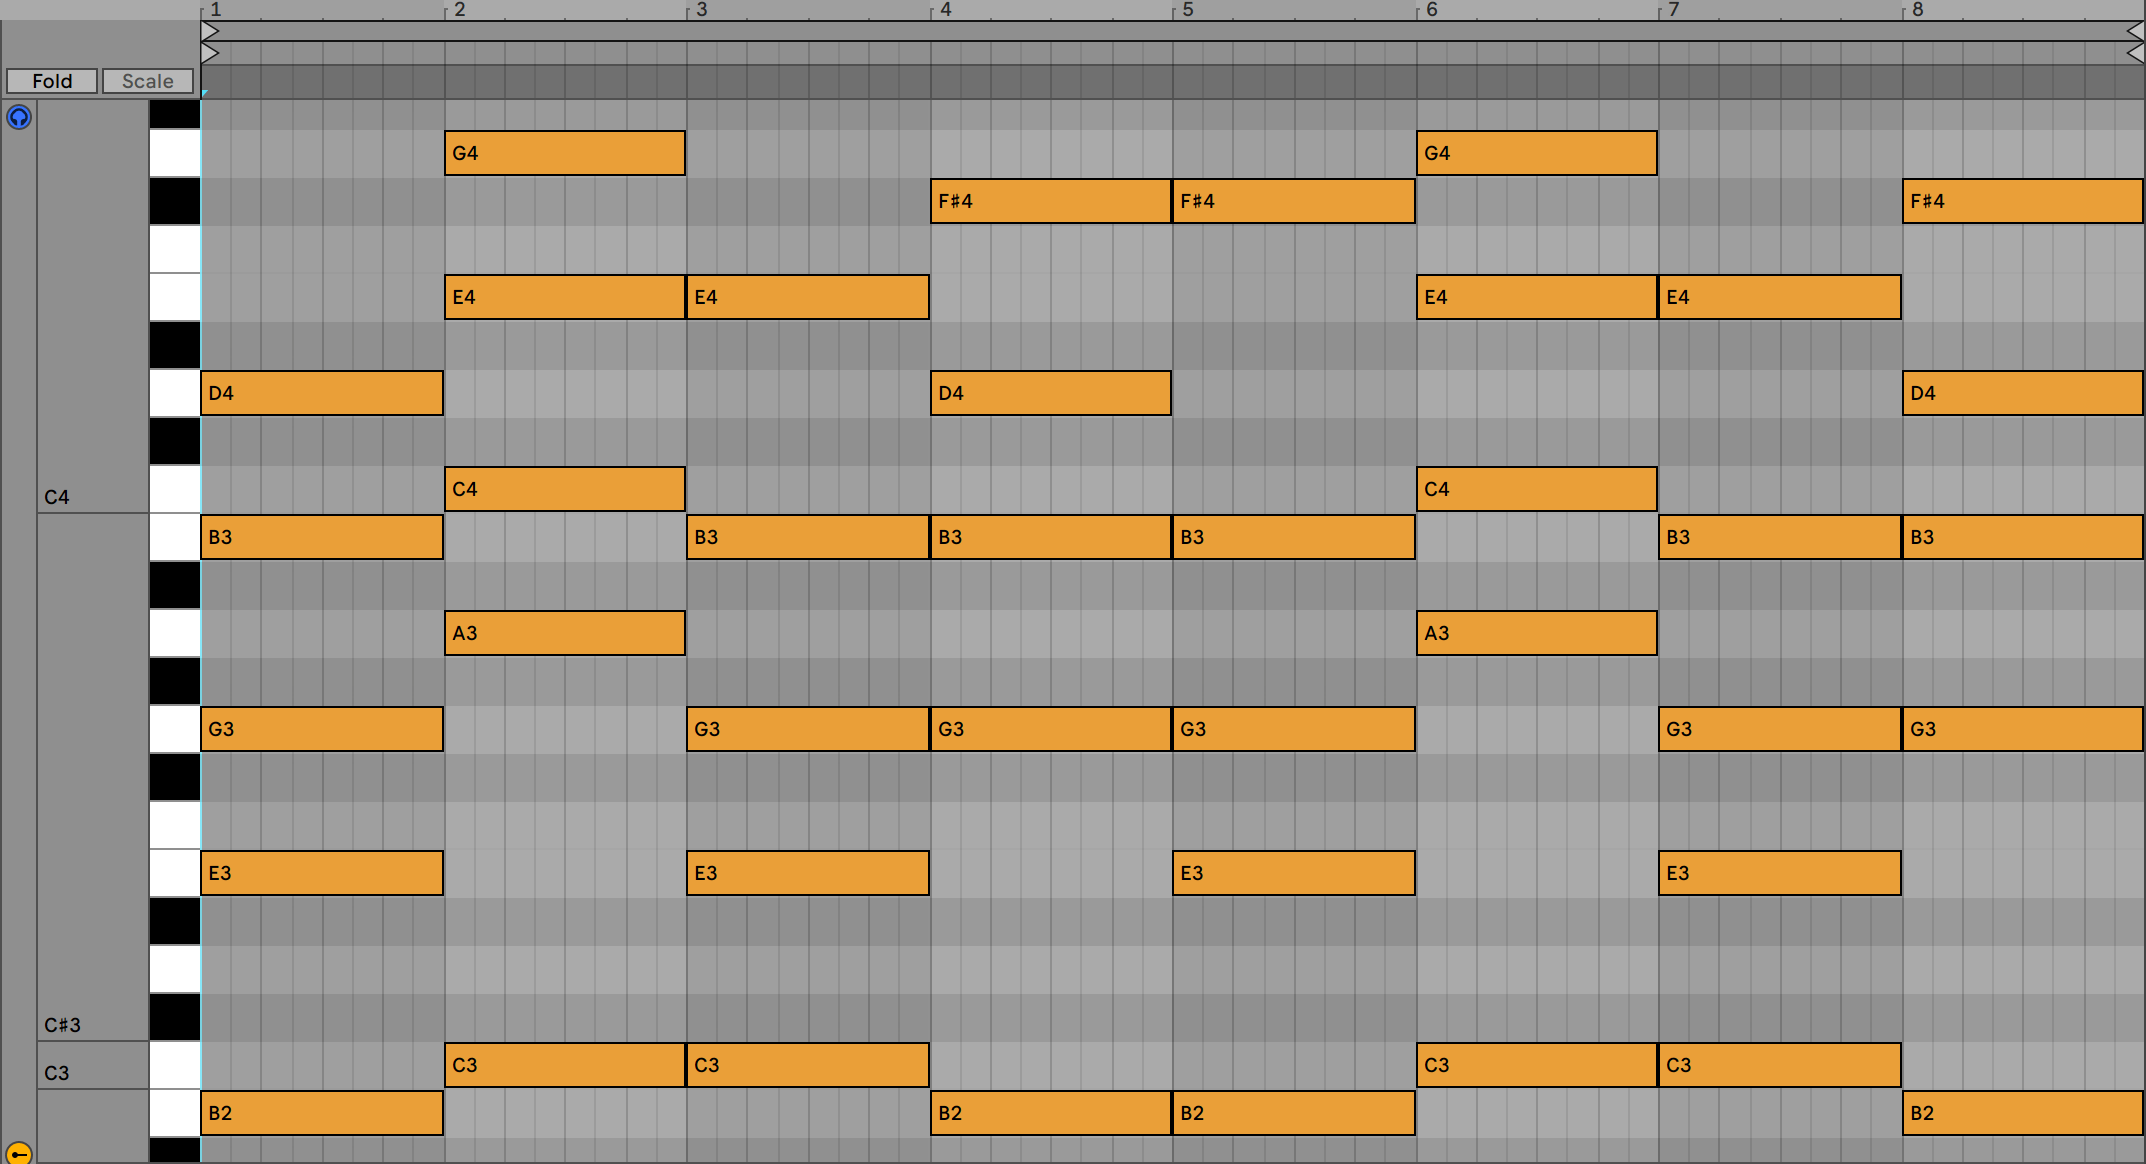
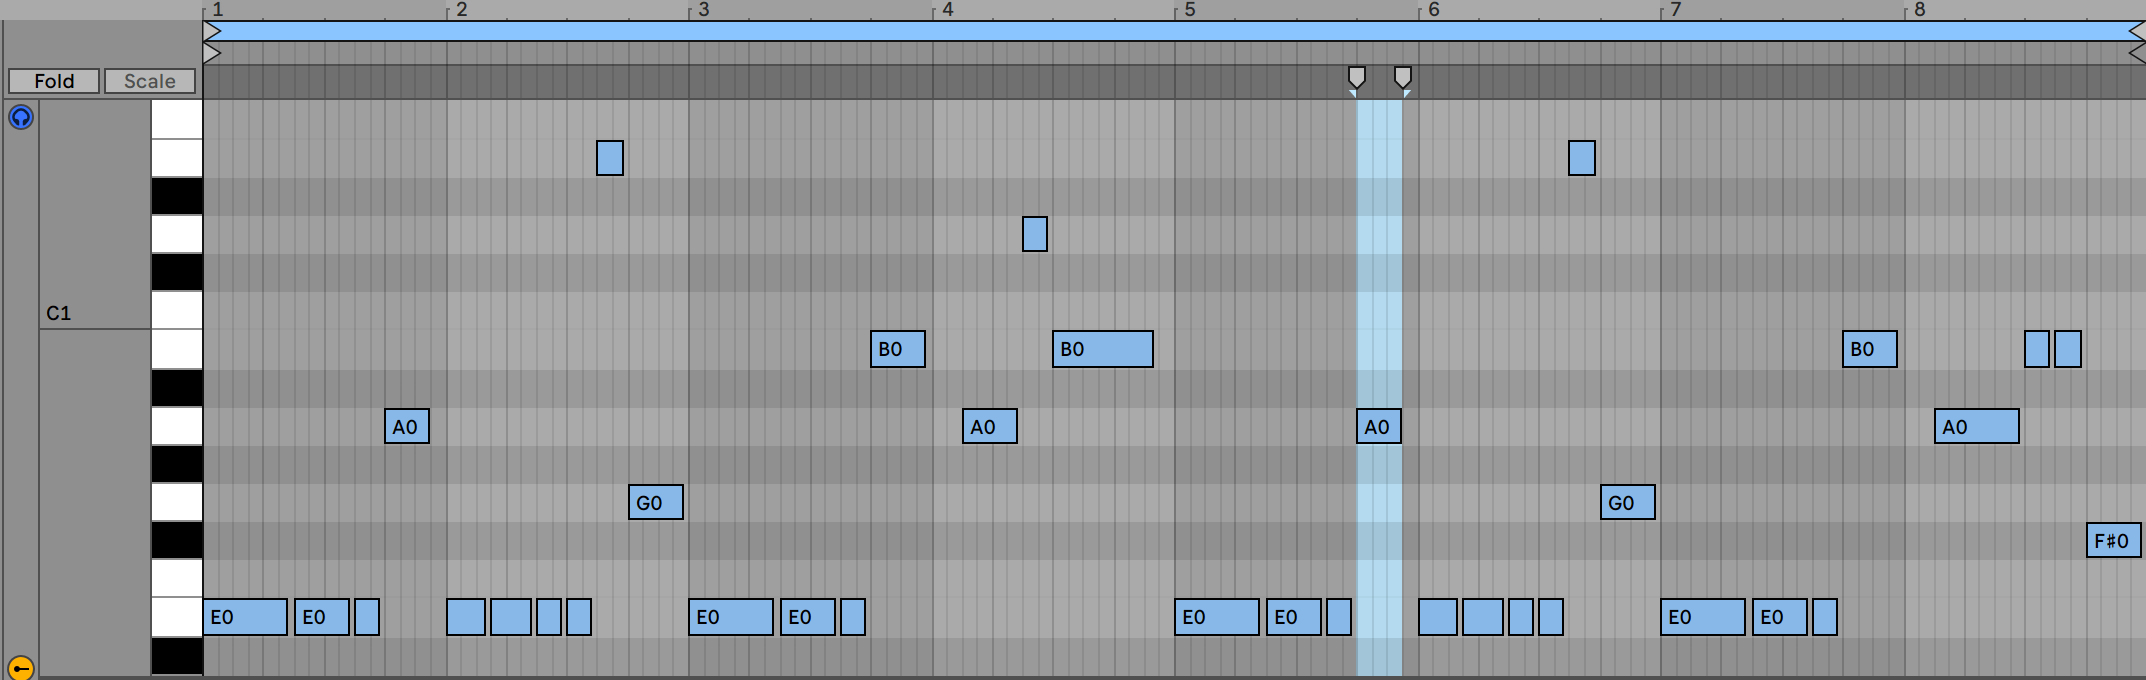
Once we are happy with how the chord progression sounds, we can alter the rhythm of certain chords to add more energy to the composition and compose a B section for the drop. Along with altering the rhythm we can also add some extra notes in the higher or lower registers to add more movement to our music. It is important not to add to many notes at this stage. We need to maintain space for other elements and keep things interesting. As you can see in the image below, we have largely kept things similar to our initial progression, only adding some variations in the 2nd and 4th bars.
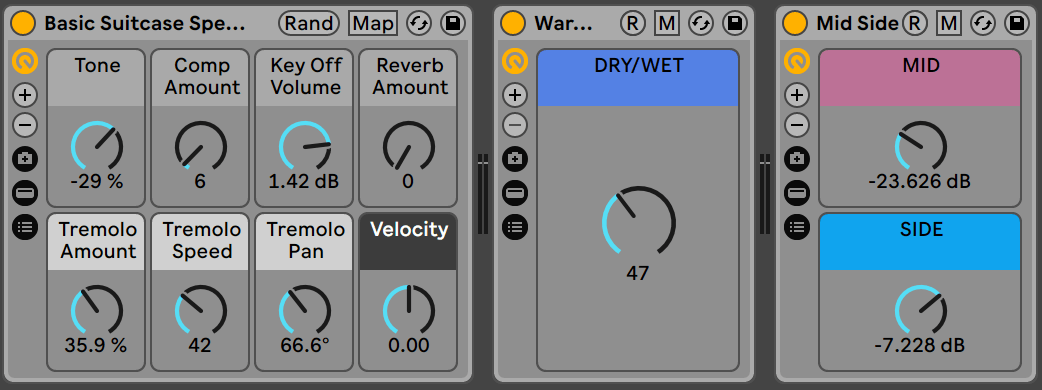
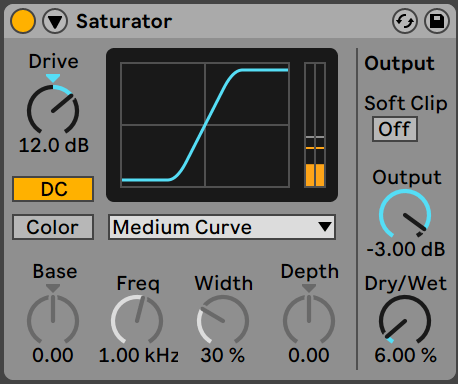
At the moment we are using a default saw wave from Wavetable (check image below) to map out chords, we will be covering sound design in the next part where this basic sound will be altered into something much more complex.

Main Melody or Lead
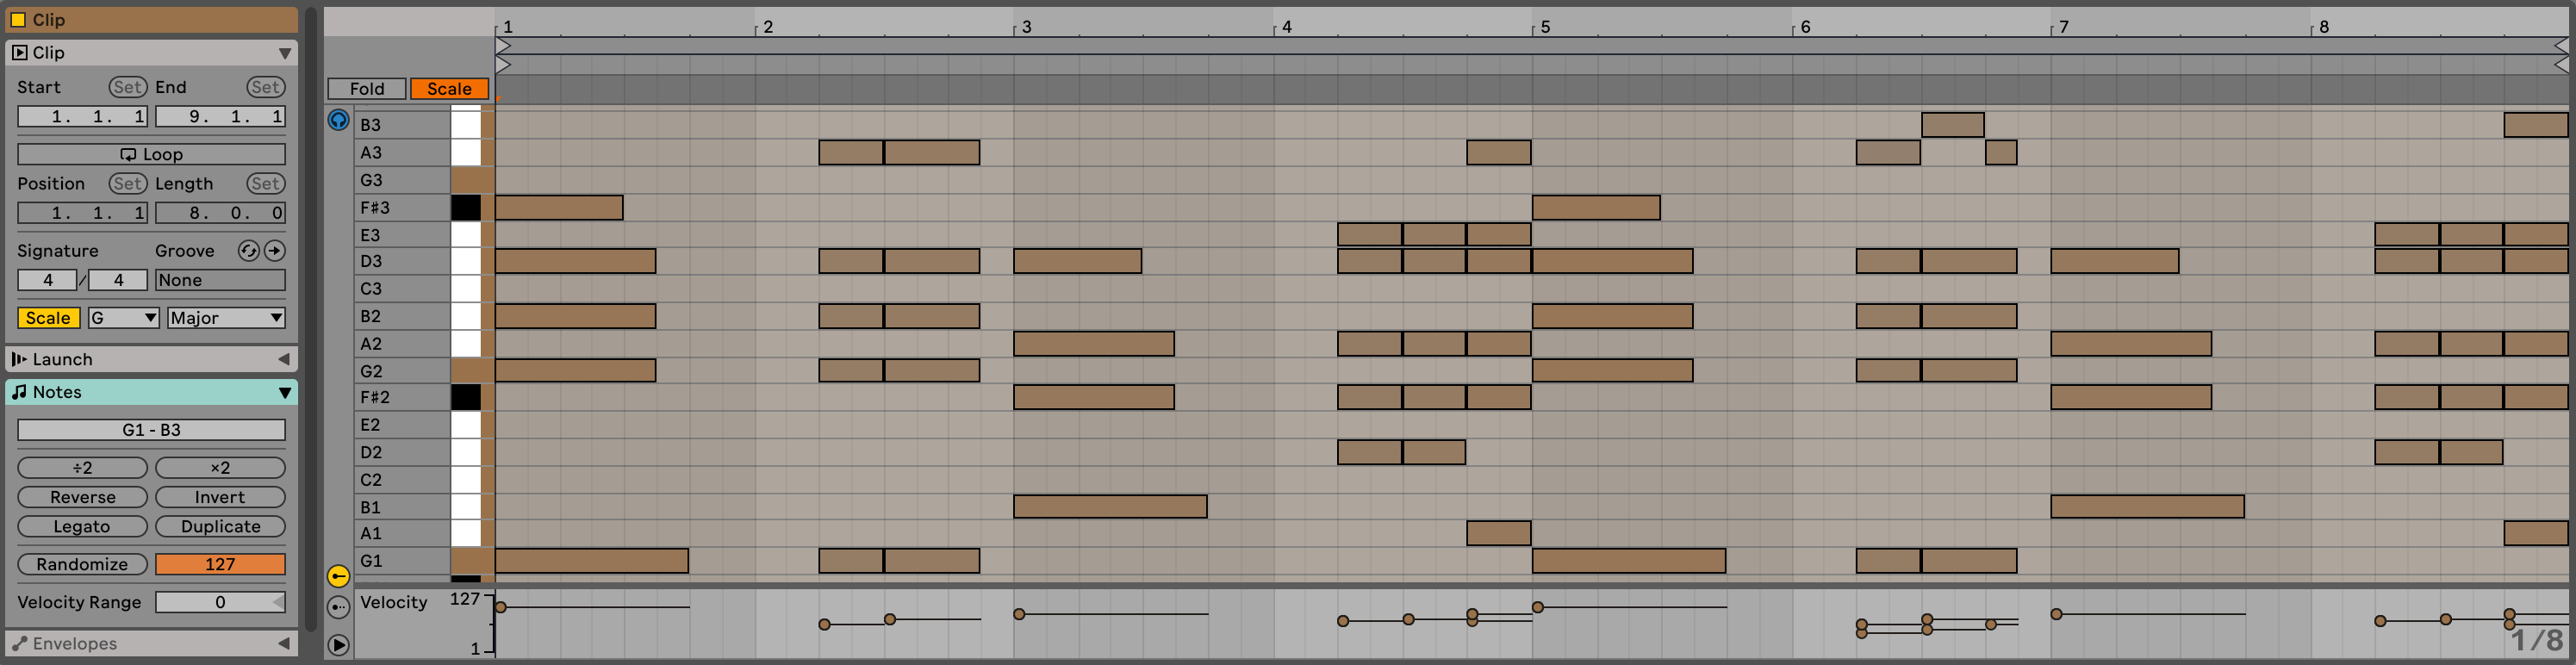
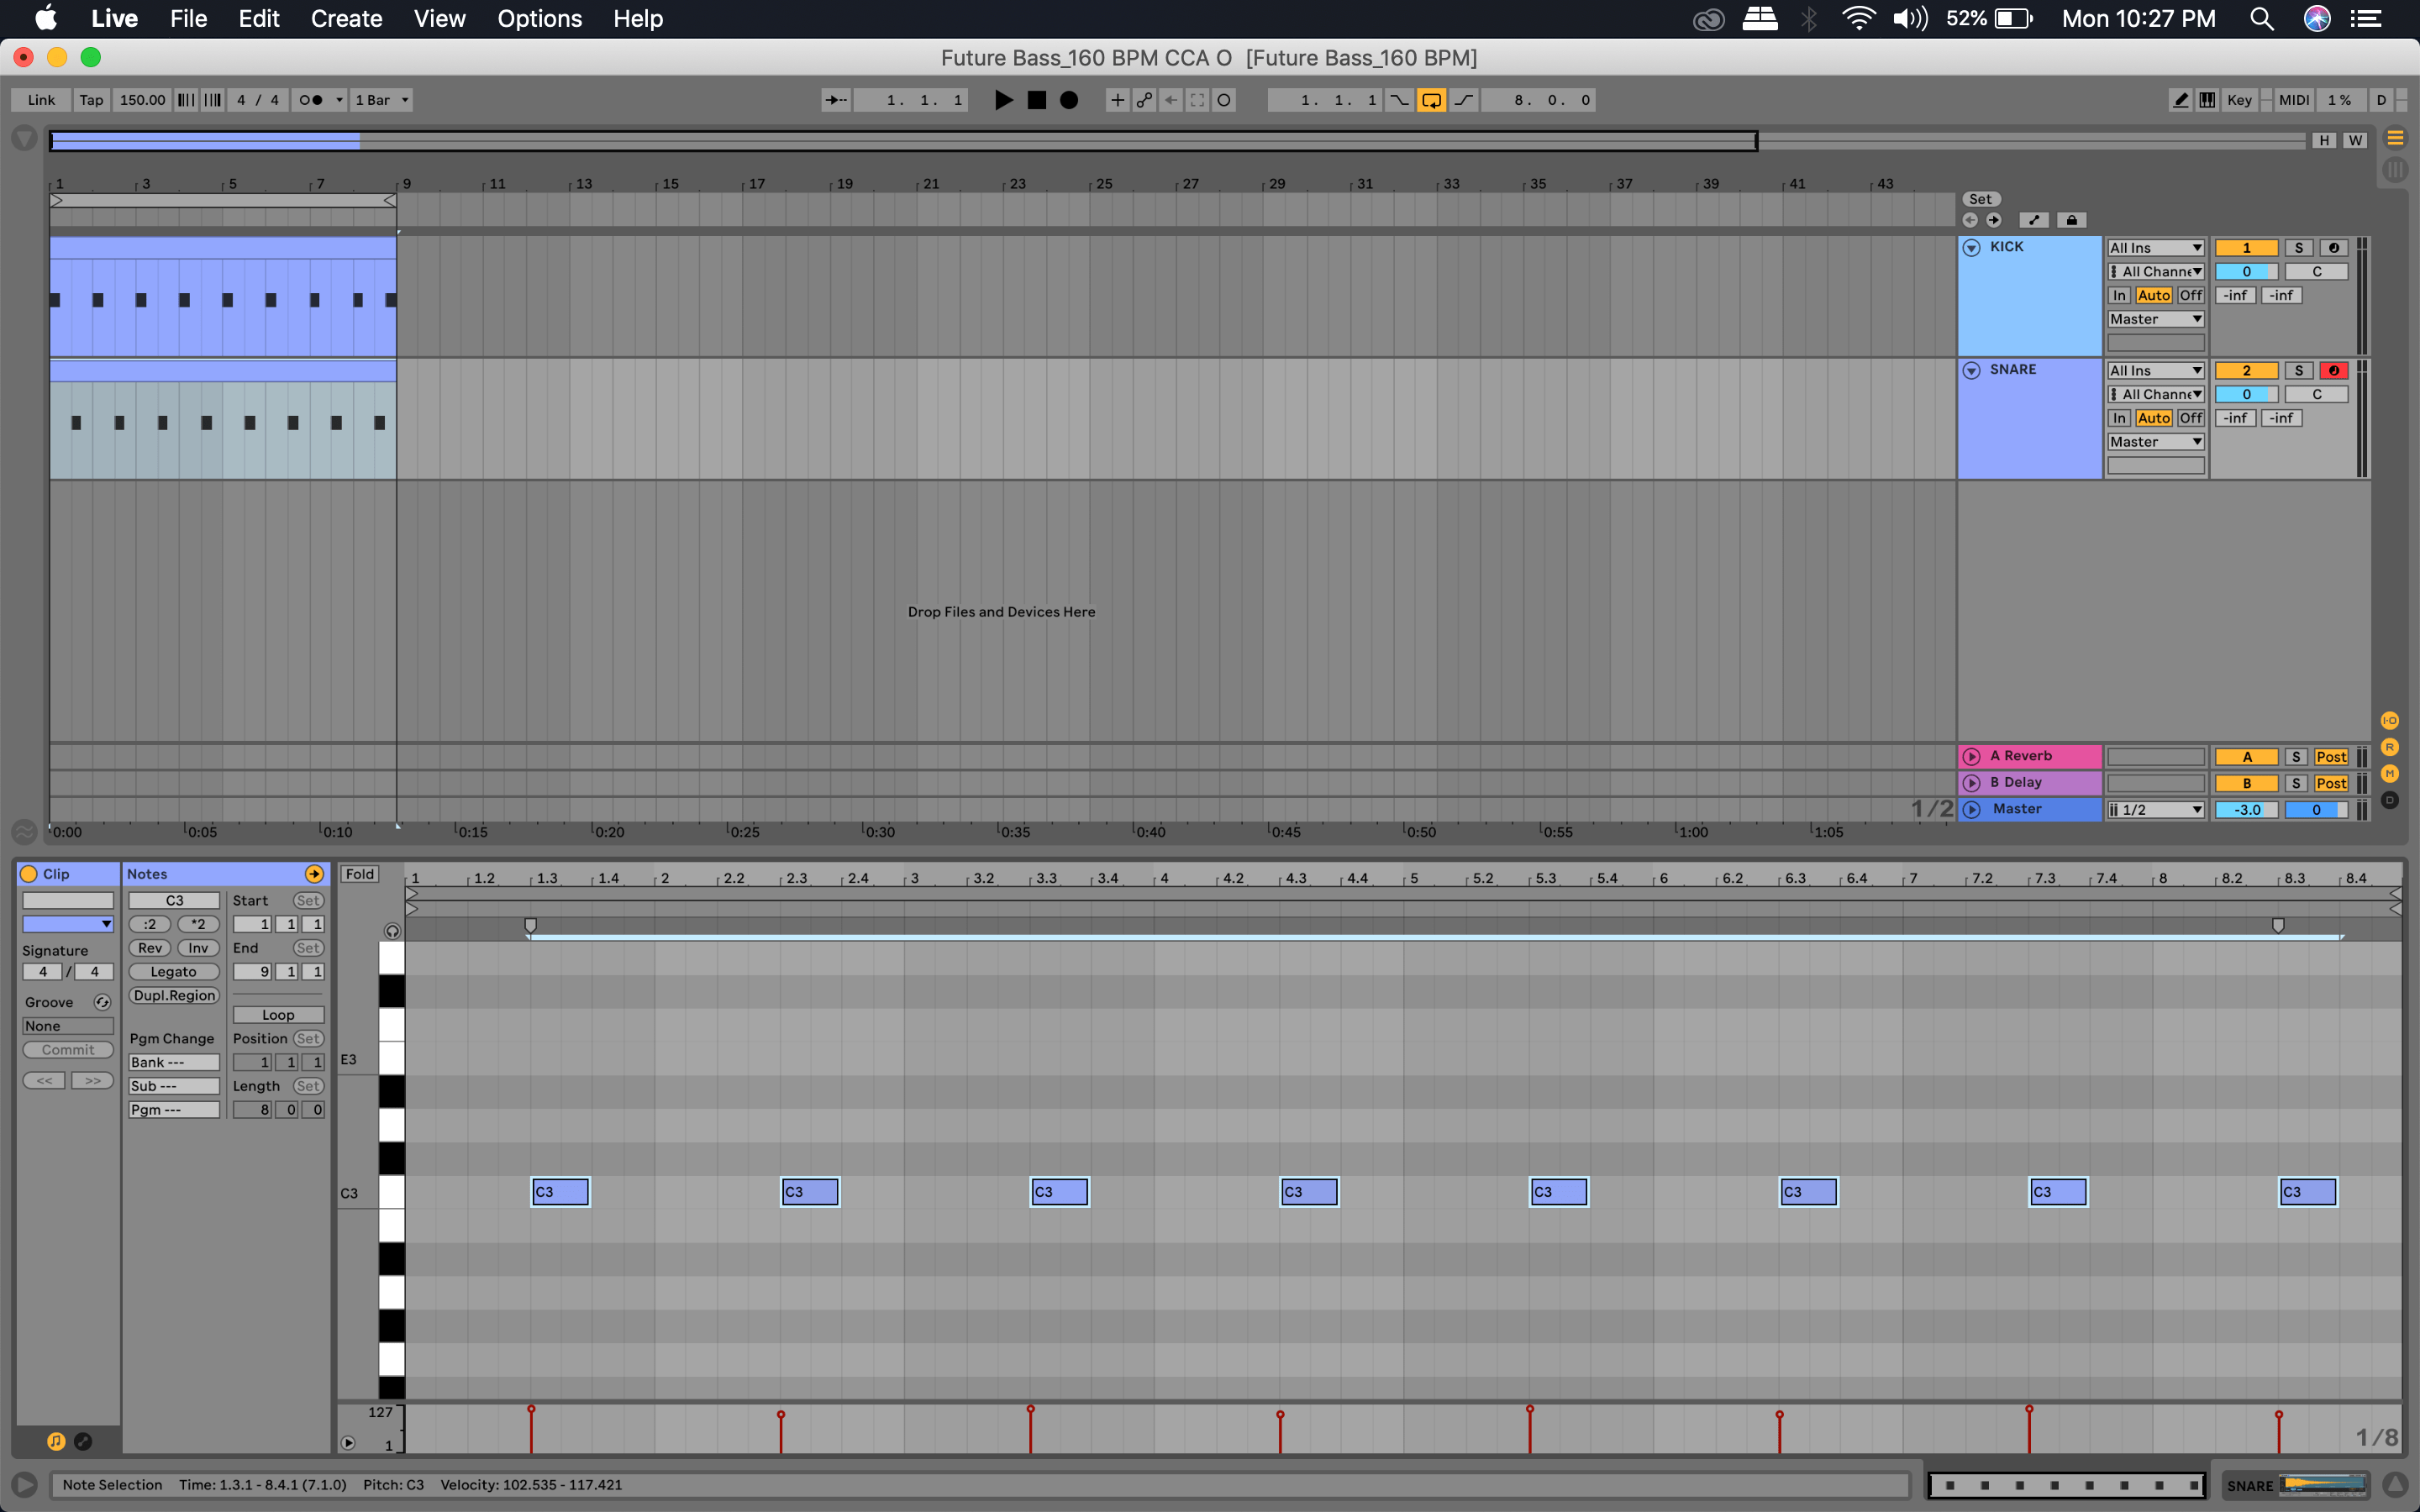
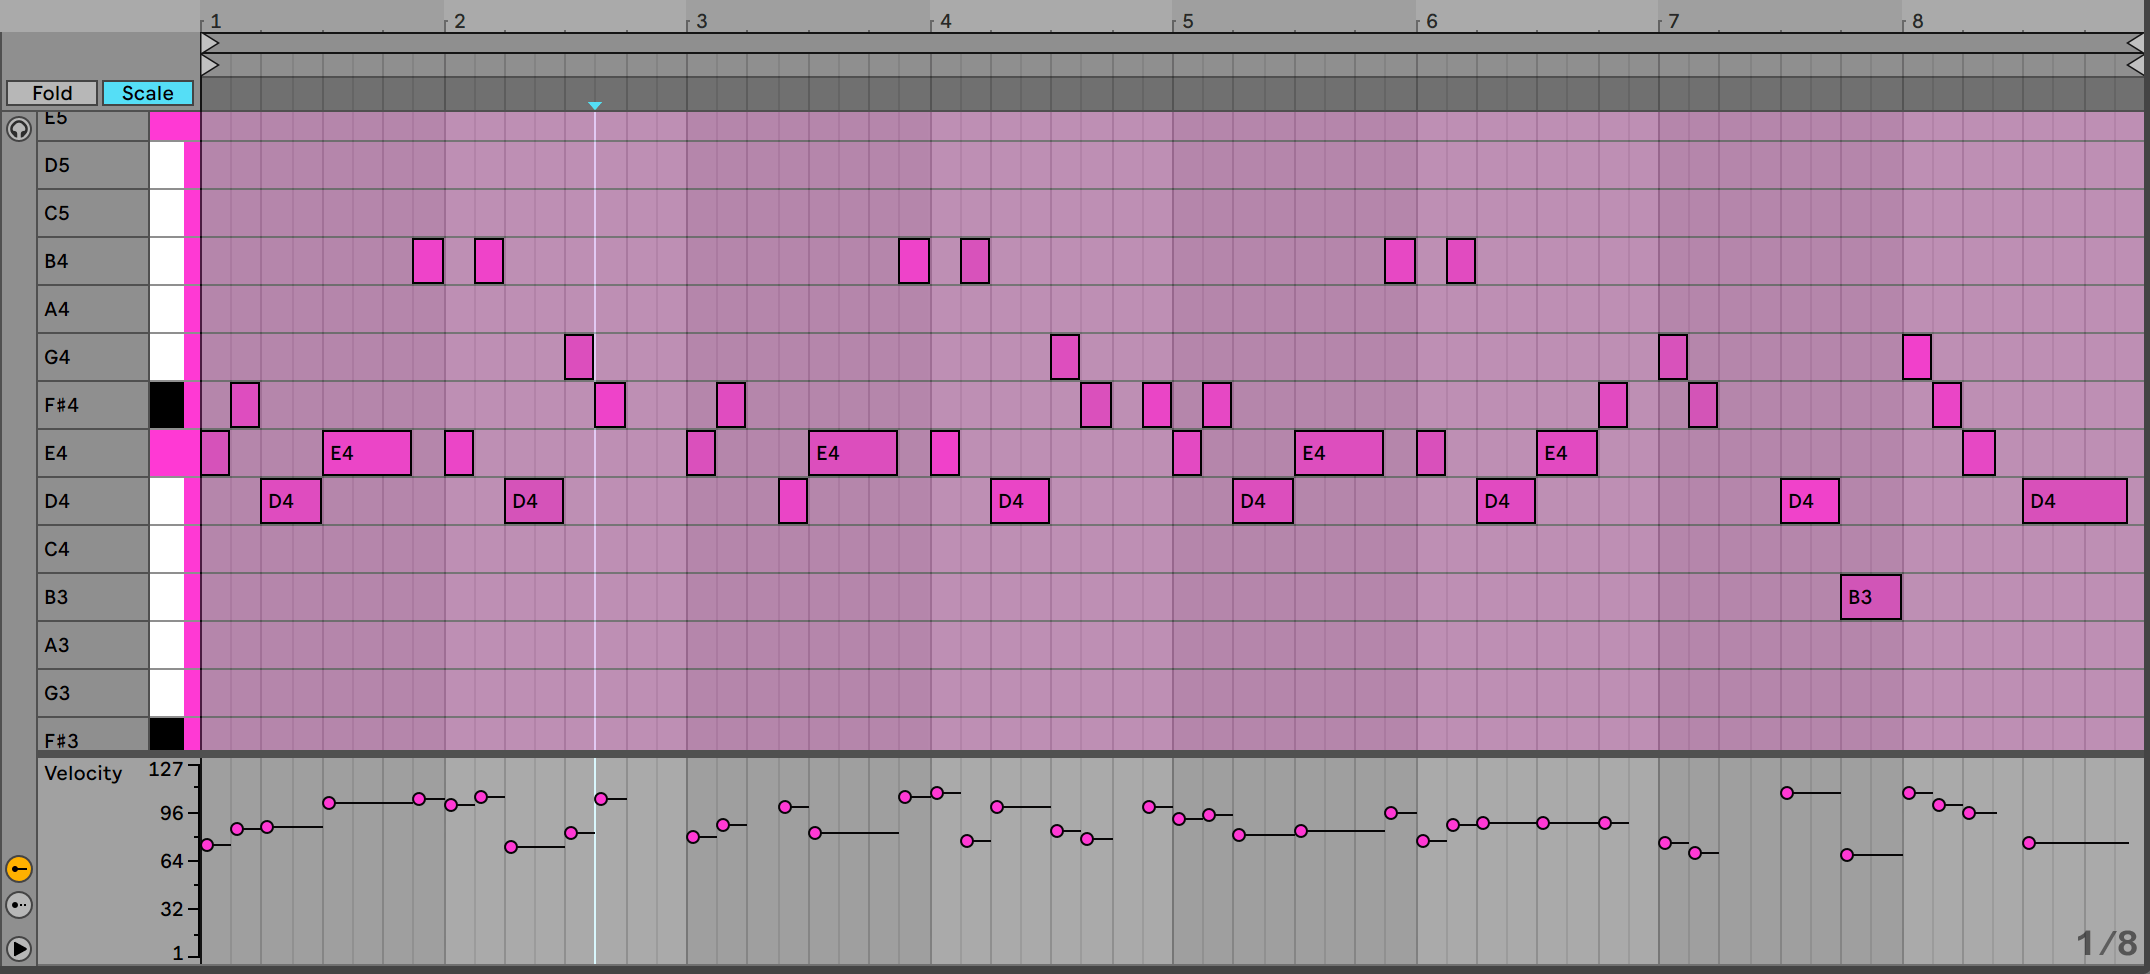
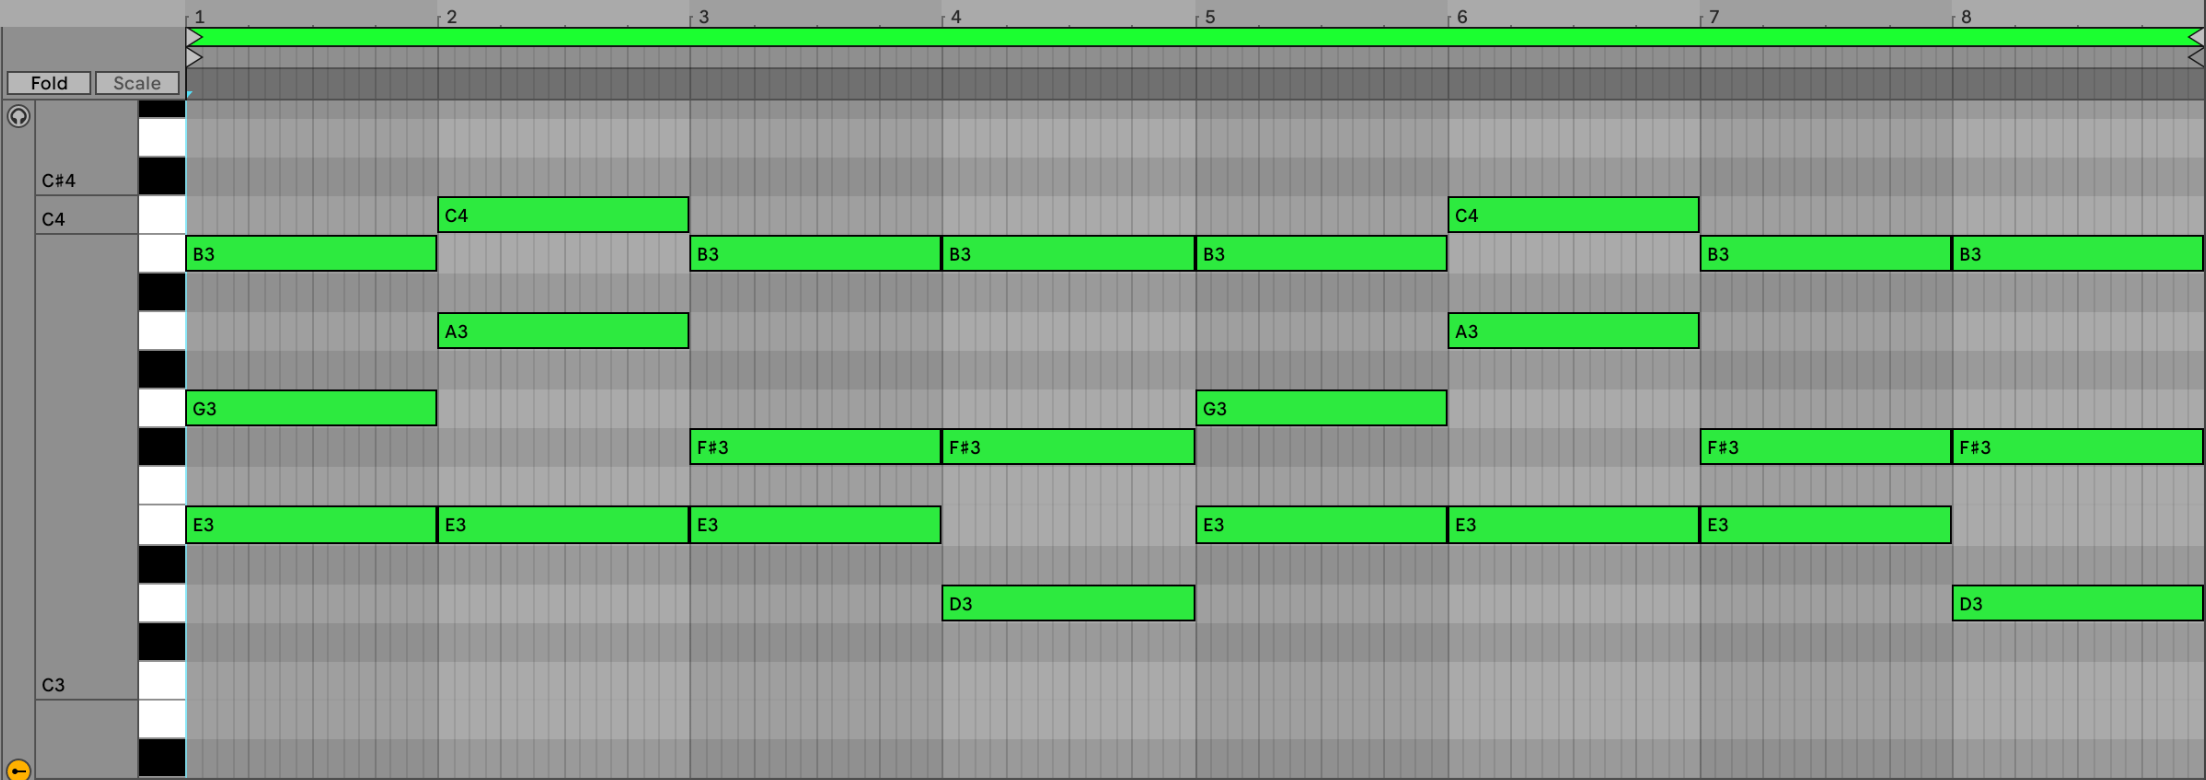
Now that our chord progression is ready, we can start experimenting with different melodies that will be in scale with our chords and also fill in the empty spaces in between. For our composition, we want our lead to be slightly offset from the rhythm of drum pattern. To achieve this, we will use the concept of syncopation where certain notes in our melody will land on the upbeat to create rhythmic variations. We also want the melody to sound uplifting, so we are using the G Major Pentatonic scale (G, A, B, D, E) instead of the regular G Major. As you can see in the image below the melody is kept very simple and with the chord progression they almost act like a call and response but it is not very obvious.

Another important trick that has been used here, is to always rest on one of the chord degrees (notes played in the chord), this makes the lead resonate better with our chord progression. We have also varied the velocity of the notes according to taste to add a bit of humanization.

We will also create a variation for this melody so that the drop does not sound repetitive. We are using a few notes out of the G Major Pentatonic scale for this section, other than that we are keeping the feel similar to our first melody (as shown in the image below).

For both the melodies we are using the default triangle wave from Wavetable. We will alter the tone in part 3 of this series, when we explore sound design.
Bass
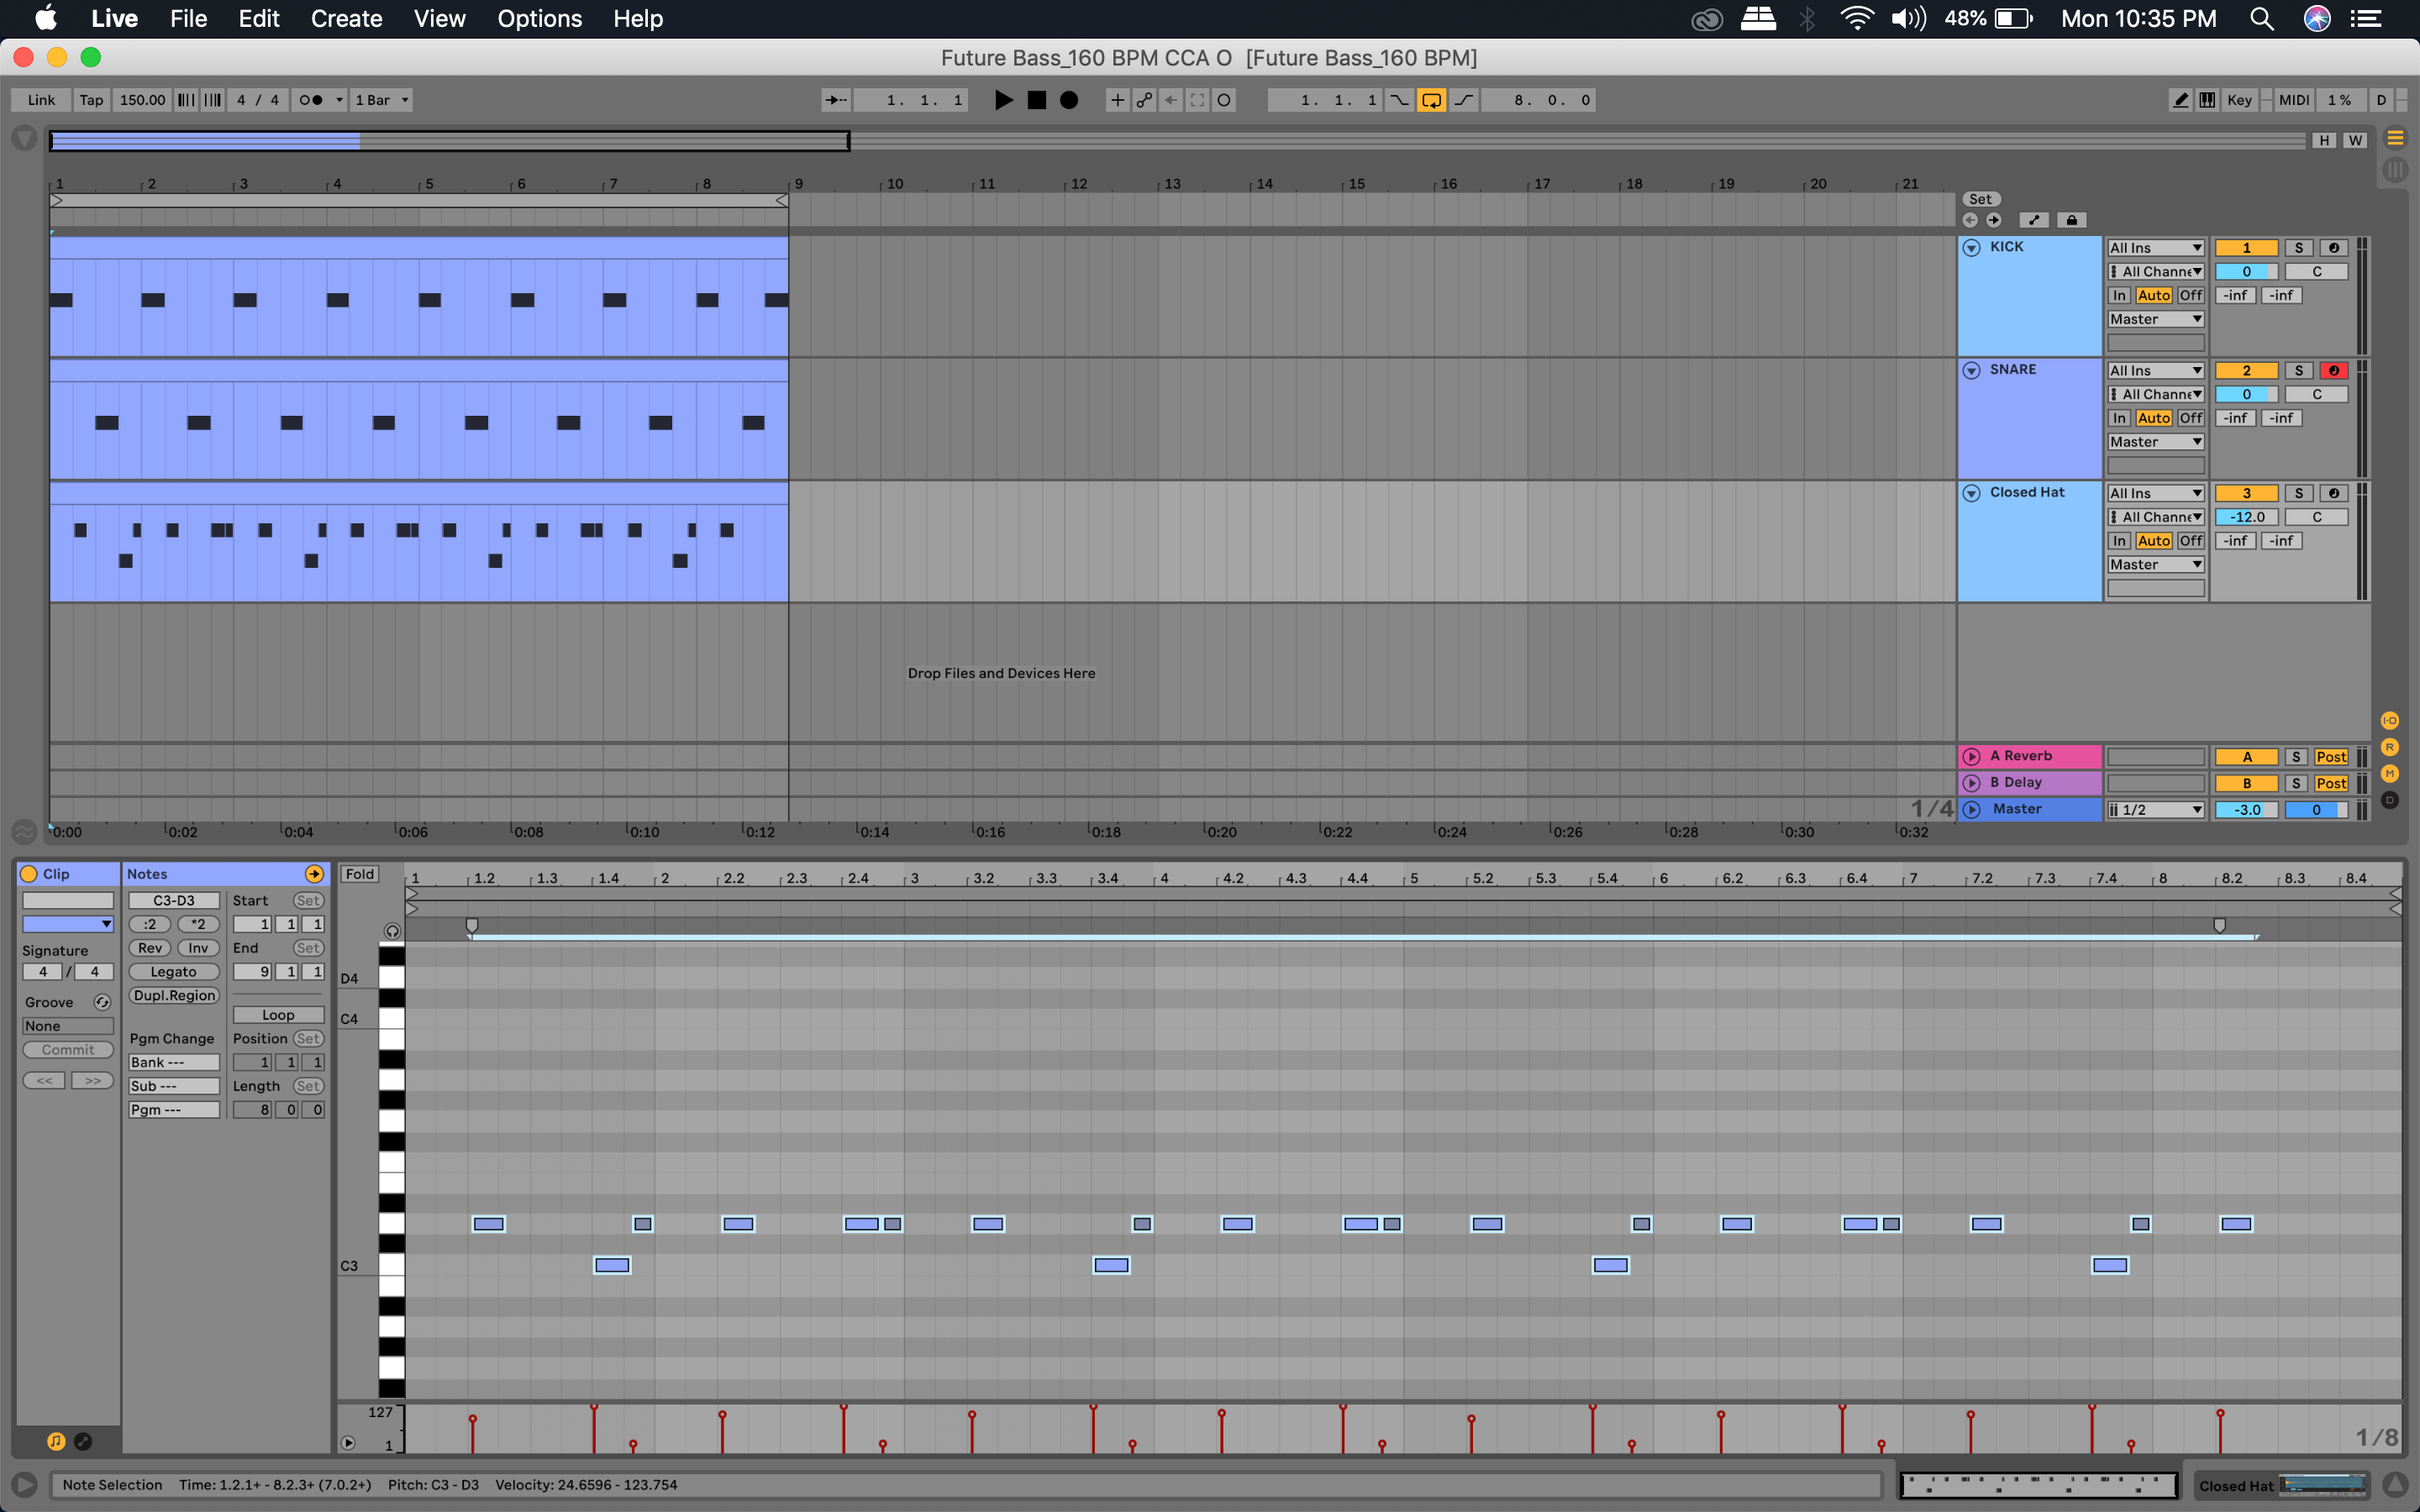
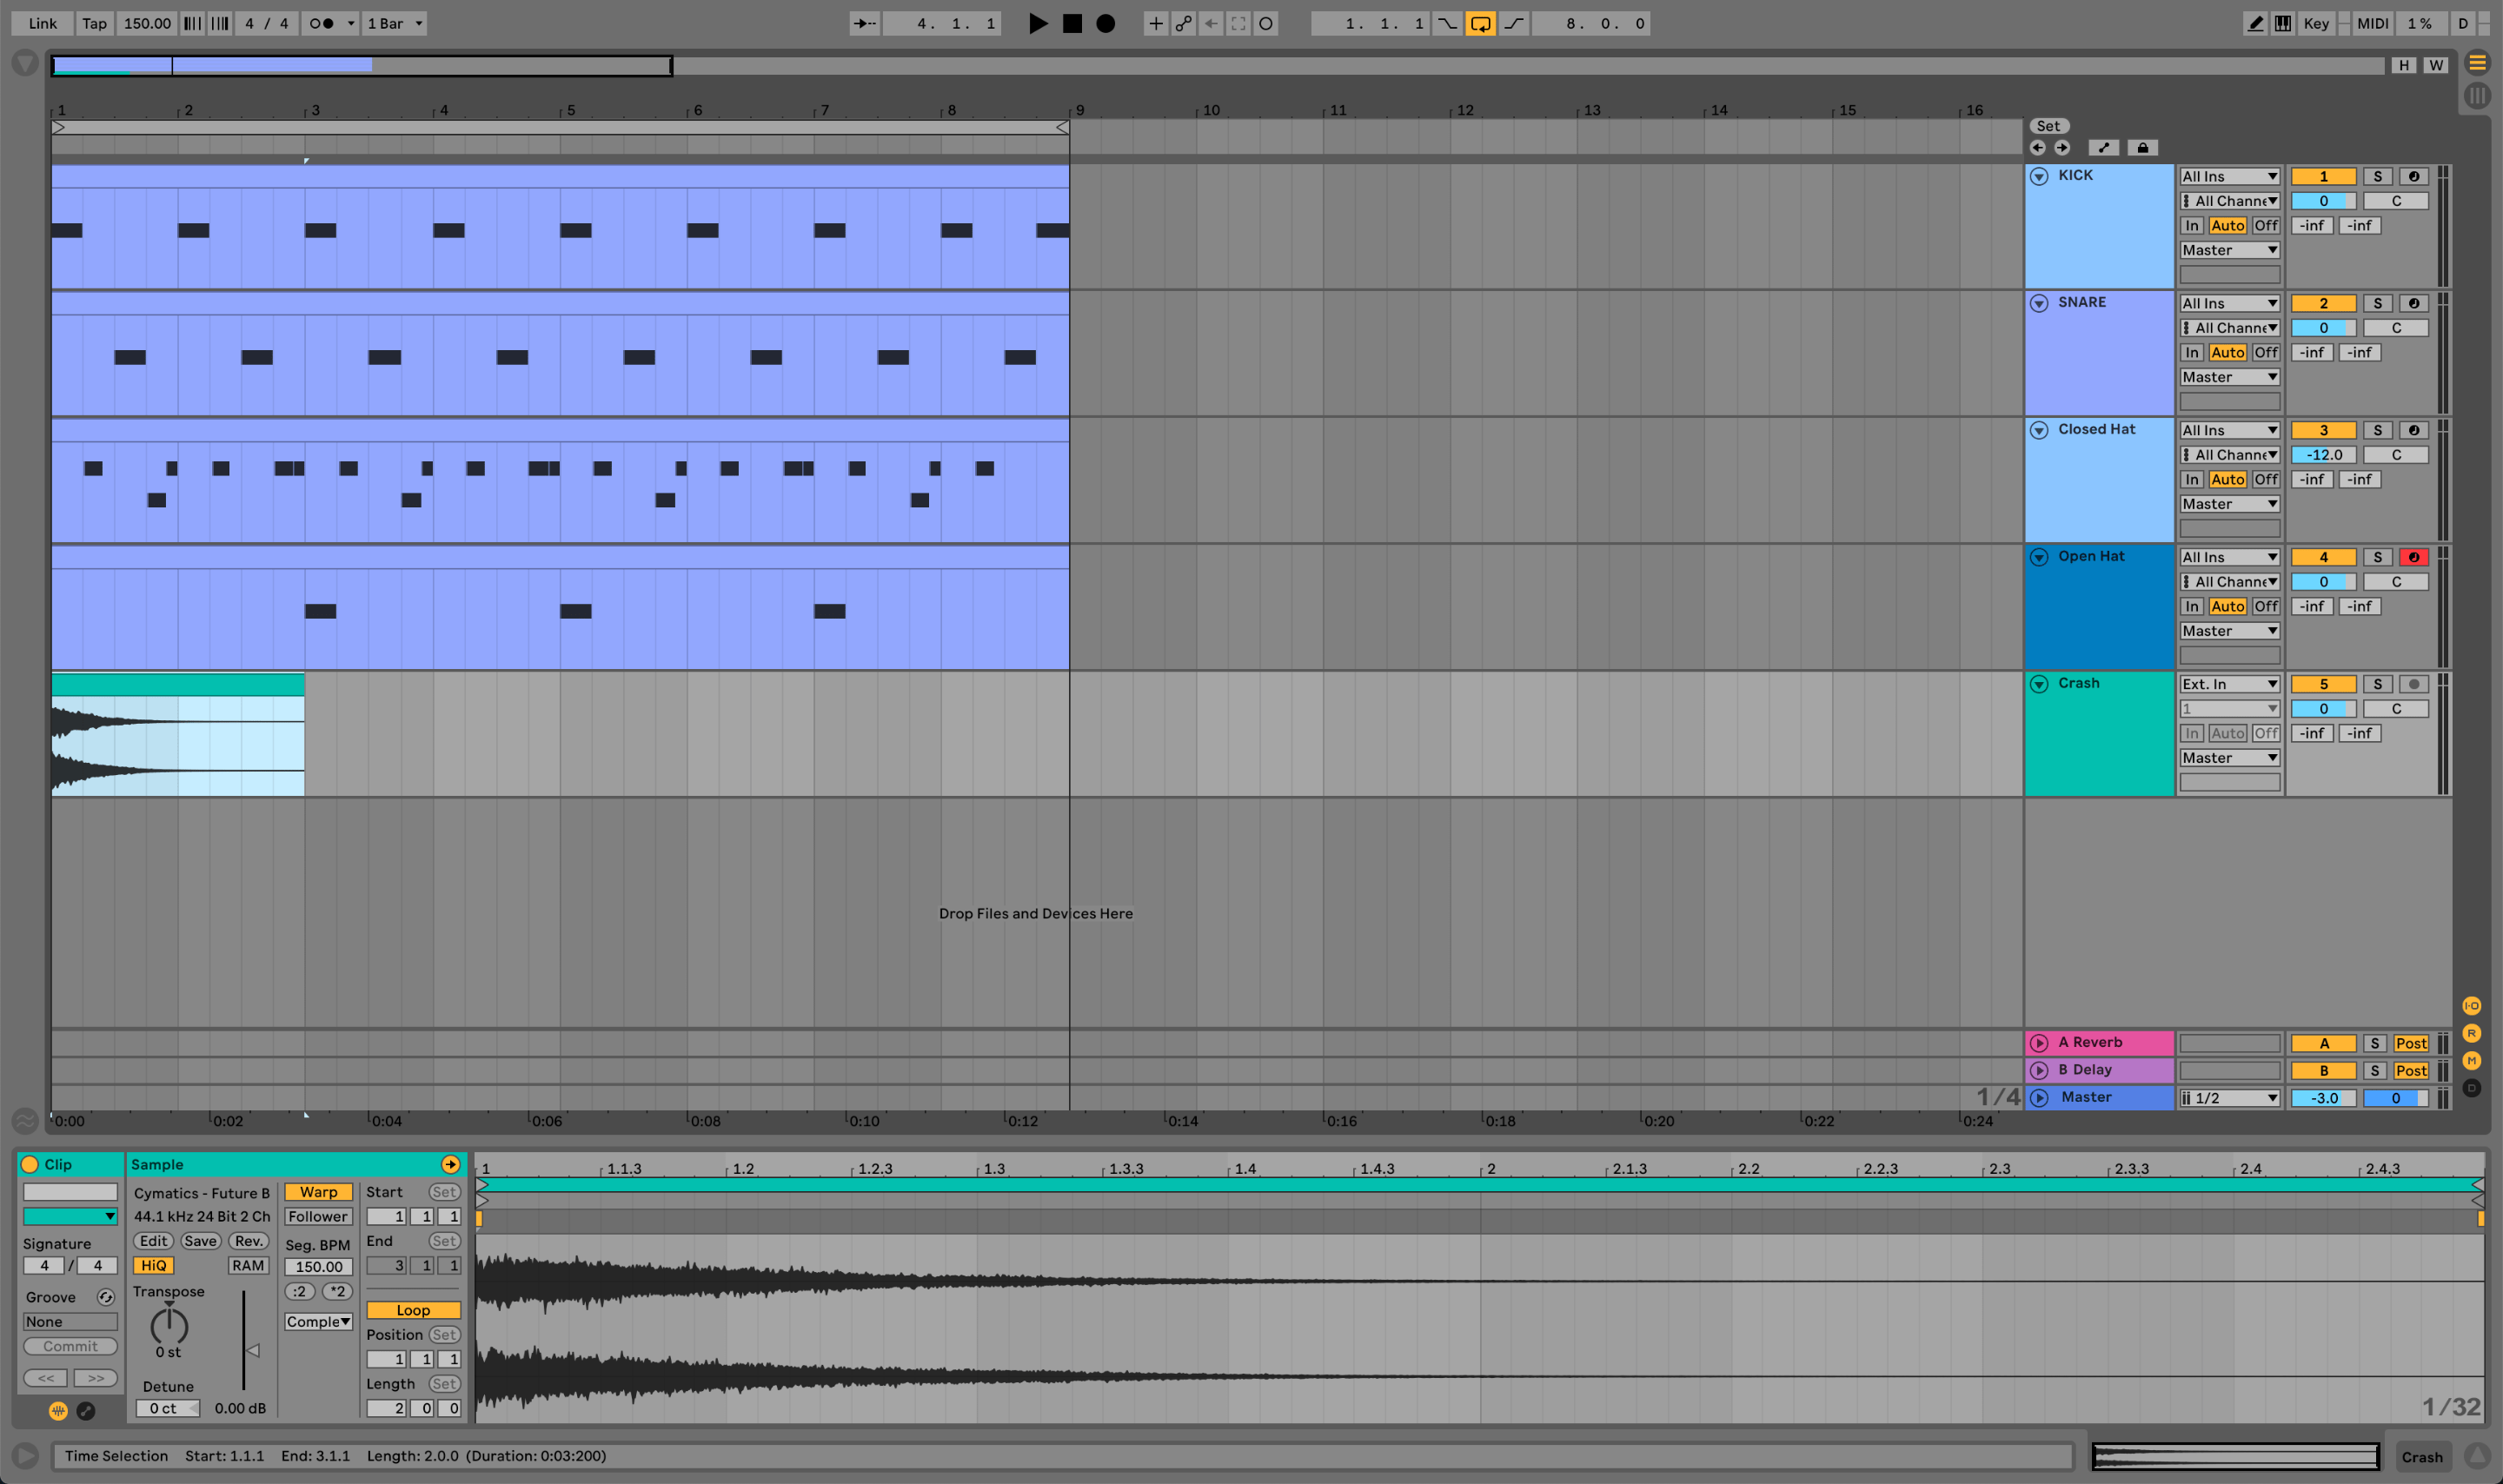
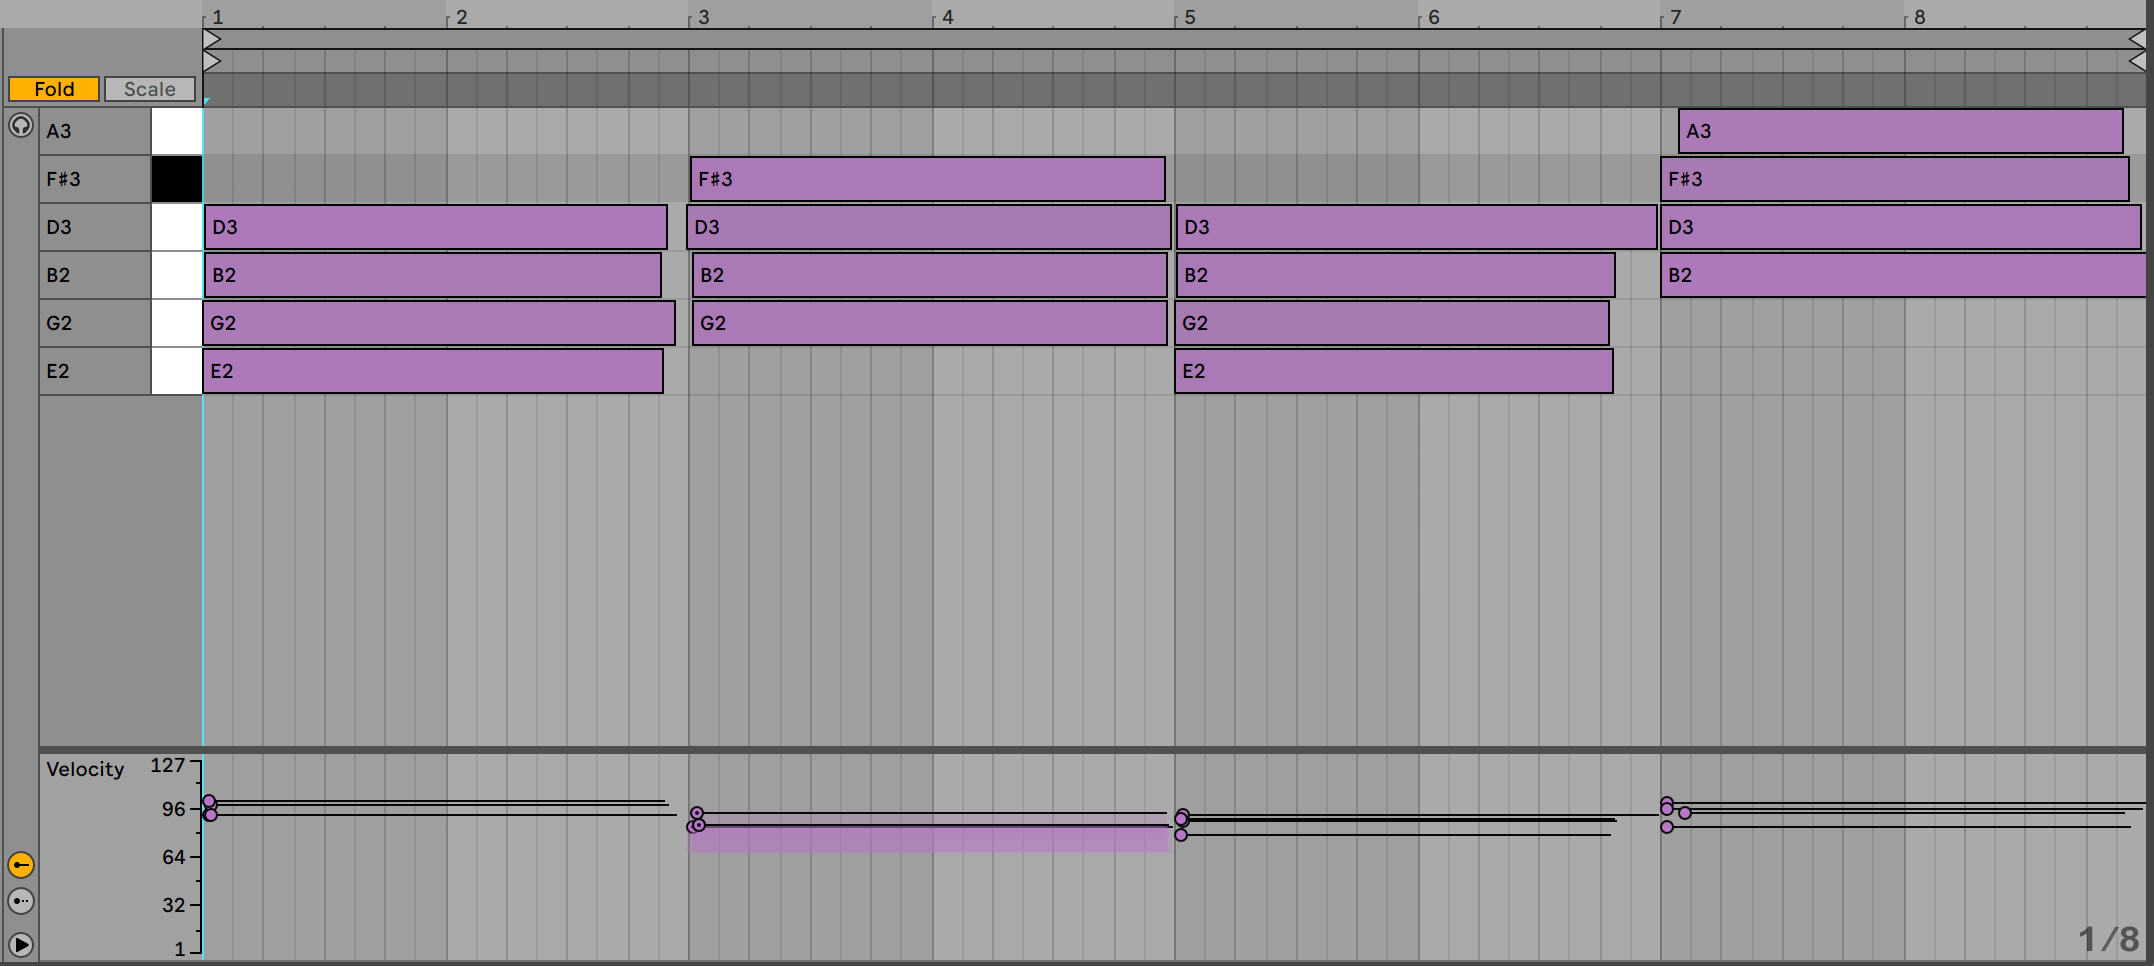
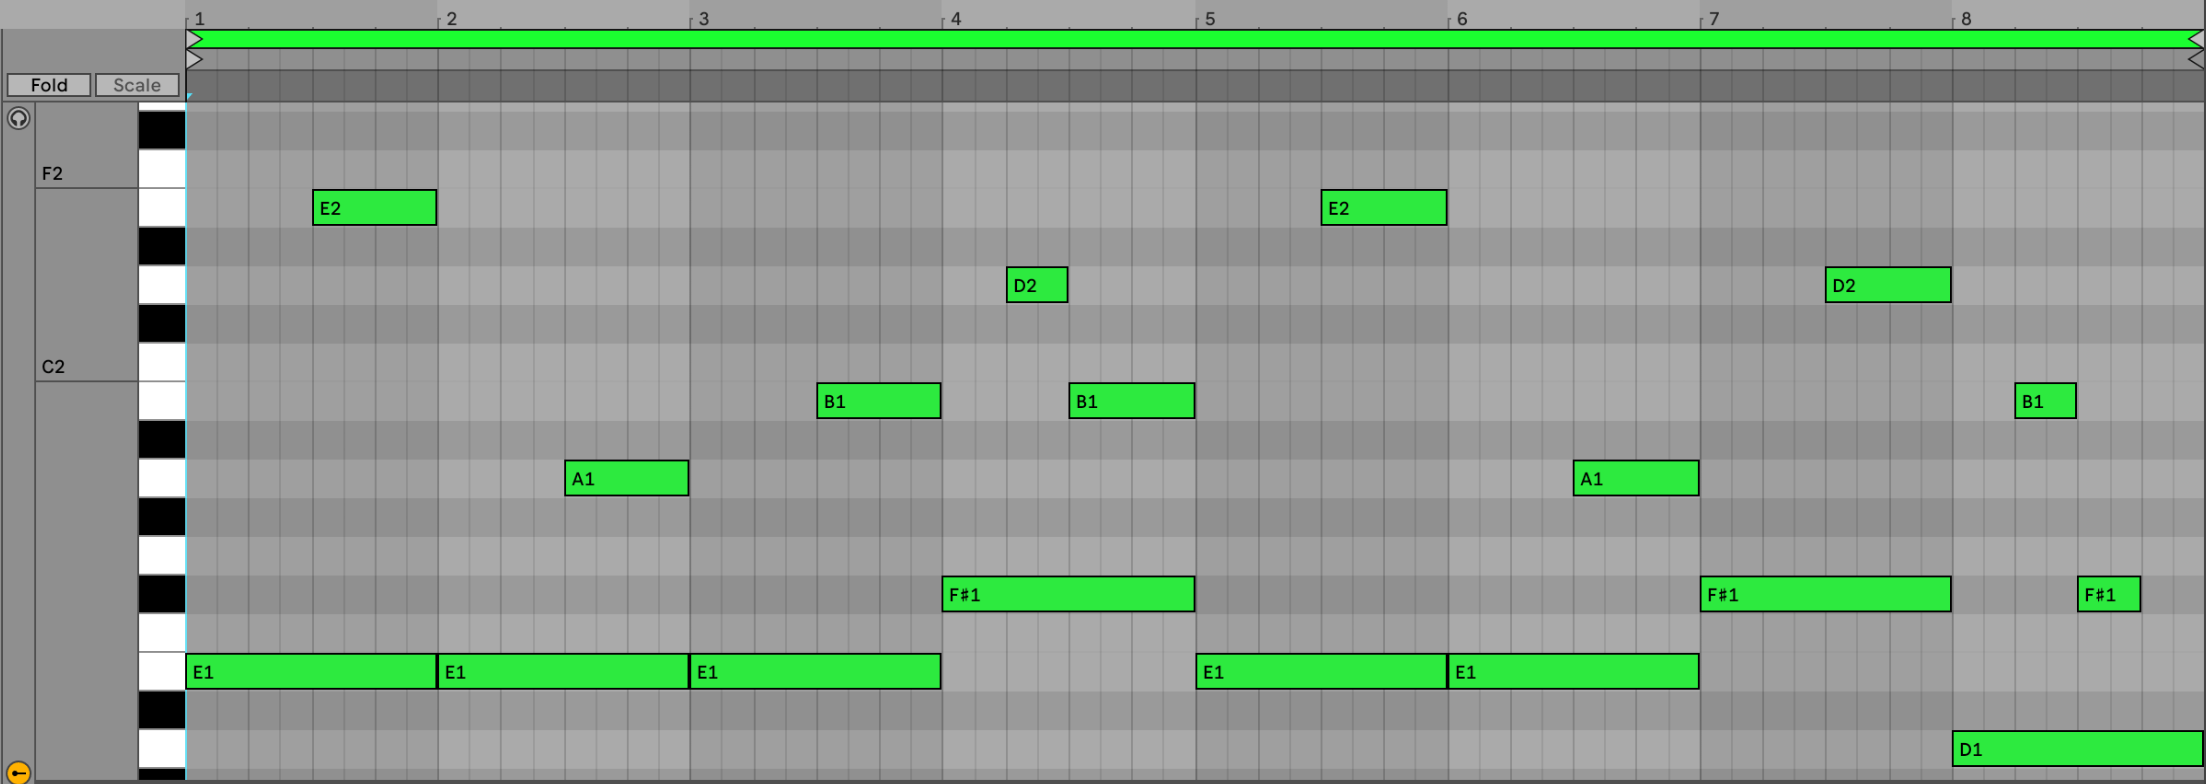
The bassline for our track will be extremely simple. We will be placing the bass notes on beat to accent the downbeats. The main role for the bass is to thicken the sound of the chord progression. Hence we have used the root notes of our chords as the main bassline with some minute additions (shown in the image below).
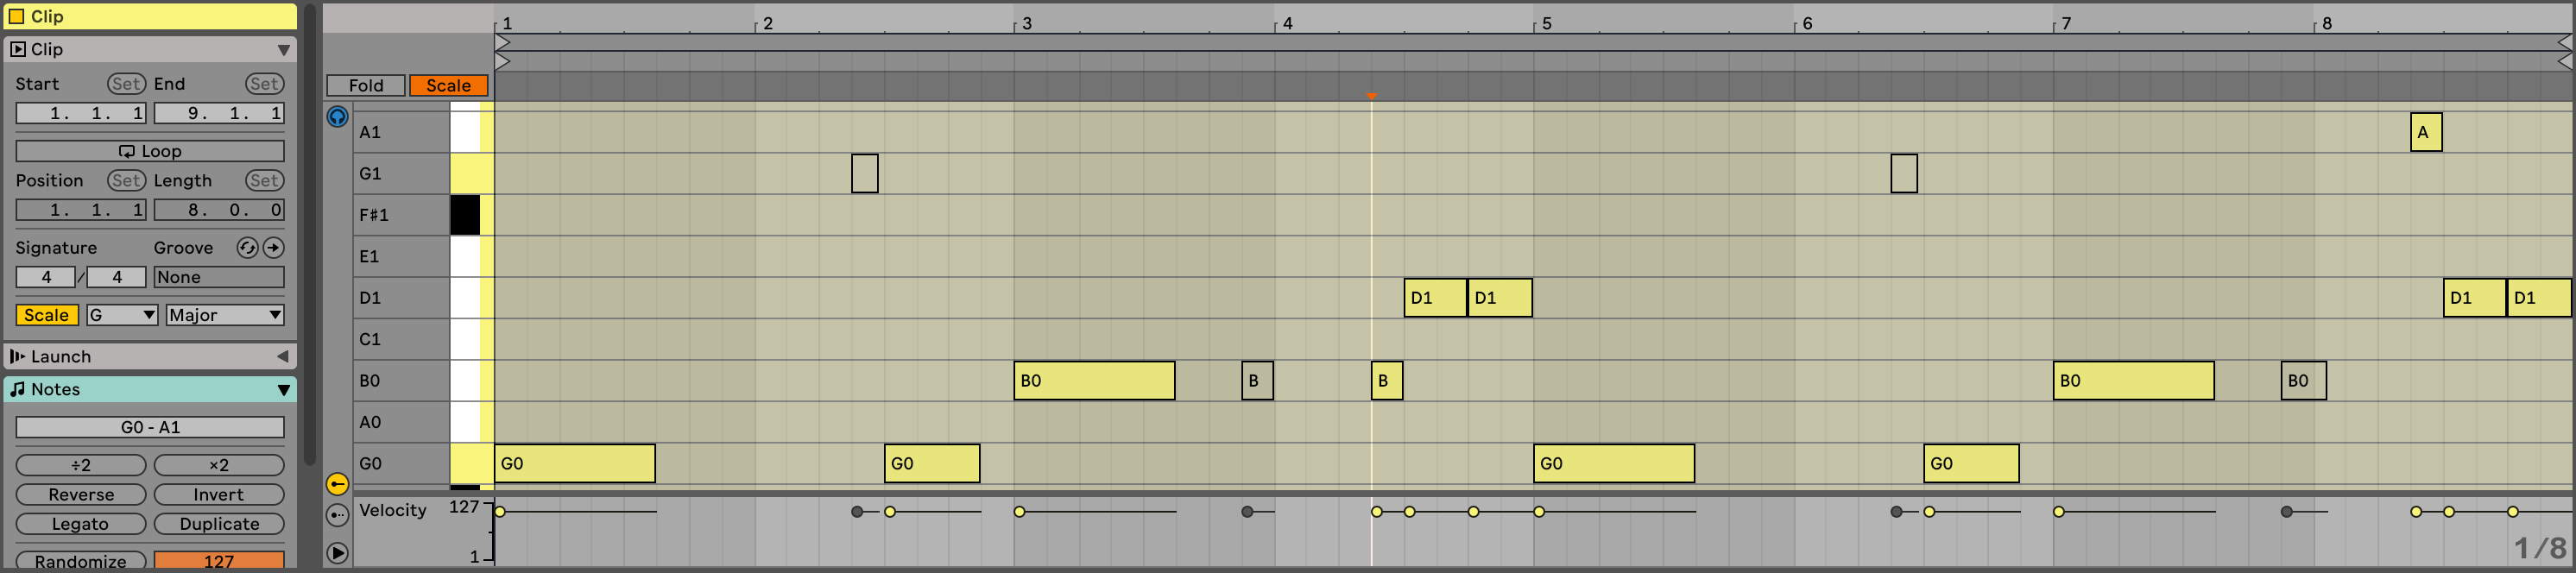
We will also create a variation for our bass part like we had done for our chord progression and lead. In this version we are going to keep things similar to the first pattern but we will add some more syncopated notes to create contrast (check image below).

We have made the bassline using the default sine wave from Wavetable as shown in the image below.

Conclusion
Thus we have created a chord progression, lead and bass section with a variation for our Future Bass track while exploring some tips to help us be more expressive and efficient with our note selection. In the next article we will explore various sound design techniques to give our music the Future Bass sound. If have not read our previous article in this series, please click the link provided below.

Introduction
Dynamic EQs combine the best features of an EQ and a Compressor/Expander. Unlike a regular parametric EQ, a dynamic EQ boosts or attenuates a frequency band in reaction to the incoming signal. A regular EQ can remove, among other things, harshness from a signal provided that these unwanted frequencies are fixed, if they move around in the frequency spectrum then the harshness would not be suppressed in areas where the EQ is not active. This is especially true for a pitched signal where the problematic frequencies may move up down parallel to changes in pitch. A dynamic EQ would be a smarter choice in this scenario because it would attenuate a frequency band only when the incoming signal surpasses a user-defined threshold.

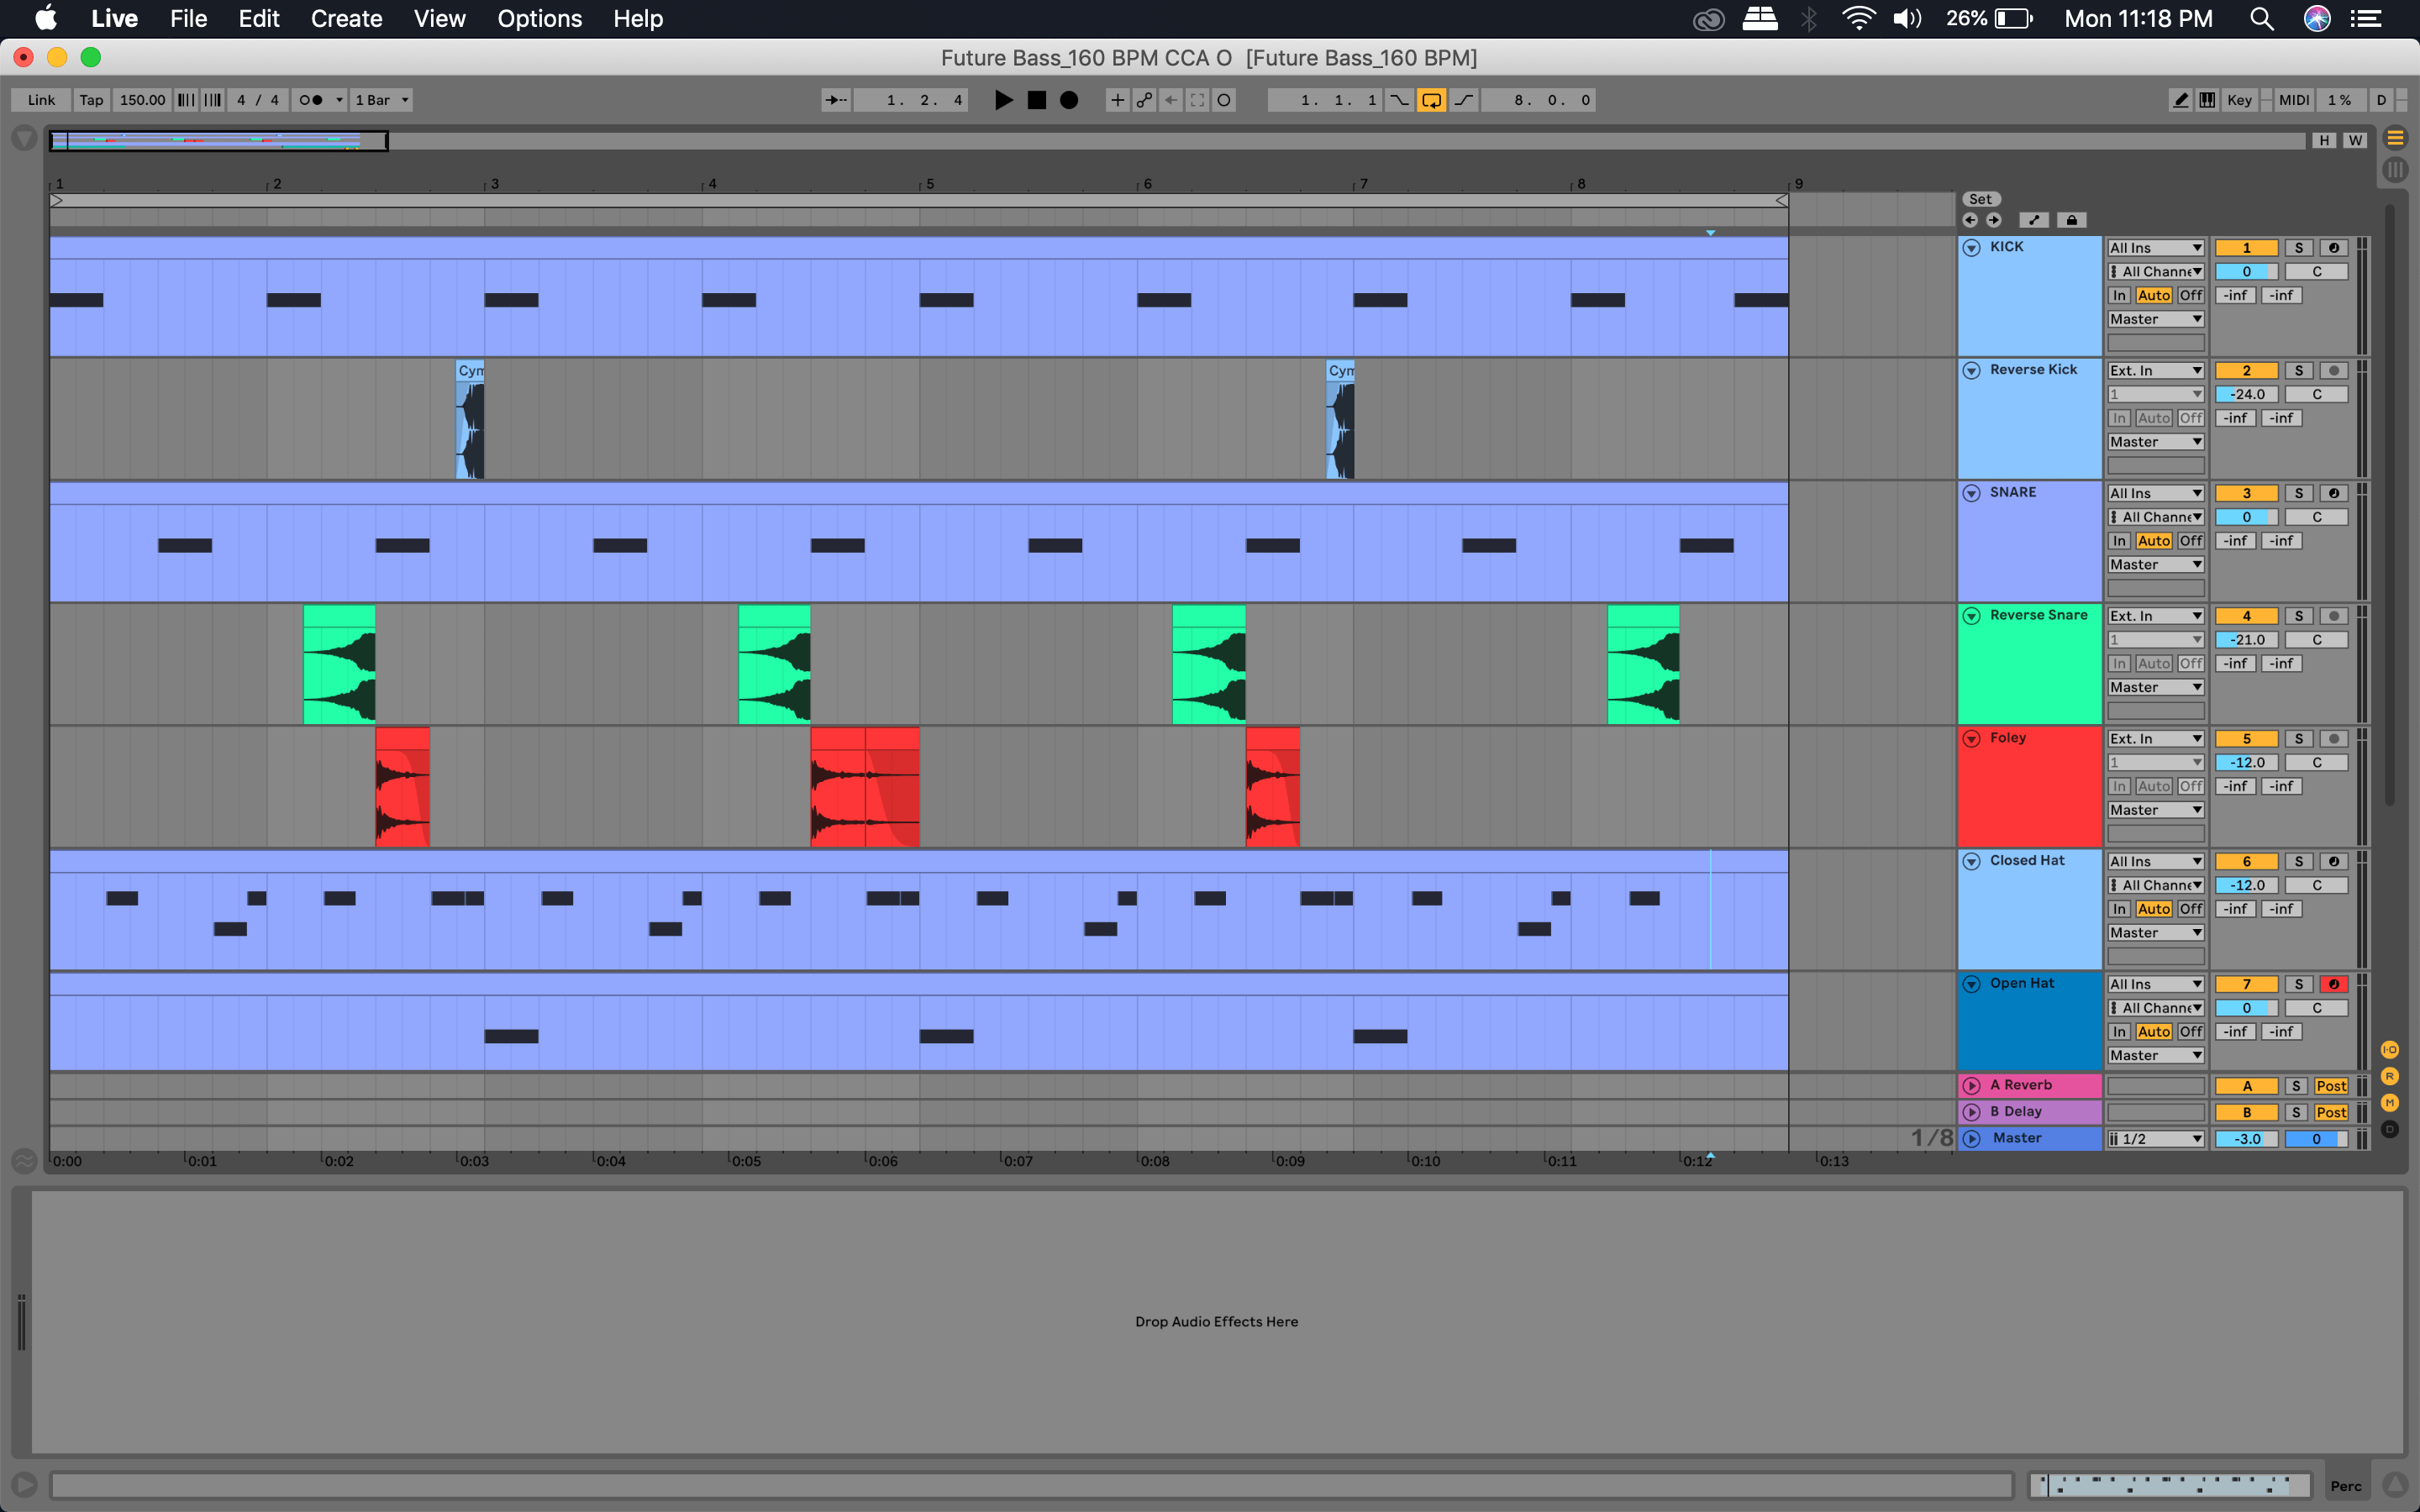
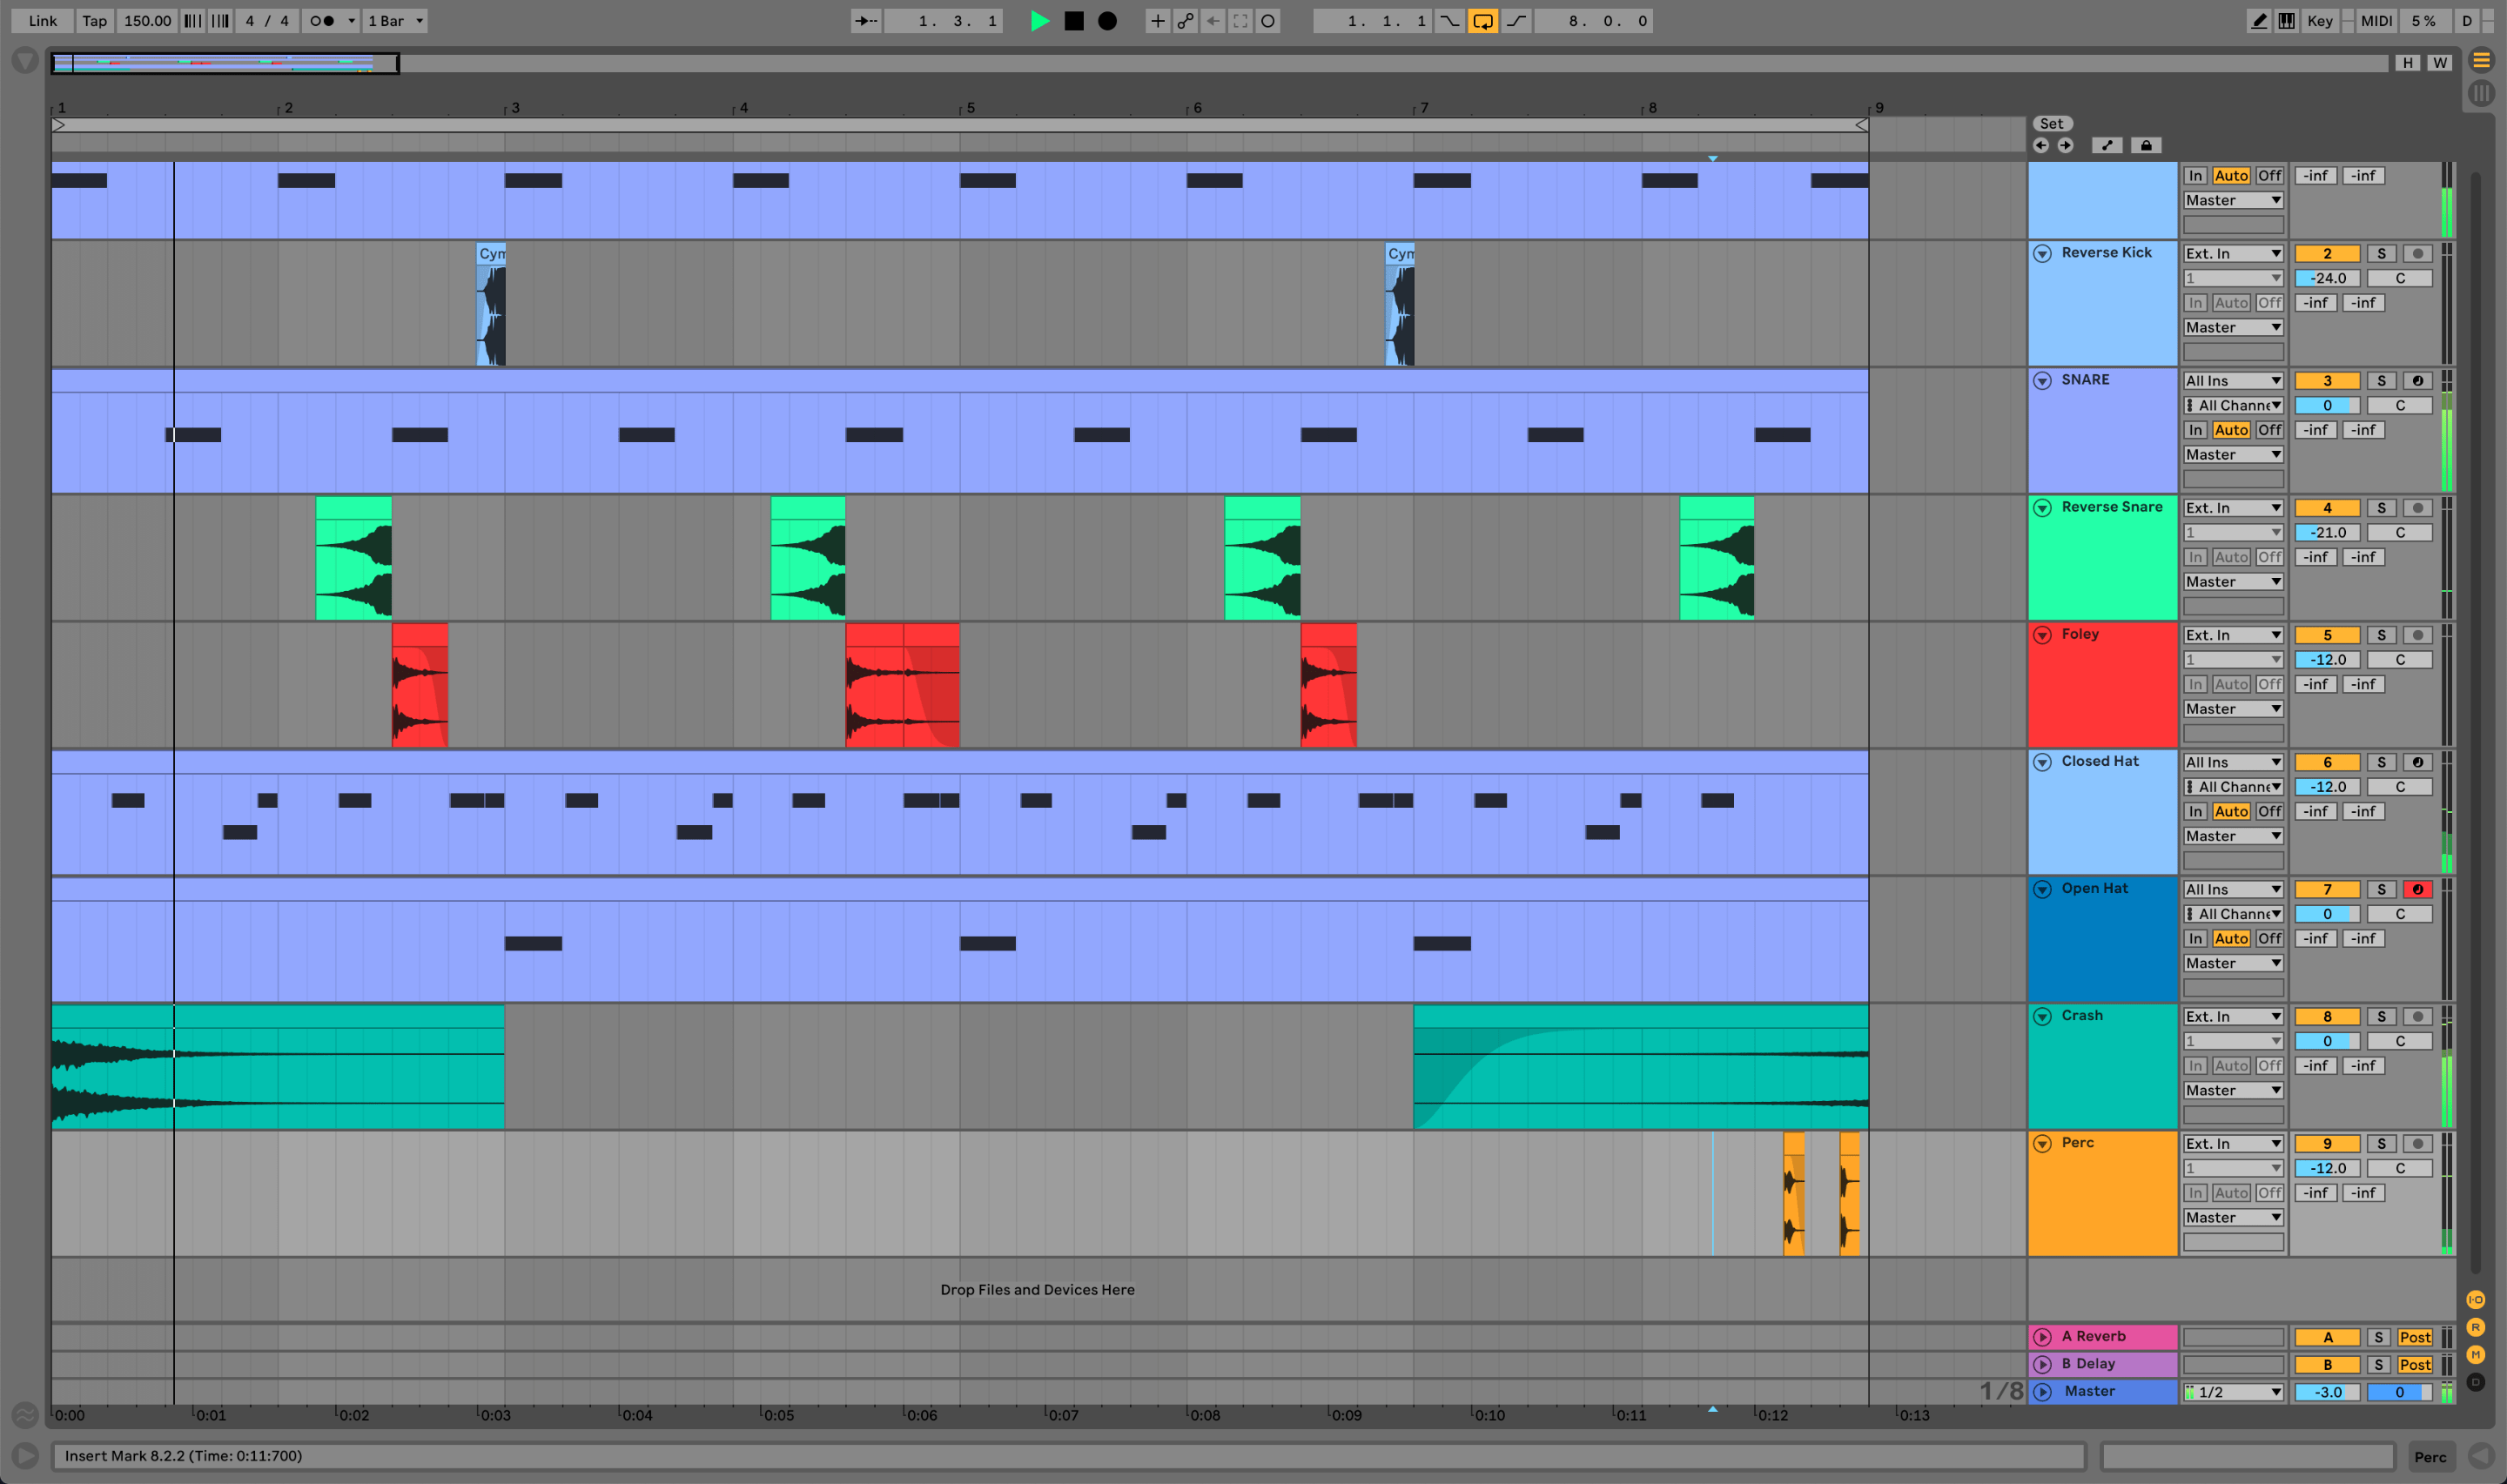
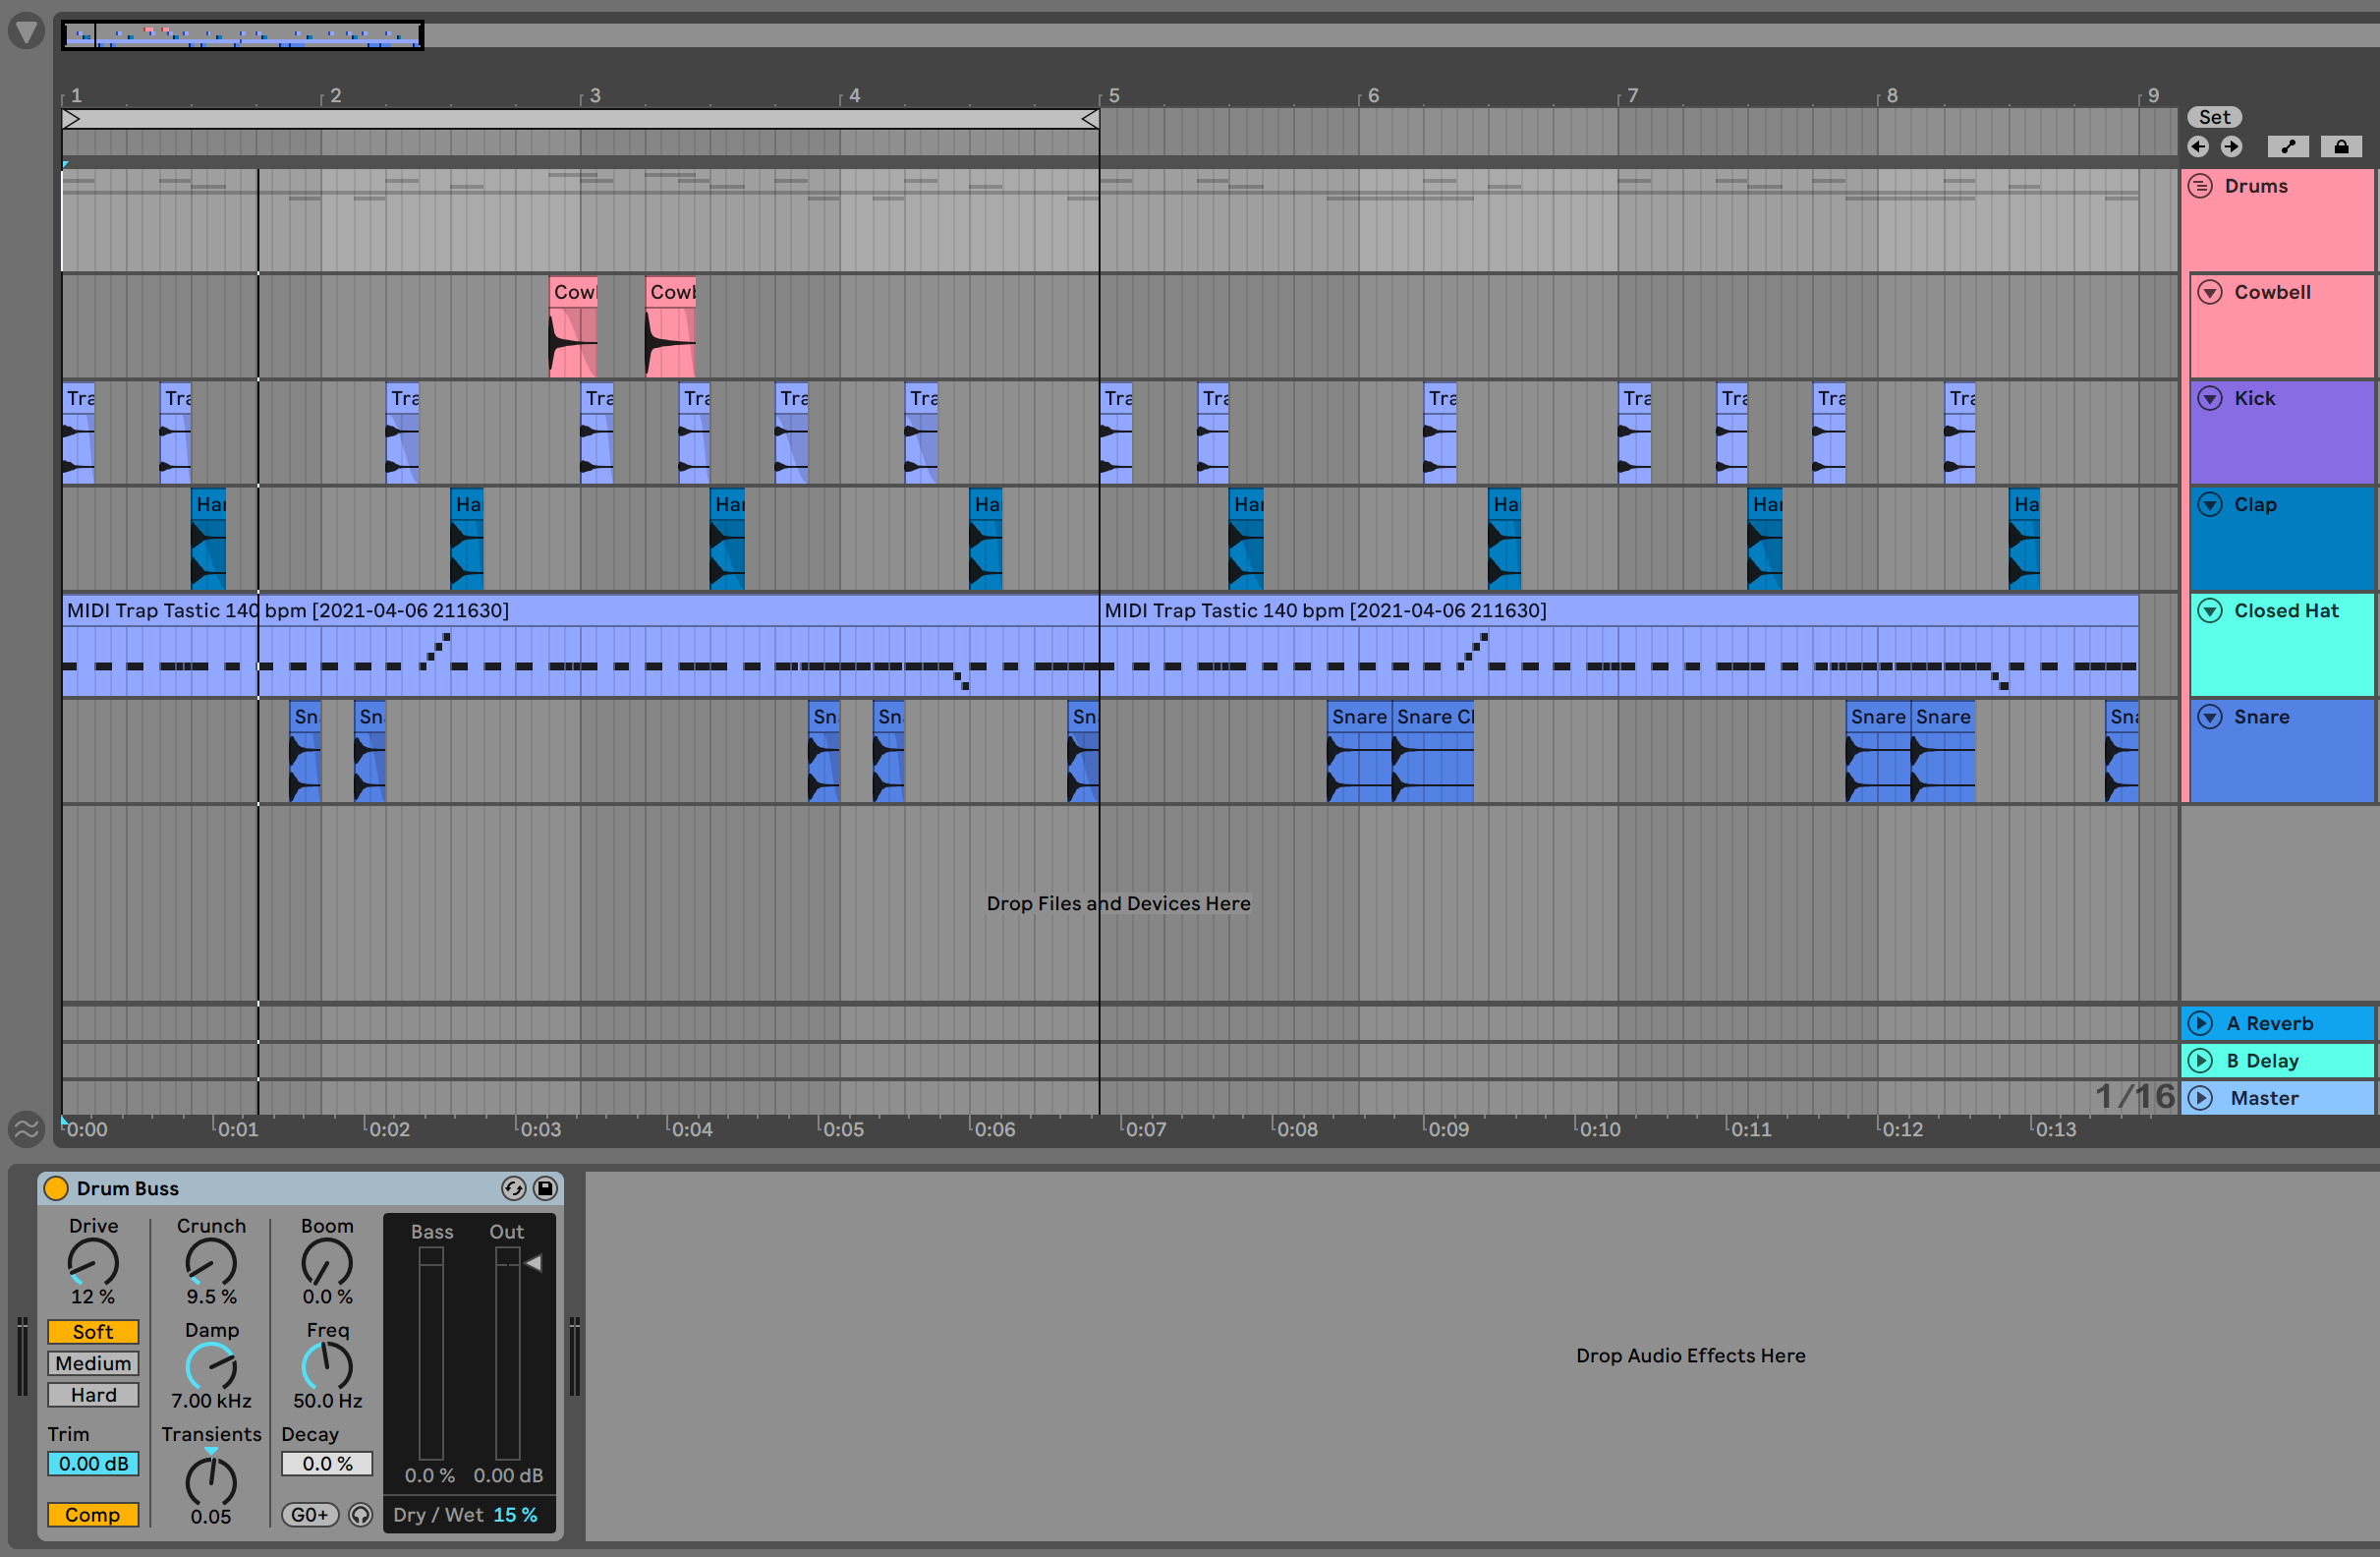
In this article we will create a future bass drum pattern and discuss a few techniques you can use to make your patterns stand out. Let us start off with some ground rules. Future Bass tracks vary between 130 - 160BPM. For our project we will set the BPM at 150. Our time signature will remain 4/4 just like most tracks in the genre.
Sample Selection
Future Bass has very punchy drums. So it is always ideal to start off with a good sample. Starting with a bad sample will lead to endless processing that will probably not end up sounding on par with a good sample anyways. There are a lot free resources on the internet where you will find some good samples. Once you have your samples ready we will move on to programming our drum pattern.
Programming the kick
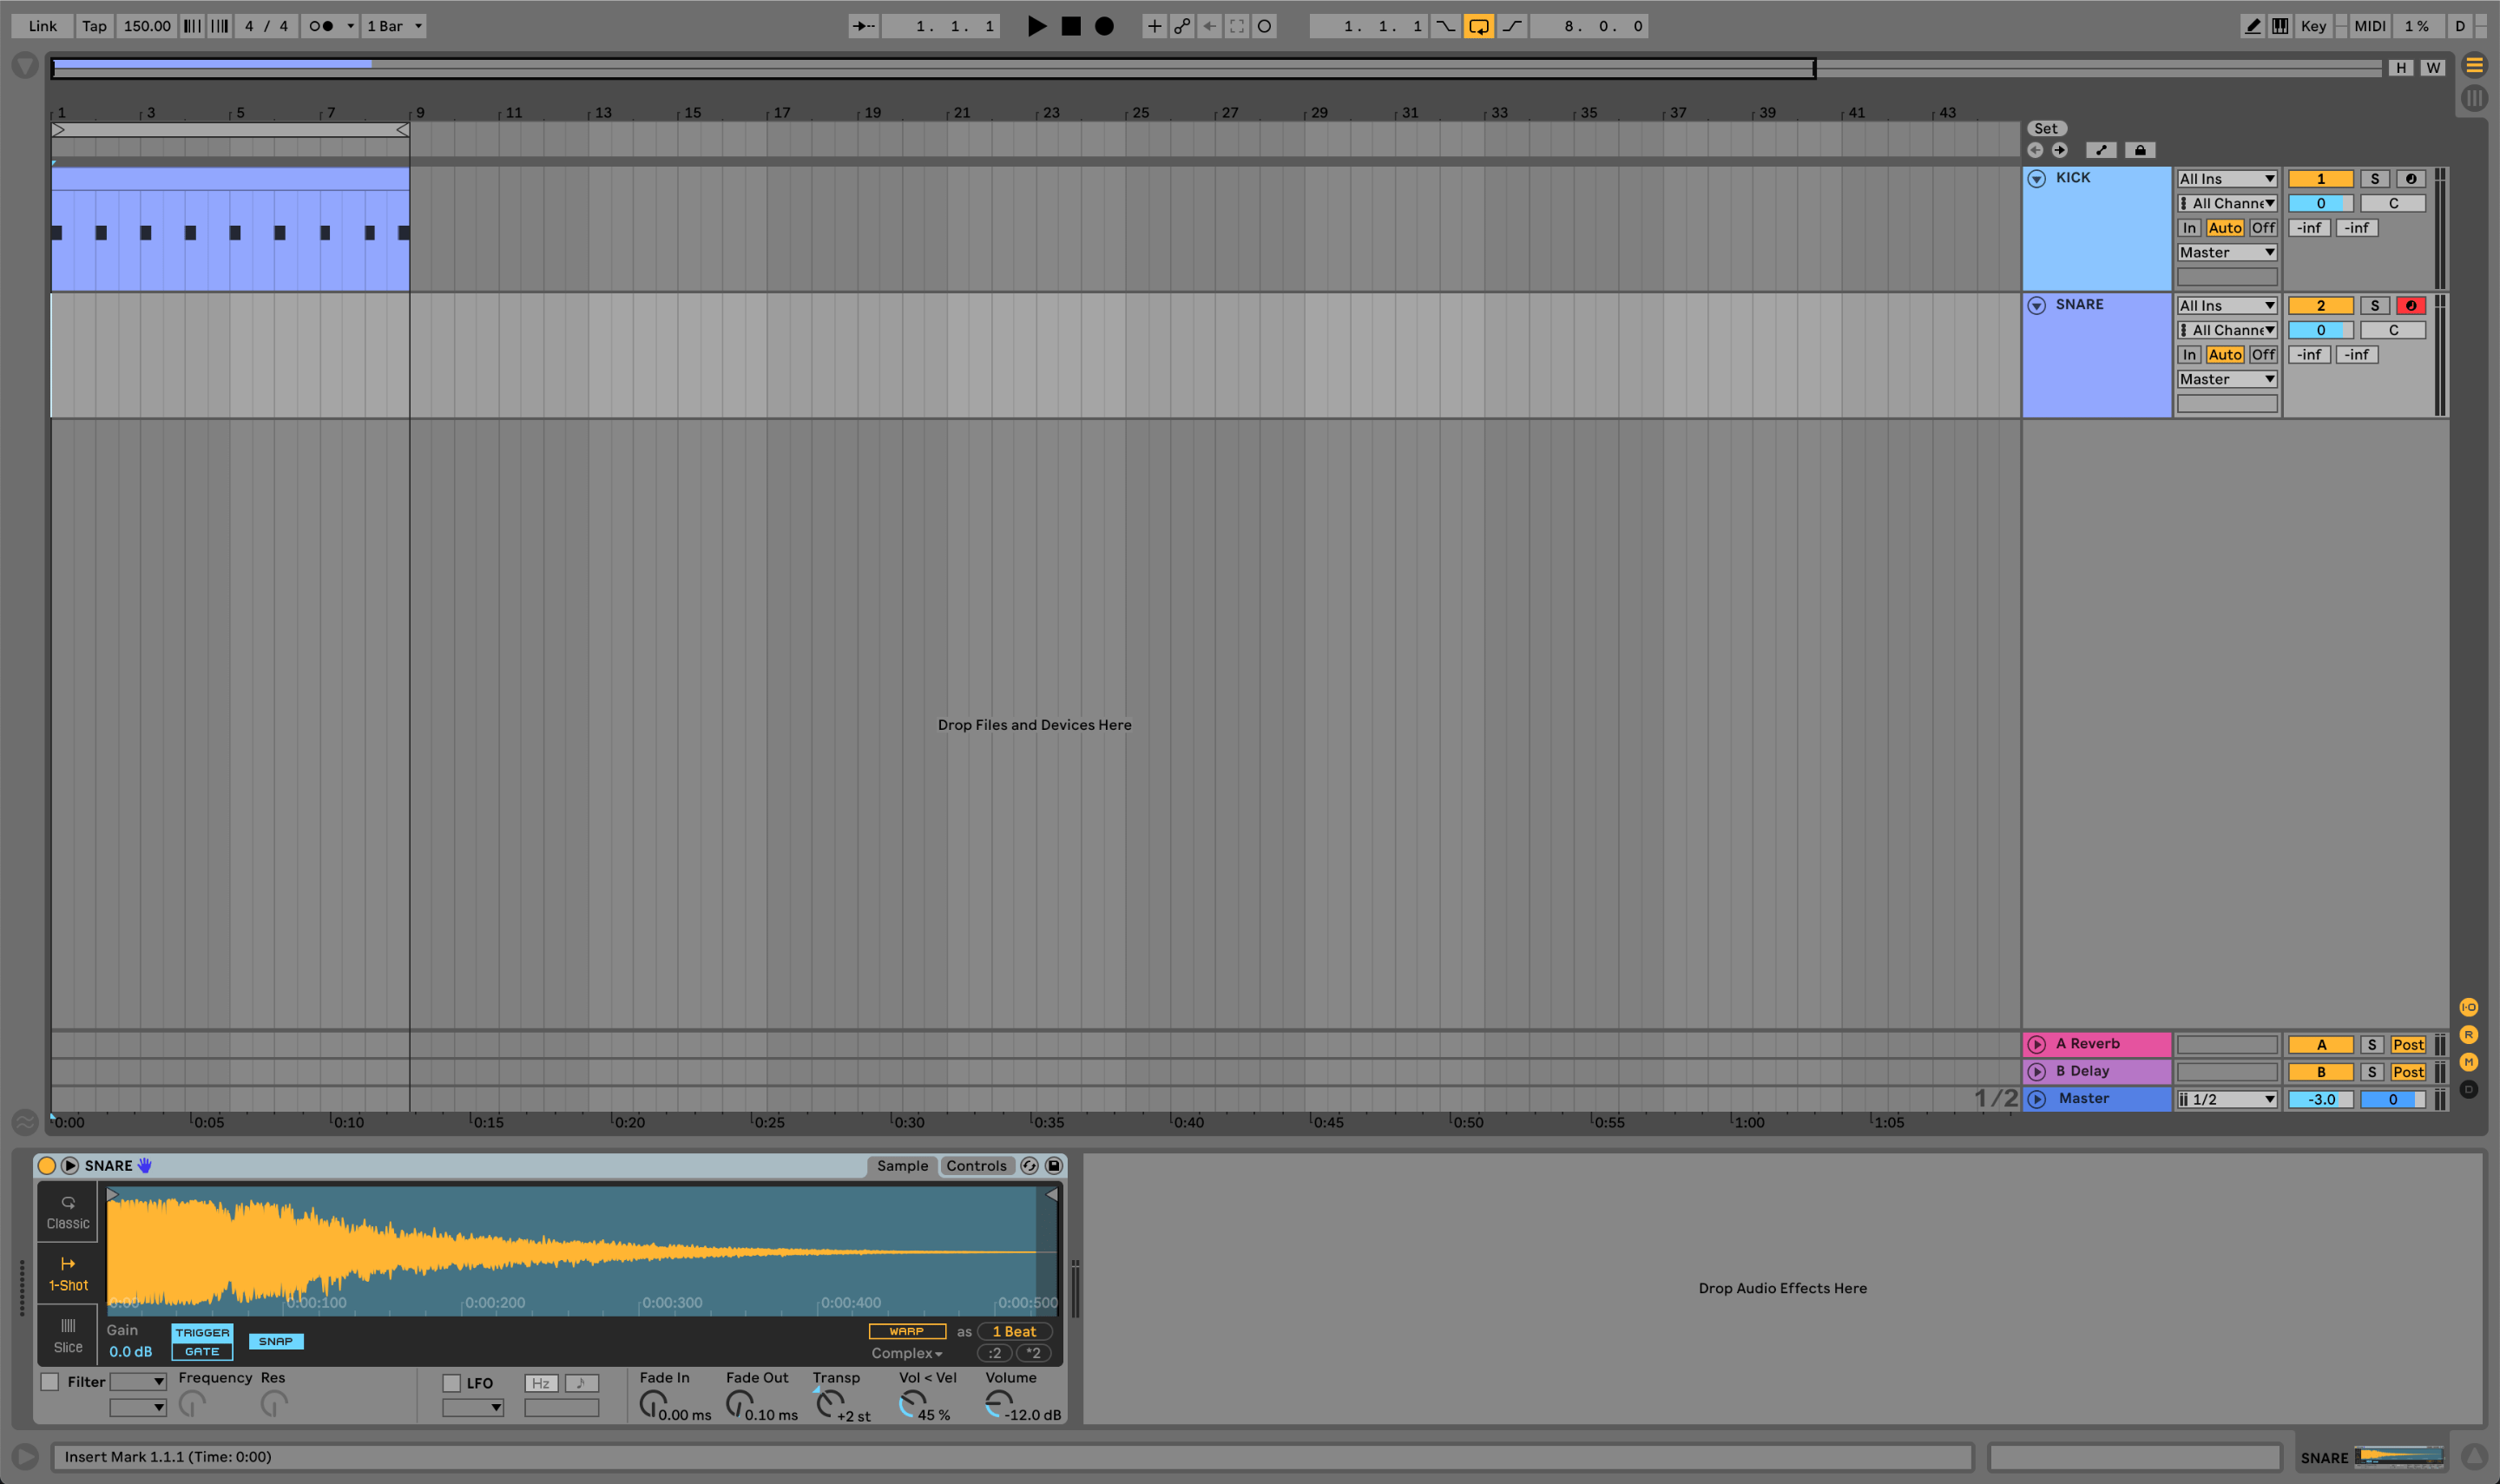
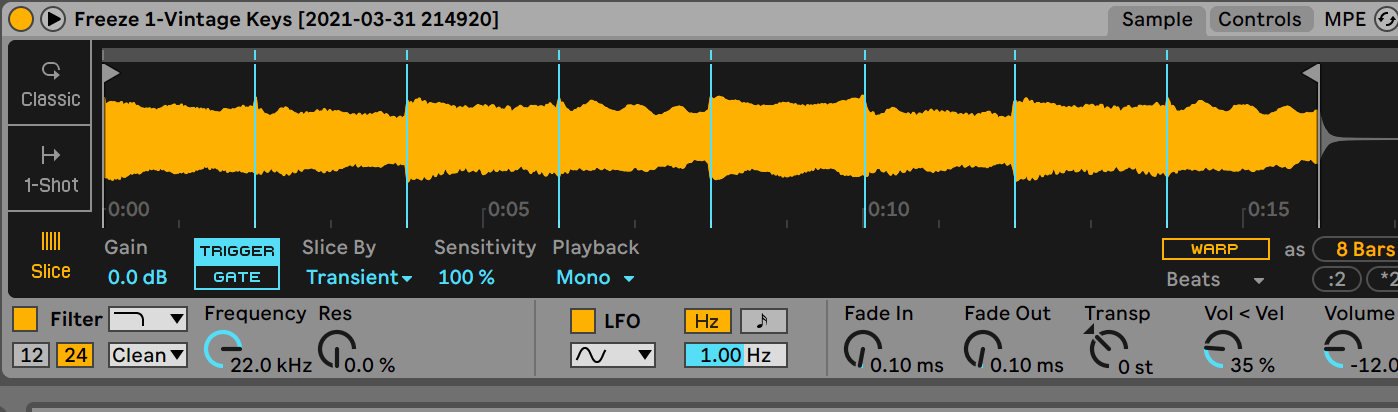
Select a punchy kick with a short decay. You can drag your audio sample directly into your track and arrange them on the grid, but we will use midi for our project. Insert an empty midi channel in Ableton (Shift+Ctrl+T for Windows and Shift+Cmd+T for Mac). Double click on your midi channel and then double click on your kick sample. Your kick should open up in a simpler, in the device view of your midi channel. Switch the simpler to 1-Shot mode from the default Classic Mode. In this mode the sample triggered plays till the end of the sample.


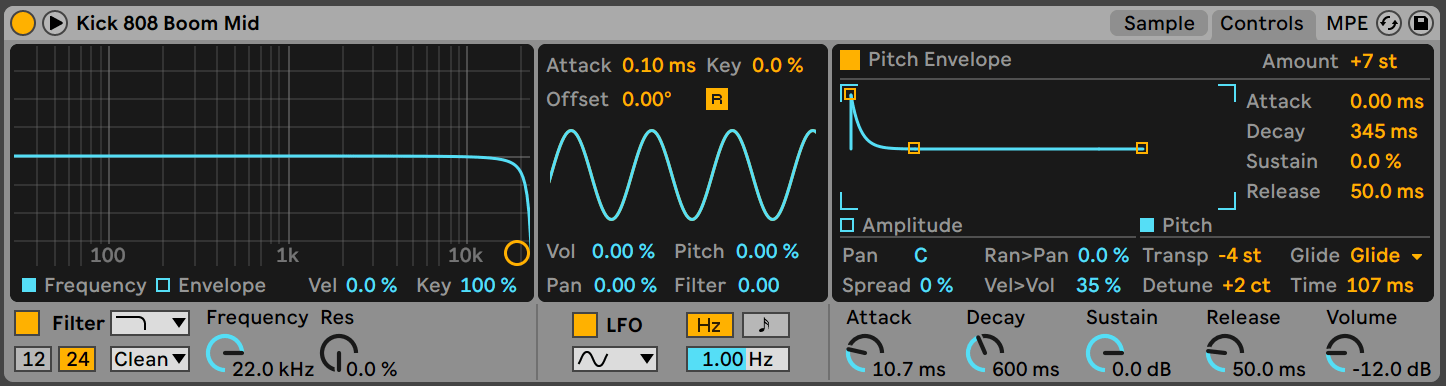
Trap basses generally consist of 808's. They have a long decay and are often distorted. 808 selection is extremely important for our final mix. You should always preview your bass sound with your kick in any genre of music, to see that they are not conflicting with each other. If our 808 is muffling the kick from the beginning, then processing will not be able to solve our problem.
1. Tuning 808's
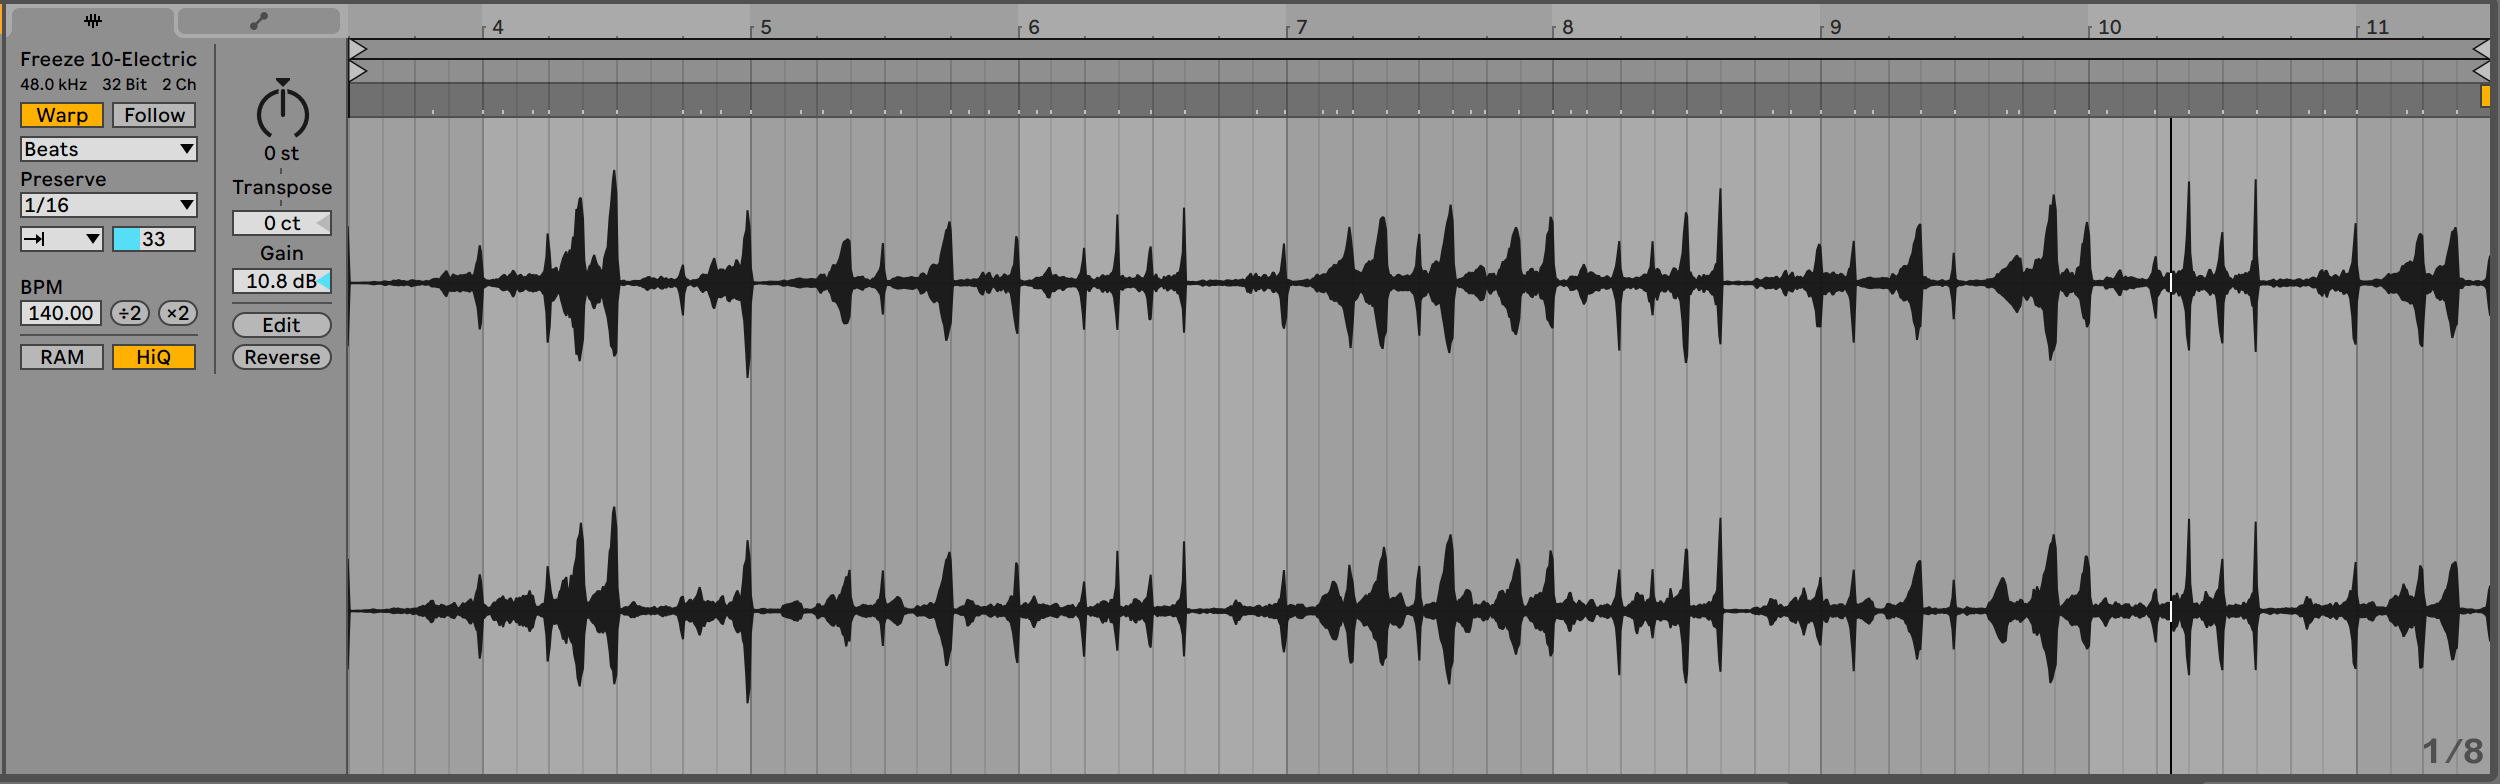
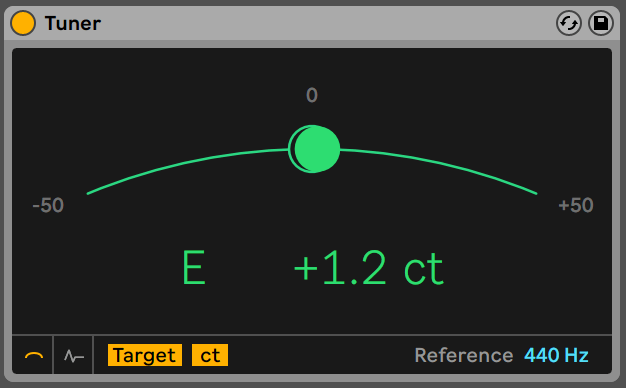
808's need to be tuned correctly to the key of our beat. Once you have selected your 808, draw it into the device view of an empty midi track. Your 808 will open up in an instance of simpler. Insert a tuner after the simpler. Now we can monitor the pitch played by the 808.

We can adjust the transposition of our sample from the 'Controls' tab in the simpler. We will tune our 808 as such, that when we hit the C note on our midi keyboard, the sample is also triggered in the same pitch.

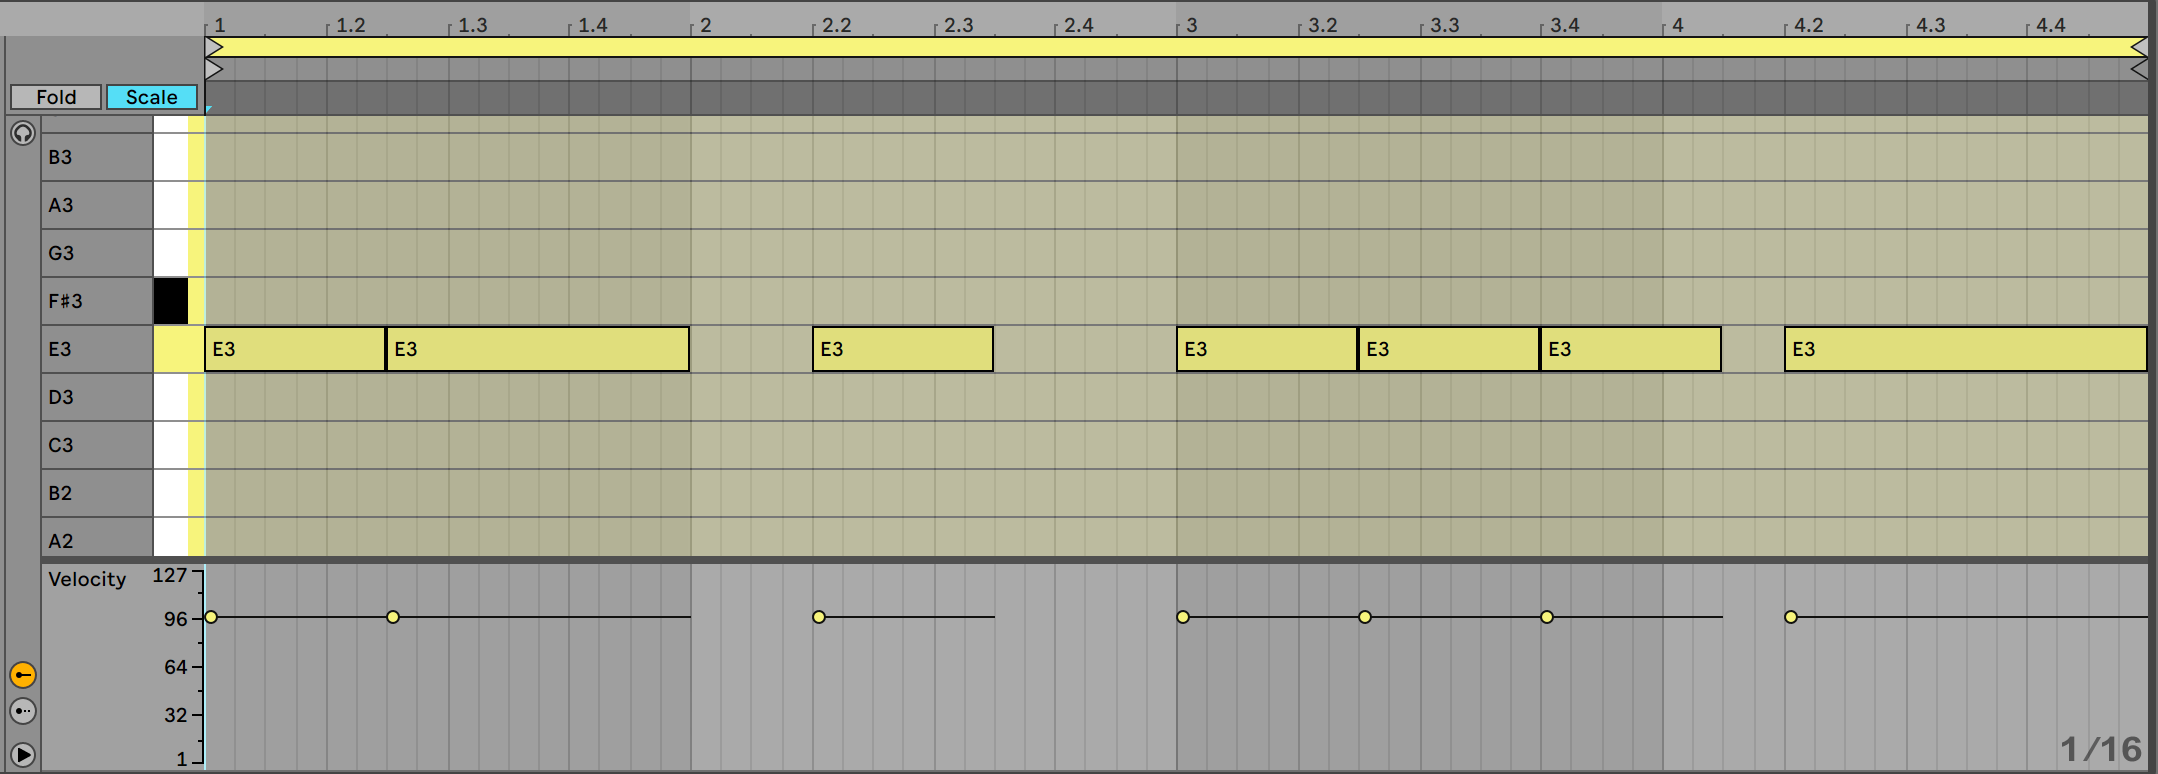

The melody and chord progression of our trap beat is extremely important for the vibe our beat is trying to create. Most trap beats are mostly based on minor scales. We will compose our melody in E minor.
In the image provide above you can see the notes of an E minor scale. Needless to say that our chord progression will also consist of a combination of these notes.
In Ableton, you can turn Scale Mode on so that the notes of your scale is highlighted on the piano roll. This will help us to adjust notes quickly.


Make Melodic Trap Beats Part 1
Trap Drums are not complicated at all. There are a few basic elements that we need to make a bouncy trap beat. A trap drum kit consists of a kick, clap and hi-hat at its core. You can add other snares, vocal one-shots and percussion samples to fit your style. Our three core drum sounds need to be punchy and short. Trap beats have a tempo of 140-160BPM. We will make our beat in 140BPM.
1. The Kick
Trap kick drum selection is extremely important. The kick needs to sit perfectly with our bass/sub in the mix. A short kick drum with a very emphasised attack would cut through the mix much easier than a sub heavy low-kick. Drag your sample into an audio track and start laying them according to Ableton's grid. You can turn the metronome on for reference.


Lofi Hip Hop Beat Steps:
Lo-Fi is a type of music where imperfections are introduced into the audio signal deliberately to achieve texture or character. Lo-Fi is an abbreviation for Low Fidelity, so music producers often employ plugins that artificially degrade the audio to give their sound a vinyl quality. In this article we will explore 6 easy steps to compose a lo-fi hip hop beat.
Step 1: Creating the right Chord Progression
Lofi chords are a huge part of their sonic quality. Most loft producers sample old jazz and soul records to create a nostalgic feeling. We will be creating our own progression from scratch and then we will sample ourselves. Lofi hiphop can be anywhere from from 70-100 BPM, sometimes even slower than that. The BPM for our project will be 75 BPM. For sound selection, try to remember what type of instruments old jazz and soul records would use. Using those sounds to create our sample will help us create a more old timey vibe.
Look at the chords that we have drawn in the image above. We are using a rhoads preset to create these chords. You can use an acoustic guitar or any other instrument but the way you create your chords will change according to that instrument. Here we are using the chords Em7 - Am7 - CM7 - GM7 for the first four bars, in the second four bar cycle, we are substituting Em7 with Emadd9. You can experiment with the added notes on these chords, also use vinyl or modulation fx on the channel to make things sound more aged.
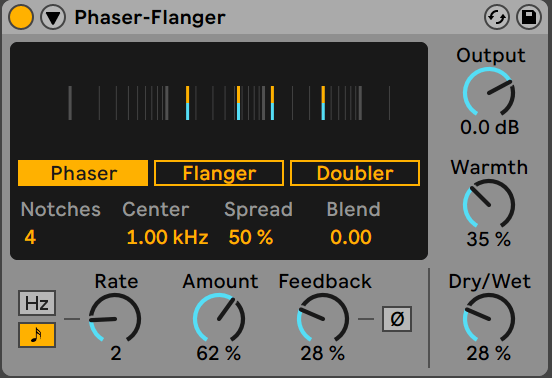
We are using the phaser-flanger device of ableton, as shown in the picture above, to modulate our Rhoads sound.
Step 2: Turning Your Chord Progression Into a Sample


All DAWs, no matter how basic, implement some form of automation. Automation means having a computer take control of a parameter within a DAW and change it's value over a period of time set by the user. Automation can refer to the turning of a knob, the sliding of a fader and the toggling of switches within our audio workstation. To carry out any form of Automation the user draws automation curves in the DAW timeline (commonly in an automation lane) which defines the movement of the selected parameter for a certain duration defined by the user. In this article we will explore some creative automation tricks and tips that will improve your mixes.
1. Creating Variations For Programmed Instruments
There are countless advantages of using MIDI, but one of the areas where this technology fails to deliver is in the realm of humanization. A programmed instrument most likely would have all notes playing in the same velocity, with the same articulation. A real instrument played by a person would naturally have a lot of variations in dynamics and articulations. The same can be done for MIDI instruments but the process often takes a lot of time and patience. Automations can be a great tool to create these variations quickly and efficiently. Automating the volume of a hi hat for example can help make it sound more natural, letting some hits be louder than others, similar to accents performed by a drummer. The pitch can also be automated to simulate articulations like vibrato and pitch bends. The pitch can also be automated in cents for instruments like drums to simulate the drum stick striking different regions of the drum skin. These techniques can add a lot of expression and dynamics to robotic MIDI sections.

Creative Drum And Percussion Sound Design
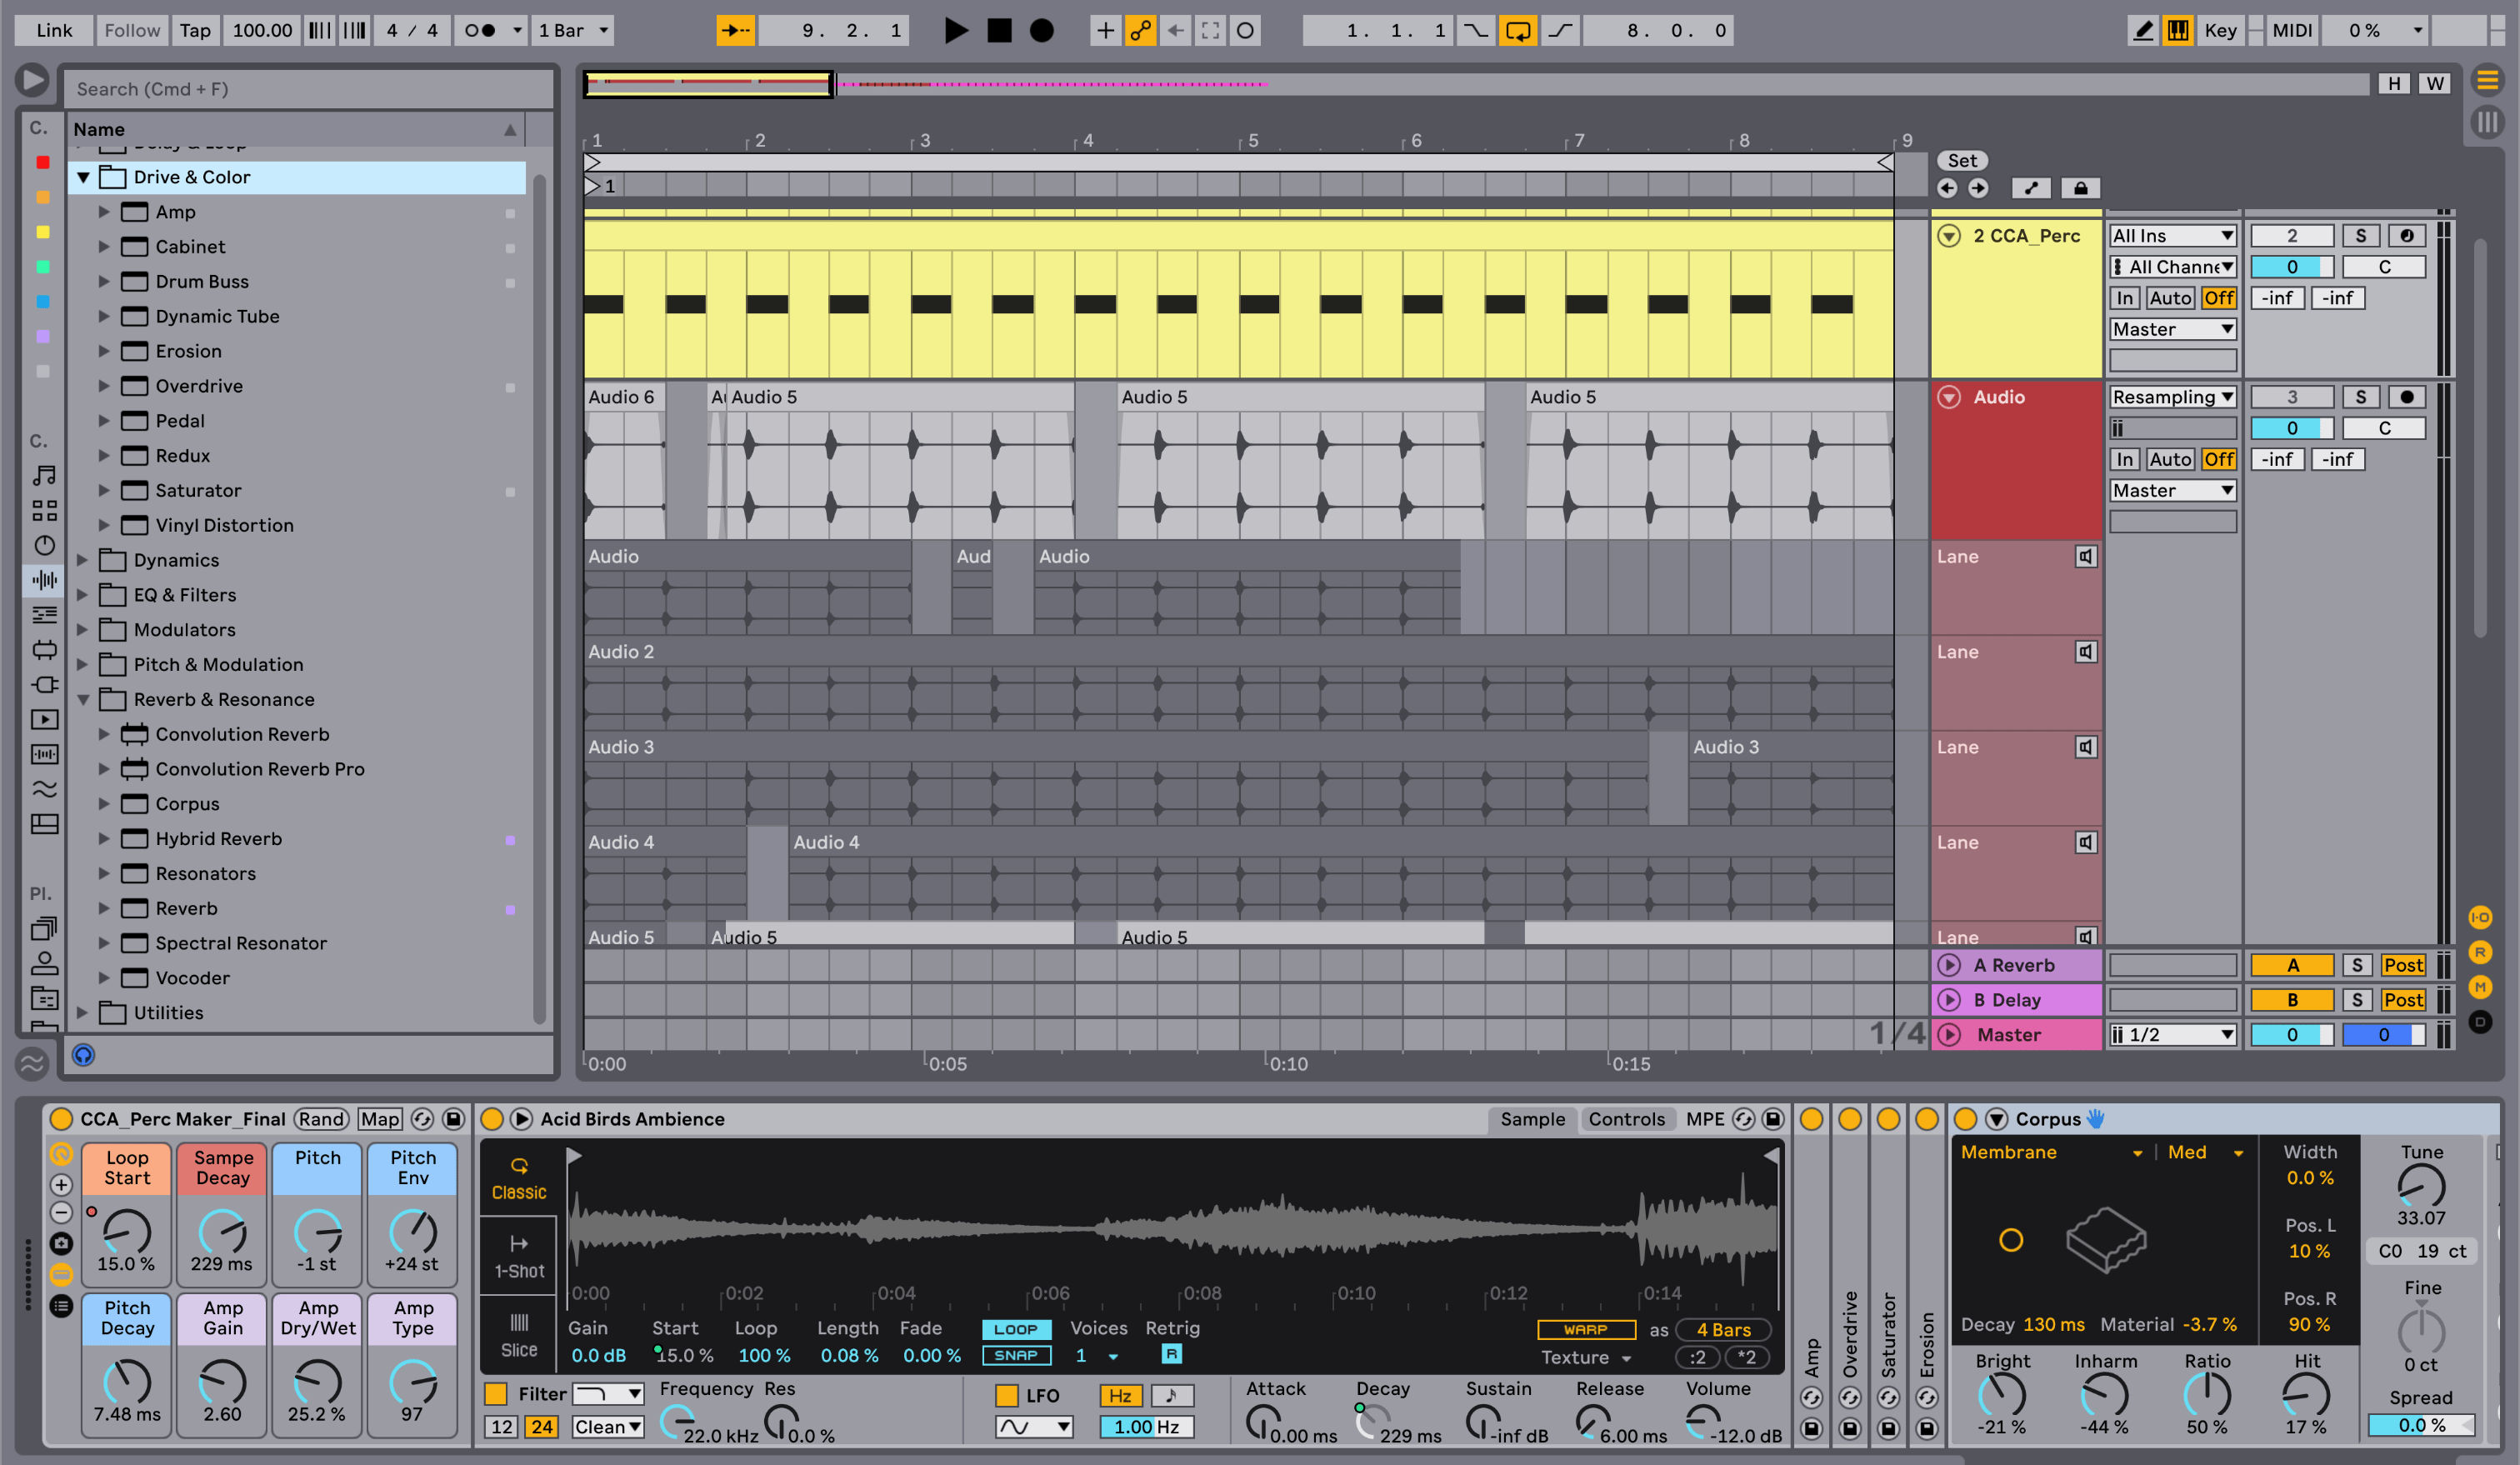
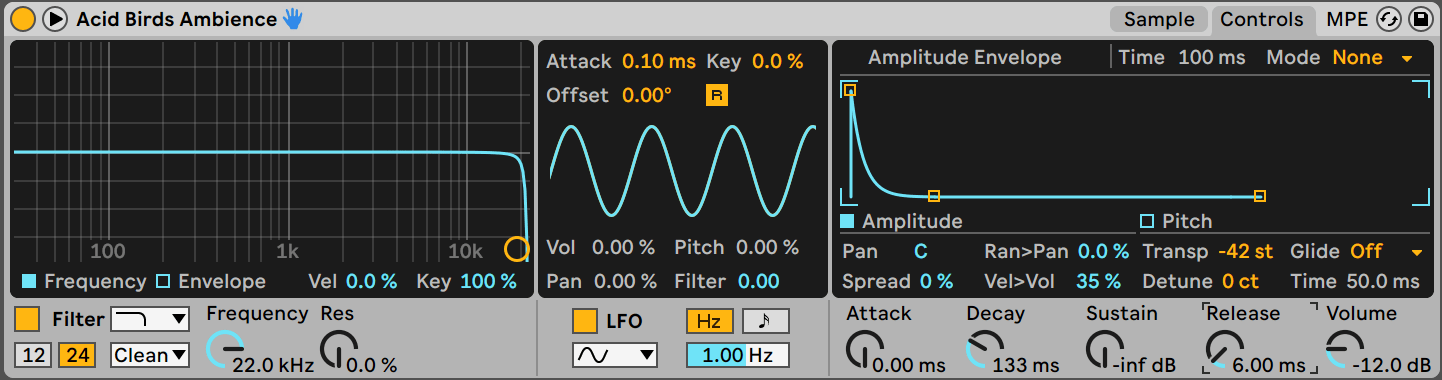
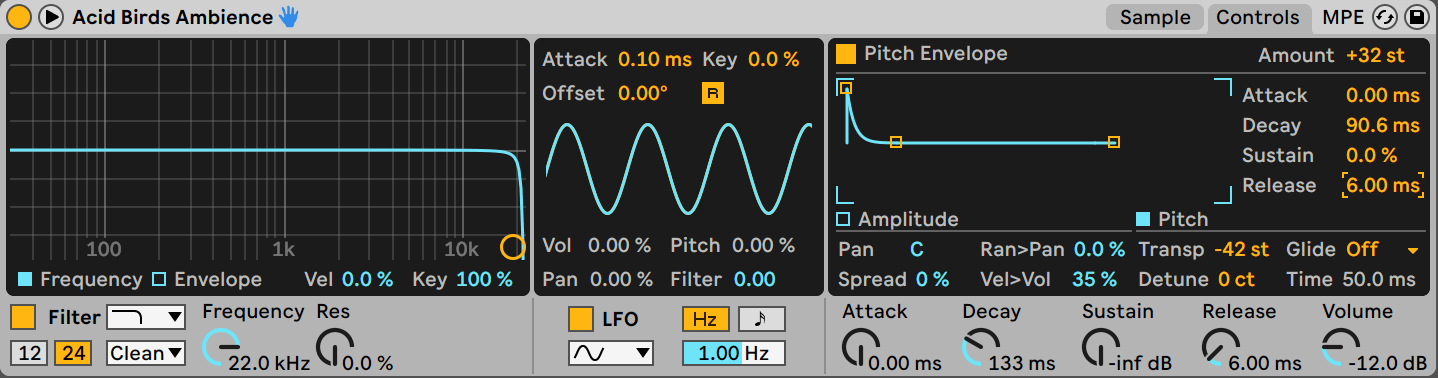
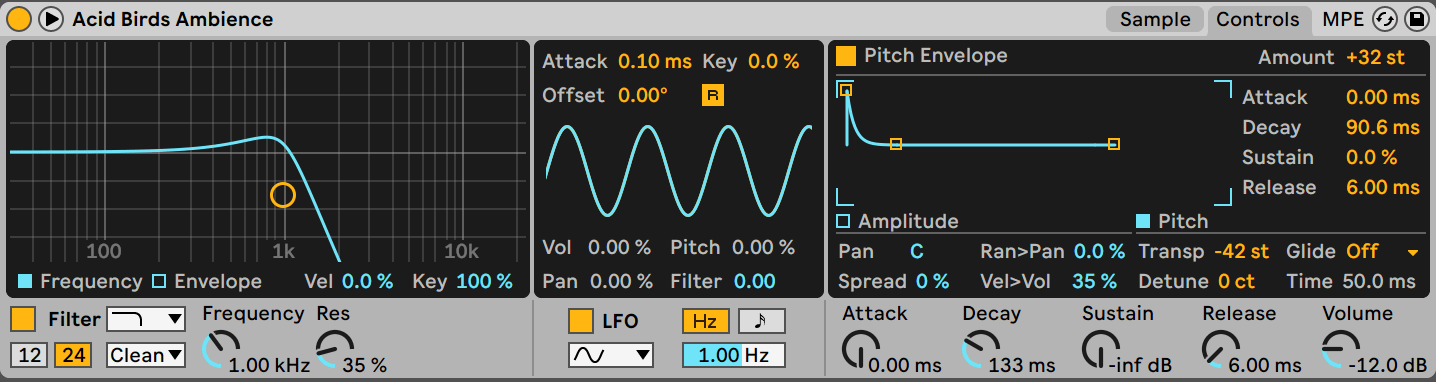
Ableton Live has a lot of tools for creative sound design. In this article we will explore an interesting technique to create your own unique percussion samples from scratch using any sample of your choice. This technique is extremely simple and effective for cooking up new perks quickly removing any need for incessant sample pack diving. We will be using Ableton's simpler for the main sound design aided with some audio effects.
Selecting the Sample
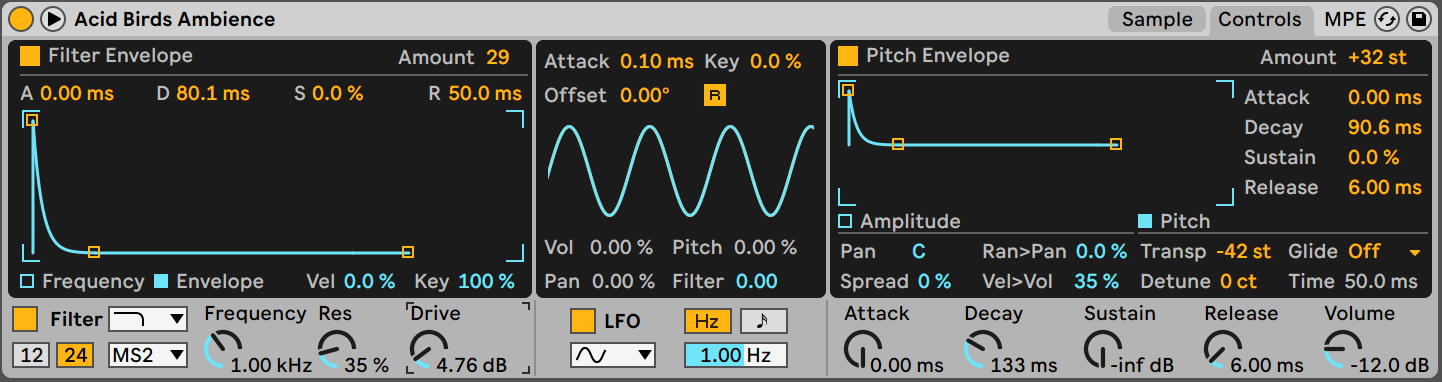
Theoretically you can use any sample you want but we will make the most out of this technique if we use loops or long samples that varies over time and has a lot of textures. Fx Loops are a great choice, so are vocal and bass loops. We have chosen the Acid Birds Ambience Fx loop from the Drive and Glow pack that comes with Ableton Live 11 Suite.
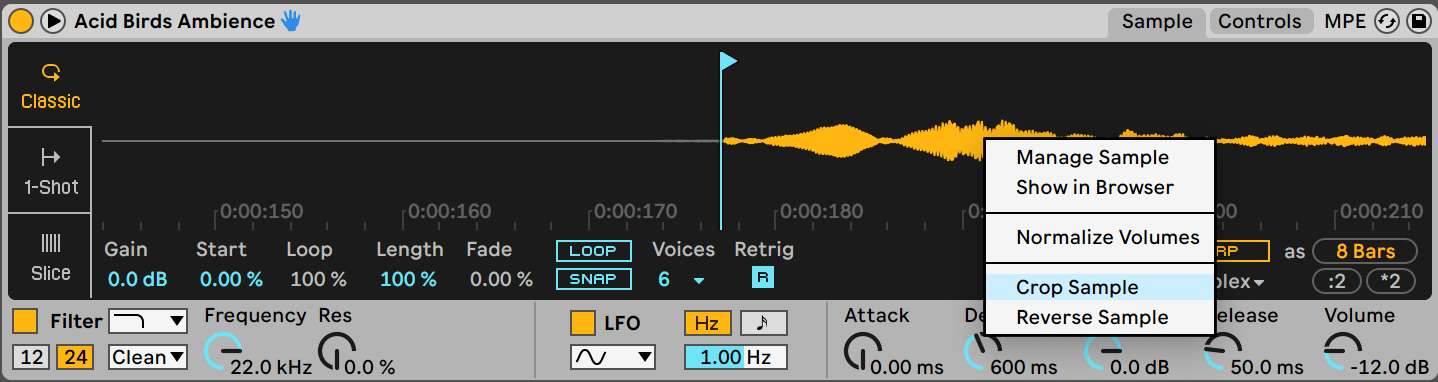
Processing the Sample with Ableton Simpler


Download Link: Click Here


Equalizers are among the most commonly used plugins in mixing and mastering tasks. Equalizers can be used for tone shaping, controlling problem areas in the frequency spectrum and enhancing certain frequencies to add presence. Equalizers have different filters that can attenuate or boost different parts of the frequency spectrum. In this article, we are going to take a look at the different types of Equalizers used in music production.


Basslines can be tricky for beginners to program. The bass plays a significant role in our mix because it provides energy and thickness to the track. Any track would sound thin and weak if bass frequencies are lowered beyond a point in a mix. In this article, we will explore a few techniques that can help us to come up with catchy basslines for our songs.


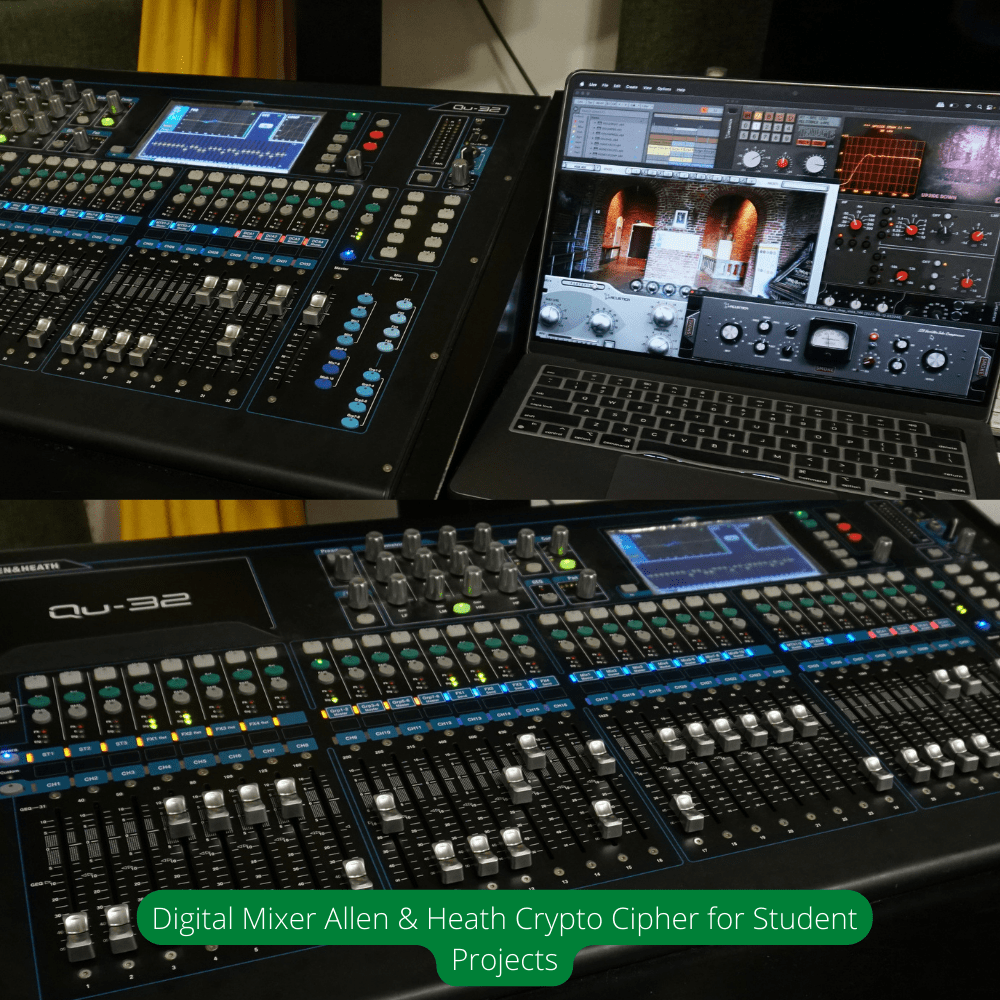
Top Sound Engineering Colleges in India | Crypto Cipher
Are you passionate about audio technology? Do you like to tweak knobs on various audio gears? If the answer is yes, then you should be considering a career in Sound Engineering. Crypto Cipher Academy can help you create a strong foundation for the future because we offer one of the best Sound Engineering Courses in India. Before we delve into what our academy can do for you, let us understand what is sound engineering at its core and what are the required prerequisites for a successful career in the field.
Duties of a Sound Engineer
1. Recording
2. Editing
3. Mixing
4. Mastering
5. Operating Soundboards, consoles and mixers
6. Operating outboard gear or analog equipment
7. Creating an acoustically optimised space suitable for music making
8. Maintaining audio equipment
9. Understanding various audio signals and levels
10. Maintaining a clean and noise-free signal flow within the studio or stage
1. Basic knowledge of Mathematics and Physics
2. Learning new technical concepts quickly
3. Interest and knowledge of technological development in the audio world
4. Understanding of audio and music
5. Problem Solving and Troubleshooting abilities
6. Communication abilities
7. A discerning ear for high quality audio
8. Attention to detail


Are You Looking for the Best Music Production Course in Delhi?
What do top artists like Dr. Dre, Kanye West, Metro Boomin, Calvin Harris, Skrillex, and DJ Snake have in common? They are masters in the art of music production. So, if you are a budding Rapper, Beat Maker, DJ, or EDM Producer, then you have come to the right place. Crypto Cipher Academy can help you by offering one of the best music production courses in Delhi. Our advanced courses have comprehensive modules on sound recording, editing, track arrangements, music theory, mixing, mastering, studio interconnection, and acoustics among many others that will bring any student up to par with industry professionals.
What Is Music Production?
Music Production is an inter-disciplinary process by which music is created, edited, perfected, and then presented to the public. In more concrete terms, music production refers to the song-making process from composition and arrangement to mixing and mastering. The music production process consists of mainly six steps:
- Composition
- Arrangement
- Recording
- Editing
- Mixing
- Mastering
What Does A Music Producer Do?
The role of a Music Producer is rather expansive and subject to change according to the genre and technology available. Crypto Cipher is regarded as one of the best music production courses in Delhi because we help budding music producers to create a vision and help them realize it. Our modules train the student in all the necessary skills that are expected from a music producer. These skills include:
- Setting up recording sessions with the artist
- Operating studio equipment
- Operating a digital audio workstation or DAW
- Songwriting and providing structure to the music
- Maintaining sample libraries and plugin collections for access to sounds
- Recording instruments and vocals
- Mixing and Mastering or hiring a specialized sound engineer and guiding them.
Do I Need Training In Music Production To
Become A Music Producer?
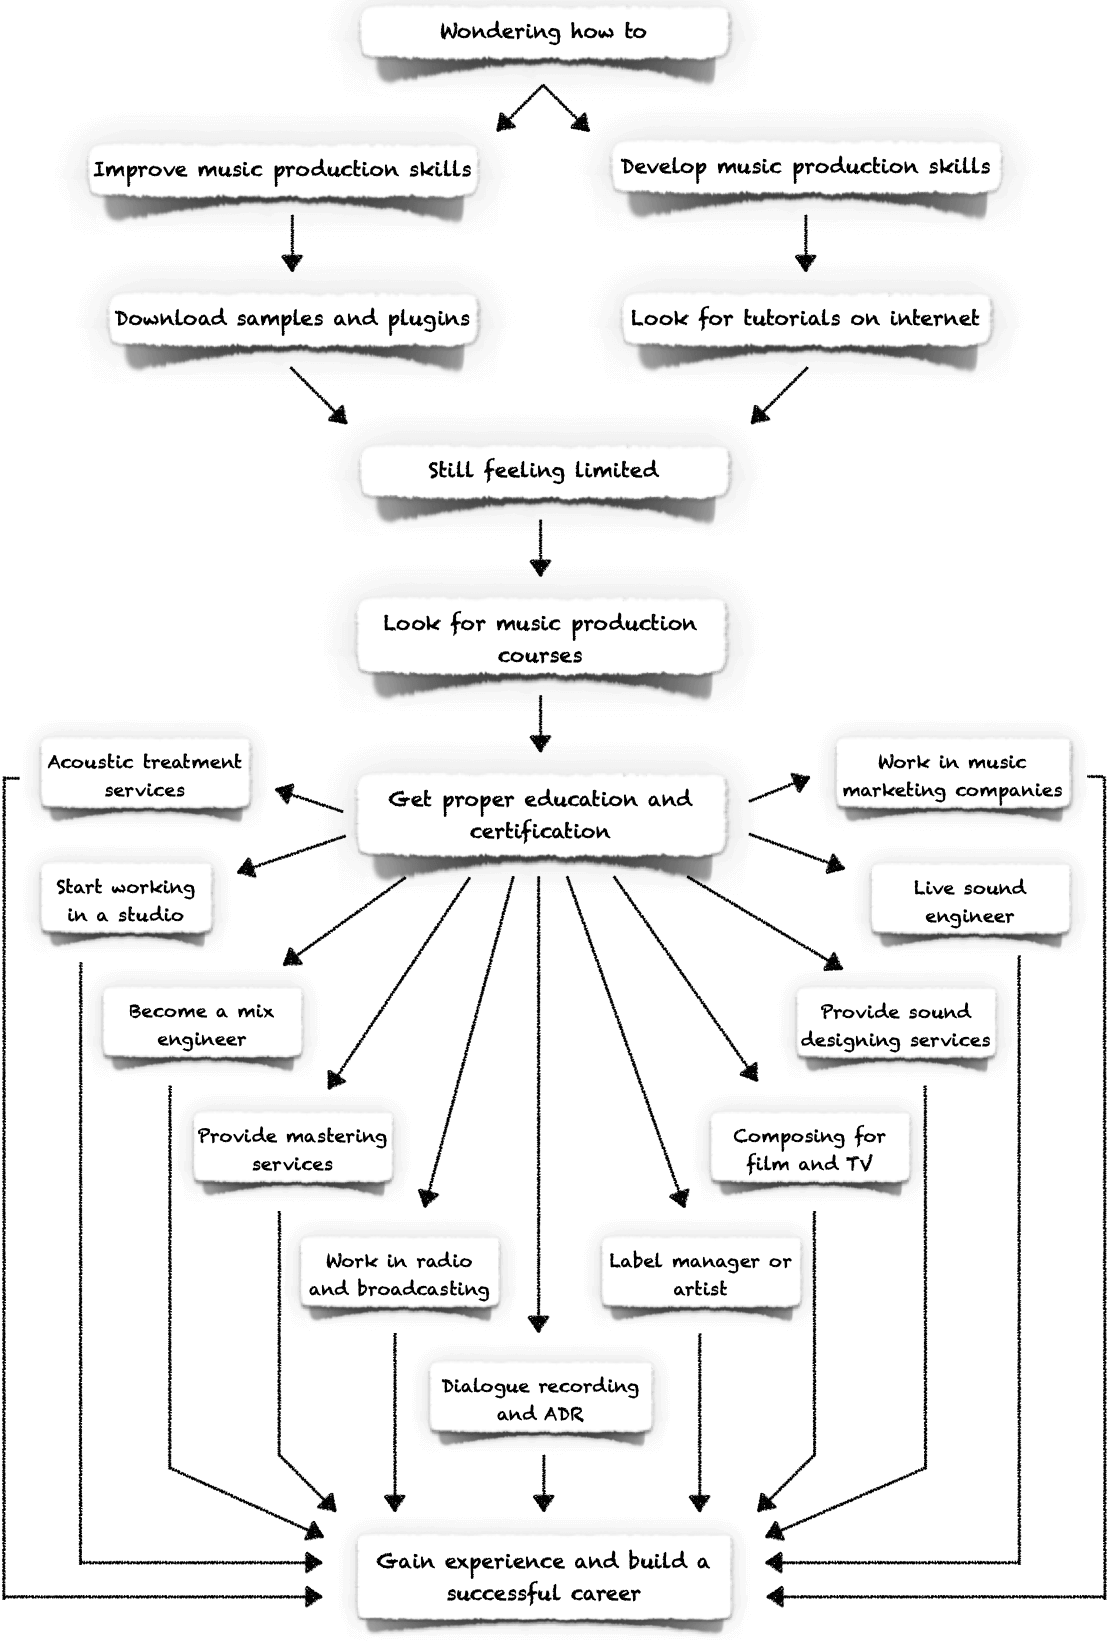
Getting professional training would be a smart move if you want to take up music production as a full-time vocation. With proper training and certification, you can get work in a studio, production house, club, or training institute as a paid employee or an intern. Obviously, there are many examples of music producers who never had any formal training but these artists are dime a dozen. Even if you already possess all the traits of a successful music producer, a proper education in the field can help you polish your skills and take them to the next level. Consult the flowchart below for a simplified look at the trajectory of a music producer from beginner to professional.
Why Select Crypto Cipher Academy for learning Music Production Courses in Delhi?
Our course is considered to be among the best music production course in Delhi because we compartmentalize the responsibilities of a music producer into comprehensive modules that come together to provide the students with a strong foundation. We cultivate knowledge in a way that a music producer can be self-sufficient and expertly navigate through all six steps of the music production process. We have separate modules that individually cover topics like recording, using a daw to make music, sound design, using different types of consoles, studio acoustics, mixing, and mastering in great detail. The students will be taught in state-of-the-art classrooms and studios with industry-standard equipment that the professionals use. They are taught by faculty members who are experienced in their respective fields and dedicate a lot of attention towards the development of each and every student. As a sample library developer Crypto Cipher is recognized worldwide. Our products are used by renowned composers and music producers for everything from Hollywood movies to game sound design.
What Would a Career in Music Production Look Like after Crypto Cipher?
Your music production career will get a kickstart after you complete one of the best music production courses in Delhi with Crypto Cipher Academy. There are many avenues to earn a decent living in this profession. As the industry grows bigger, every year a greater demand for skilled music producers is generated. Other than music production the students can take up vocations like mix engineer, mastering engineer, sound designer, sample library developer, beatmaker, live performance, live sound engineer, film dialogue related work, recording engineer, audio editor, film and TV composer, midi programmer, ADR work, audio post-production work and many more. The student can also seek employment in studios, sound rental companies, sound installation companies, radio and broadcasting, production houses, film/game sound design, and foley recording services. They can also start their own studio to provide services to clients and grow their own business. Another option is to work in other music-related fields like music marketing, working with labels & studios as skilled artists or managers, audio equipment dealers for marketing and demonstrations, and also work for acoustic treatment companies.
Frequently Asked Questions of Students and Admission Seekers
- What Equipment Do I Need to Start in Music Production?
You do not need a lot of equipment to start music production. However, there are a few things that are absolutely necessary like a computer and a DAW which is compatible with your DAW.
- What DAW will we learn?
We will be learning two DAWs. Logic Pro and Ableton Live ( Level 1 & 2 - Advanced )
- Is Knowledge of Acoustics Necessary for a Music Producer?
The environment in which music is produced has a massive influence on the end result. Music is produced in a room most of the time. The room has a tone of its own that colors the output offer speakers. Not only does the room color the sound, but the placement of your speakers inside the room will also change your output considerably. This distorts our perception of the music we hear. At Crypto Cipher we offer a dedicated module on studio acoustics that provides the student with the knowledge that they can use to fine-tune their own production space and also build their own studio. Please read Acoustics Module for more details.
- Is Knowledge of Mixing and Mastering Necessary for a Music Producer?
One can hire a specialized mixing/mastering engineer but they lose creative control of their music. More and more music producers opt to mix and master their own songs. A thorough understanding of the mixing and mastering process will be useful even if you do hire an engineer for the job because then you can guide them to realize the vision you have for your music. Although we encourage each student to learn "The Art of Mixing & Mastering"
- I just want to learn DAW so is it okay if I don't like other modules?
For students who only want to master DAWs, we offer a 2 monthly course that will give you a strong foundation for music production but we encourage students to take Diploma courses as all the modules have been designed for a successful music career, not to mention you don't want to miss best music production course in Delhi which is carefully designed step by step process to make candidate powerhouse of Knowledge. Please read about Complete Music Production & Sound Engineering Modules details on Crypto Cipher Academy Website
- How do I get my certification?
The student needs to pass all the exams for individual modules and also submit all the projects that are assigned. On completion, we will provide the student with our certificate.
- Are there online classes?
We only offer online classes during lockdowns. Otherwise, classes are held at the Academy. A lot of topics cannot be covered properly with online classes. Module-like ones involving studio equipment require the student to be physically present in the studio to understand it to the best of their abilities.
- What is the Eligibility for this course?
Besides having a genuine interest in the music-making process, students must have a general idea about computers, operating systems, and basic mathematics.
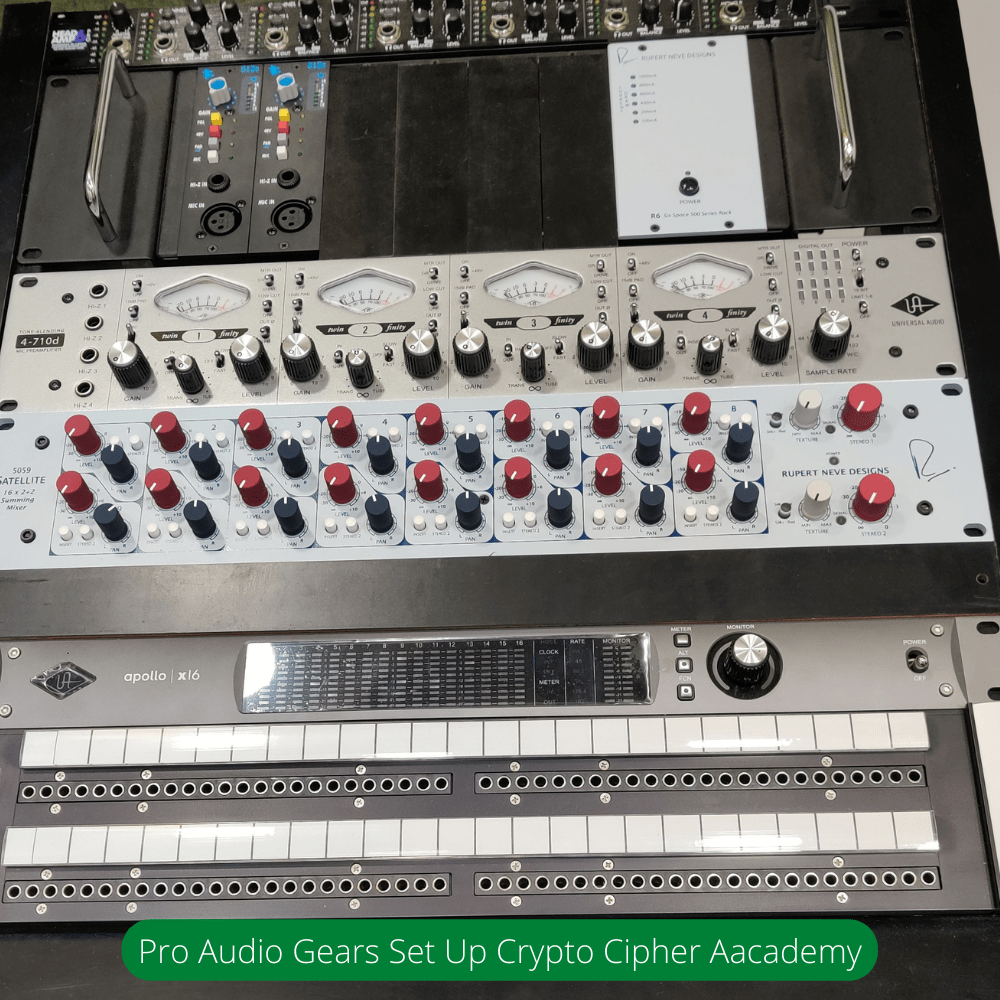
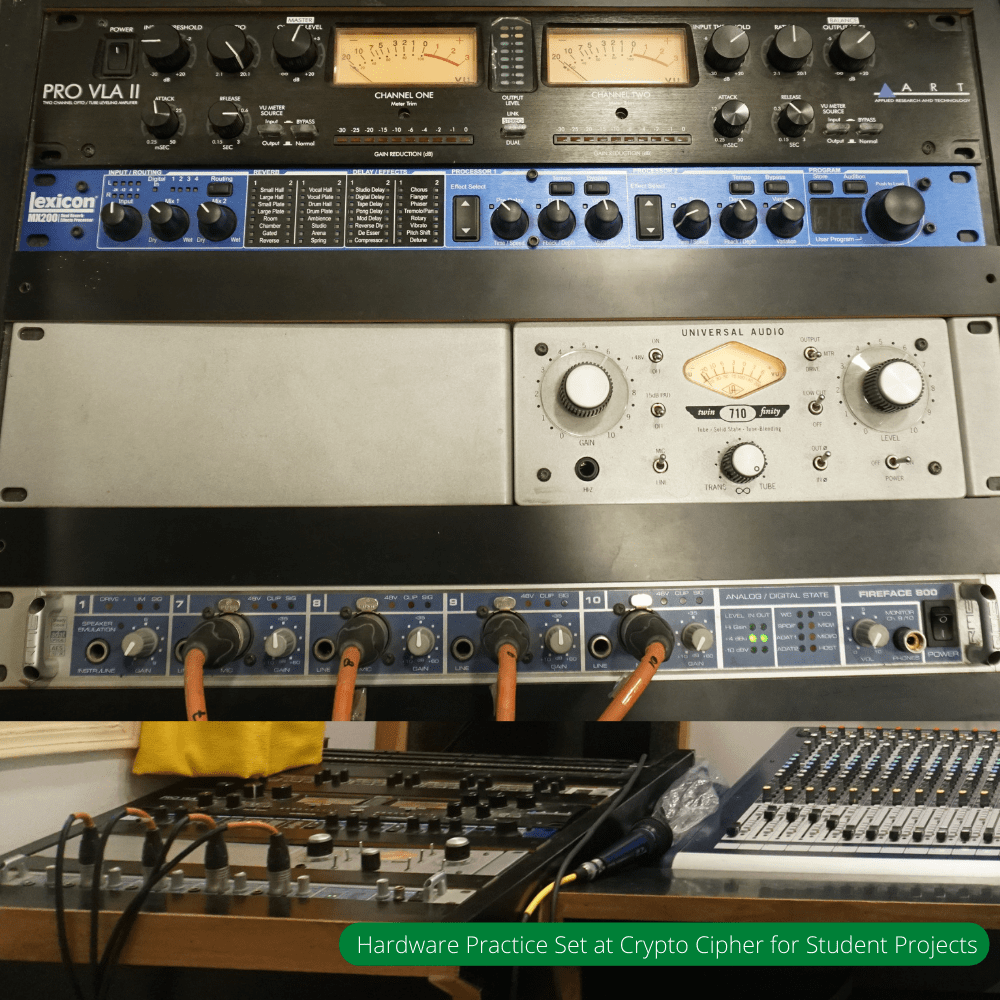
- What are the facilities at the Academy?
At Crypto Cipher Academy classes are held at two of our project studios. Students are trained with equipment that is commonly used by industry professionals. Please visit Studio Equipment Page for further detailed information.
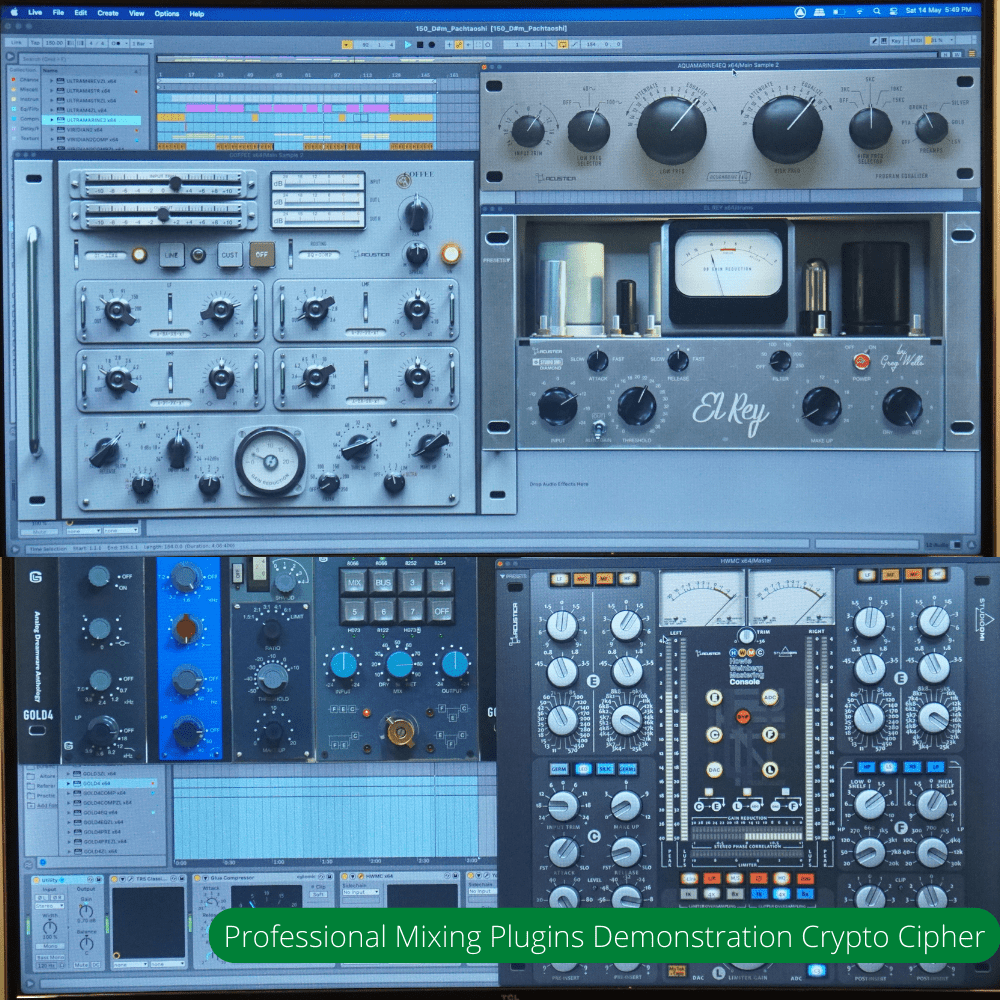
- What plugins will I learn during the course?
Students are taught using the best plugins available to music producers. We use various plugins from leading developers like Izotope, Native Instruments, Fabfilter, XFER, Waves, and UAD, among others. Please read Mixing & Mastering Module for detailed information

There are different types of Compression techniques for different types of Compressors. Mentioned few useful steps to enhance the control over your Mix. There are 7 tips to understand different types of Compressors and Compression in context to variety of Mixing situations. They are discussed as follows:
There are different types of Compression techniques for different types of Compressors. Mentioned few useful steps to enhance the control over your Mix. There are 7 tips to understand different types of Compressors and Compression in context to variety of Mixing situations. They are discussed as follows:
Step 1: Using different types of compressors appropriately
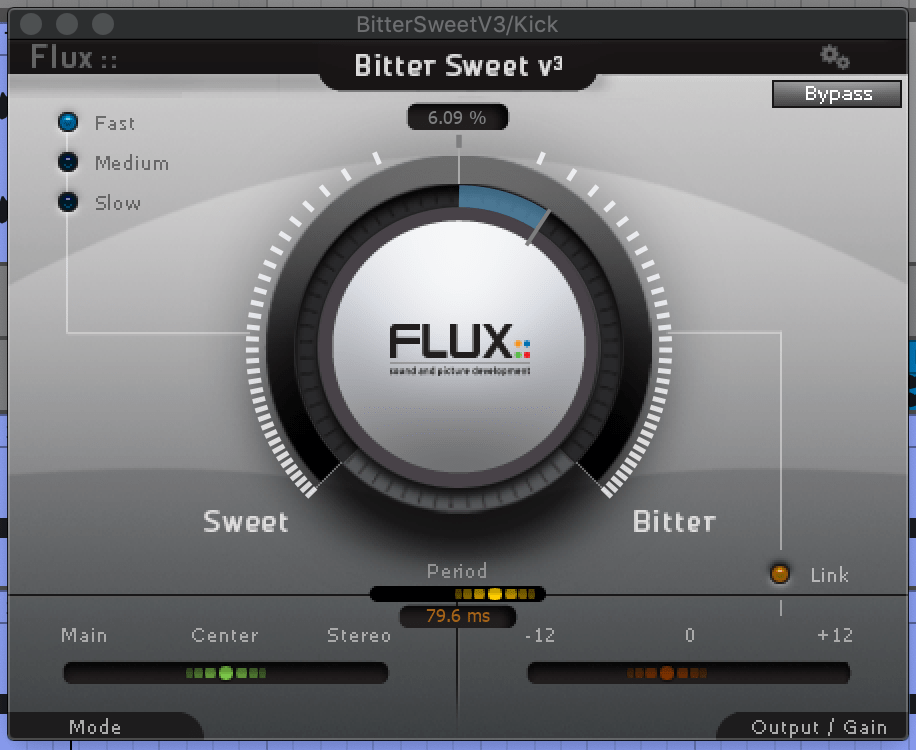
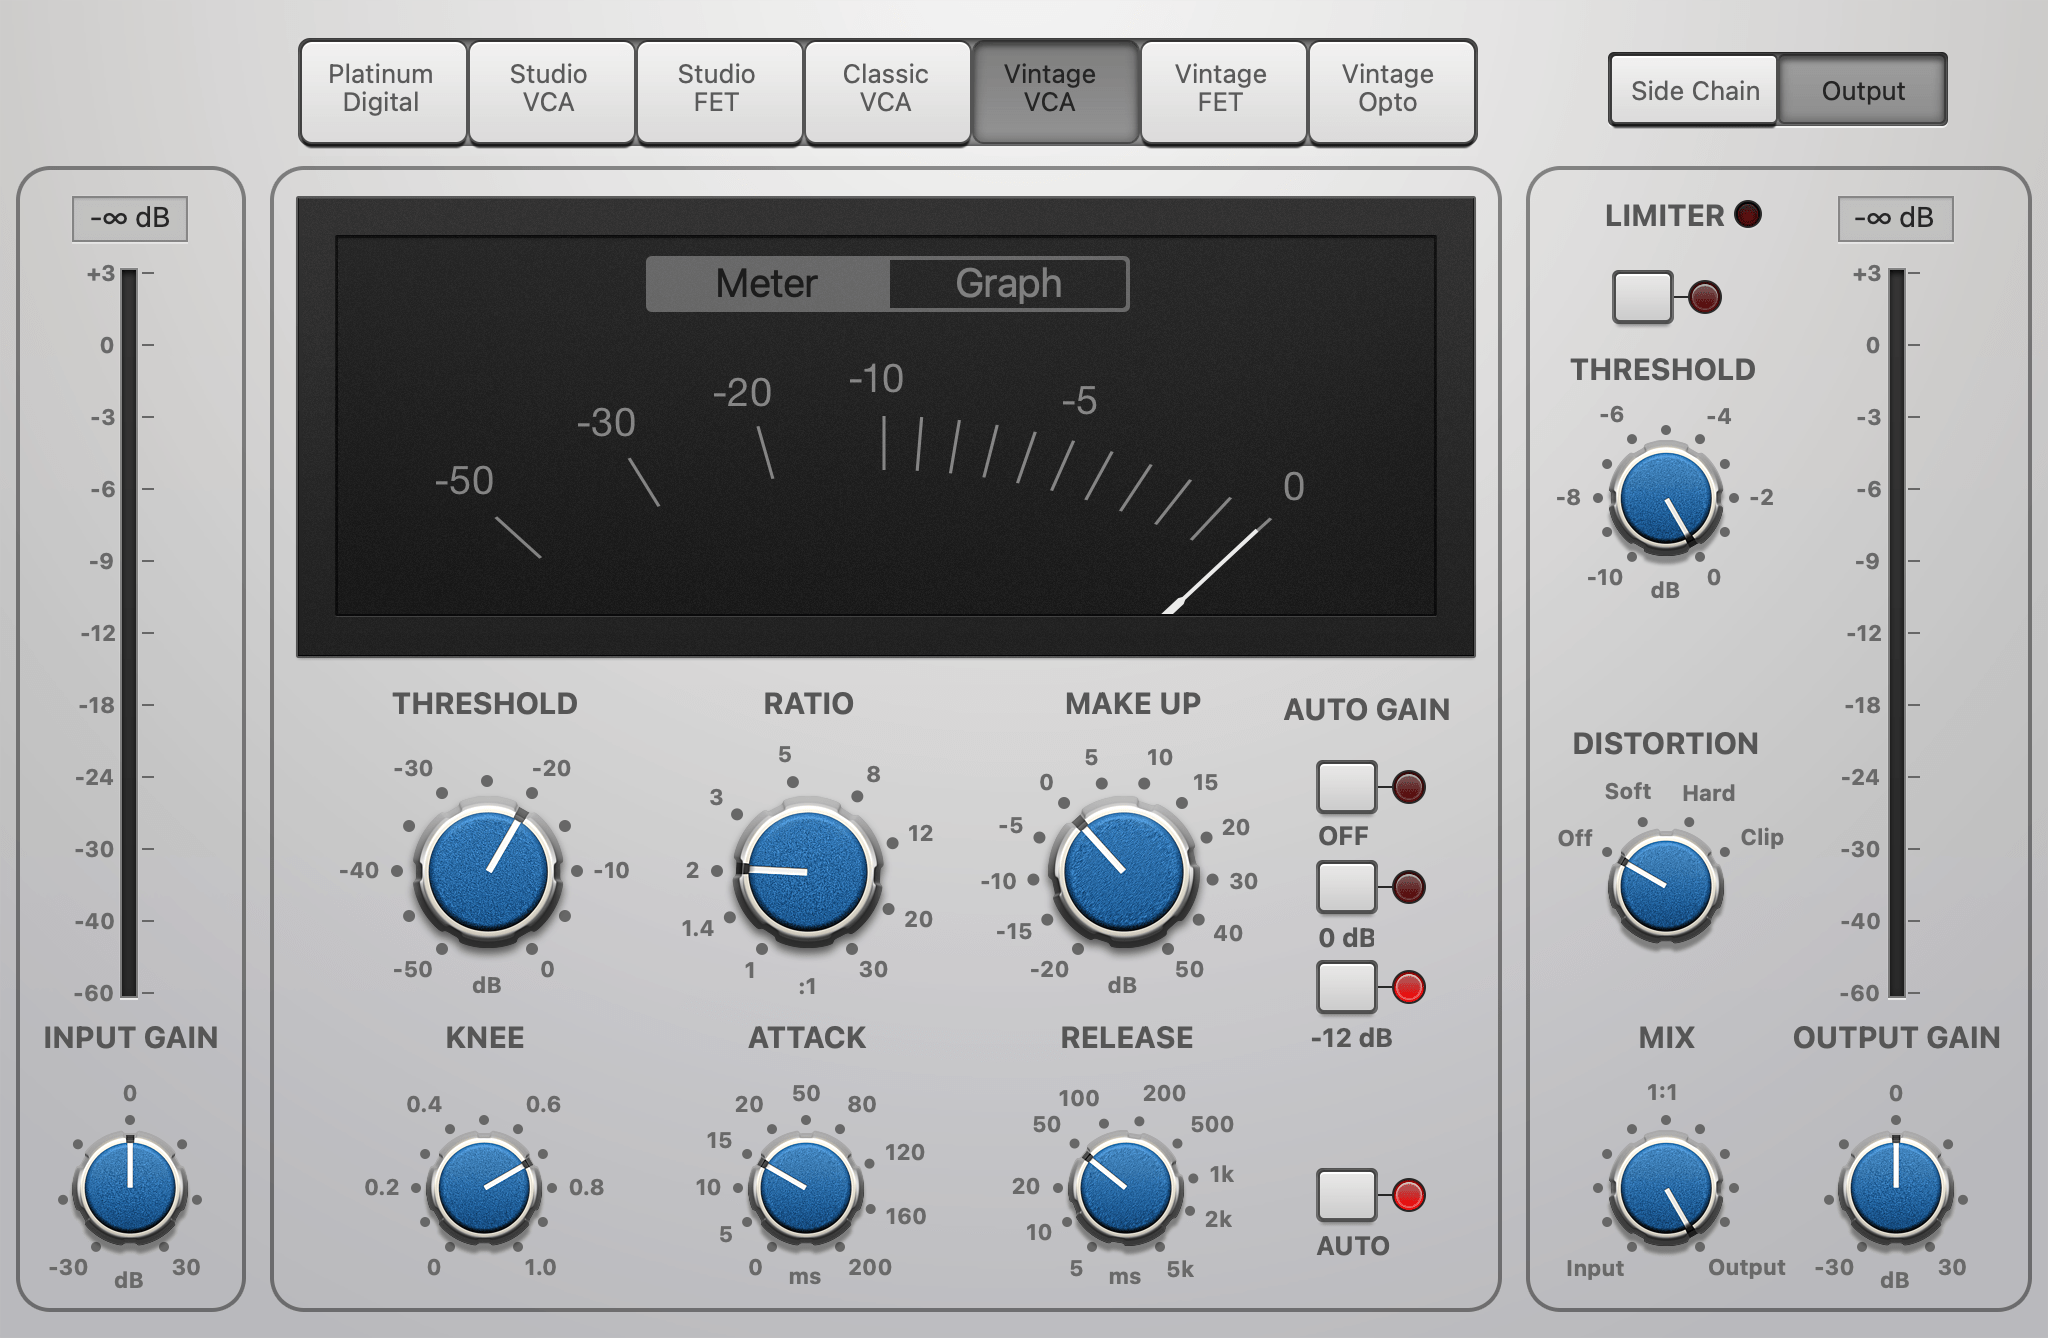
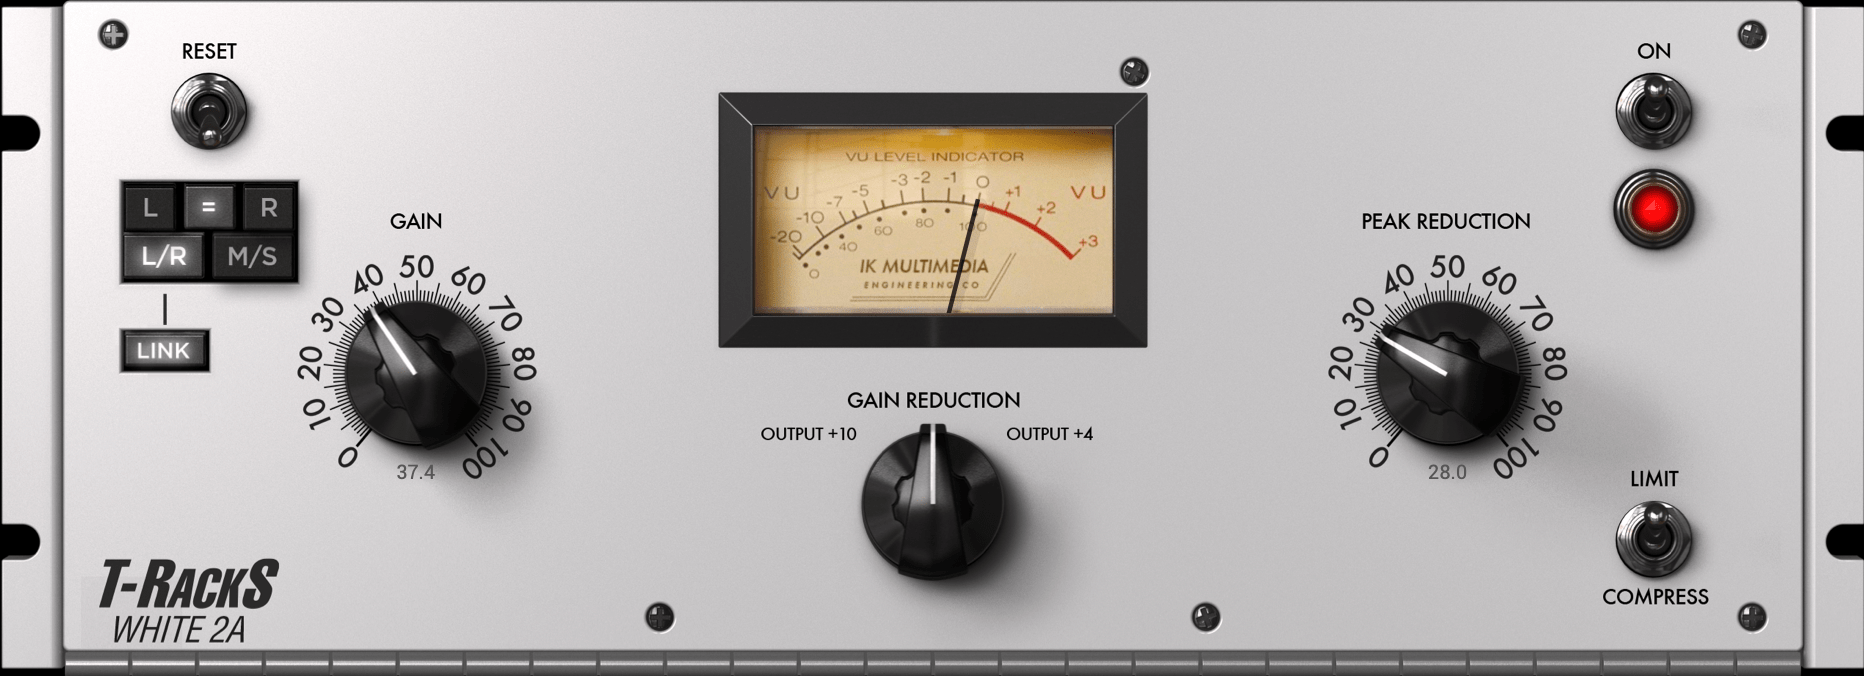
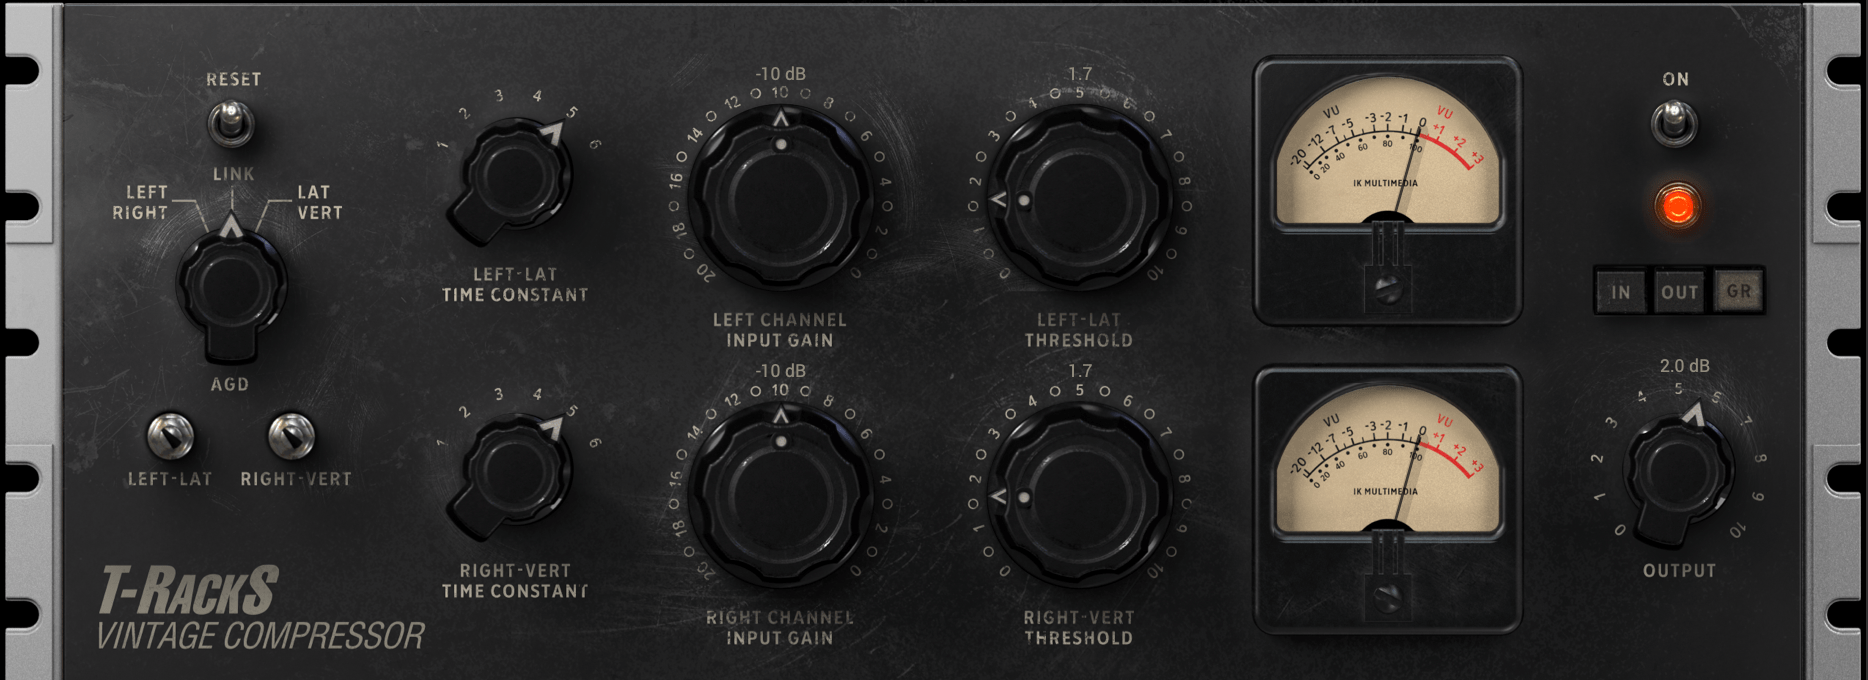
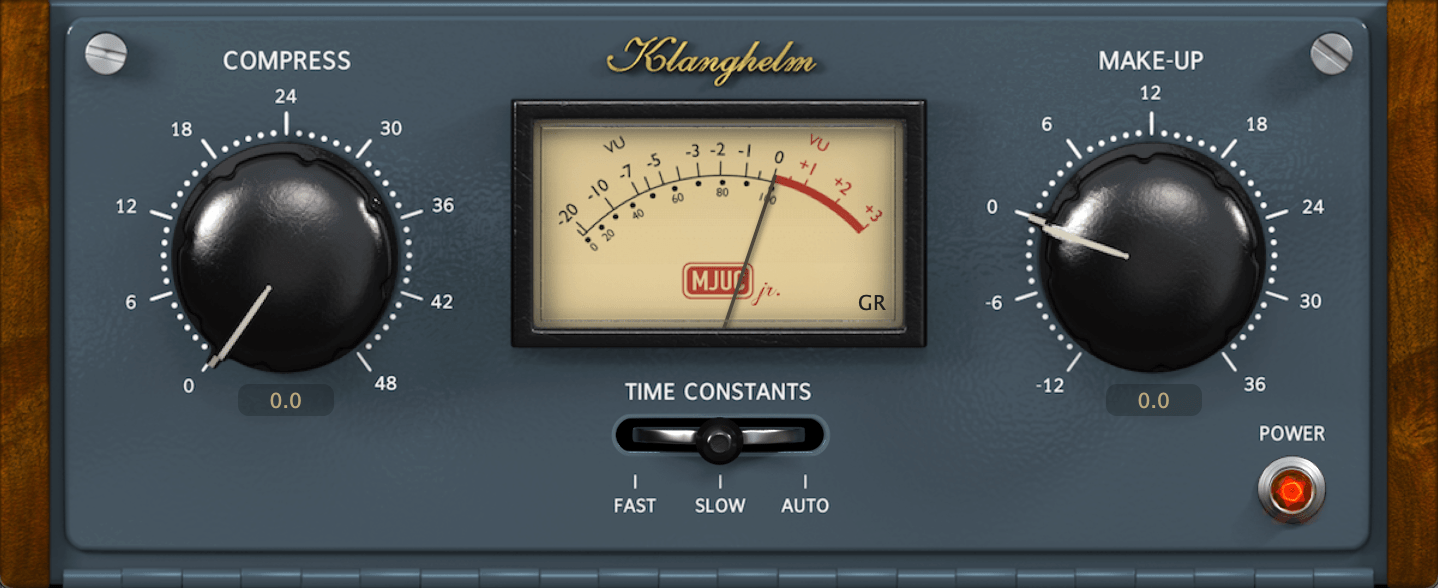
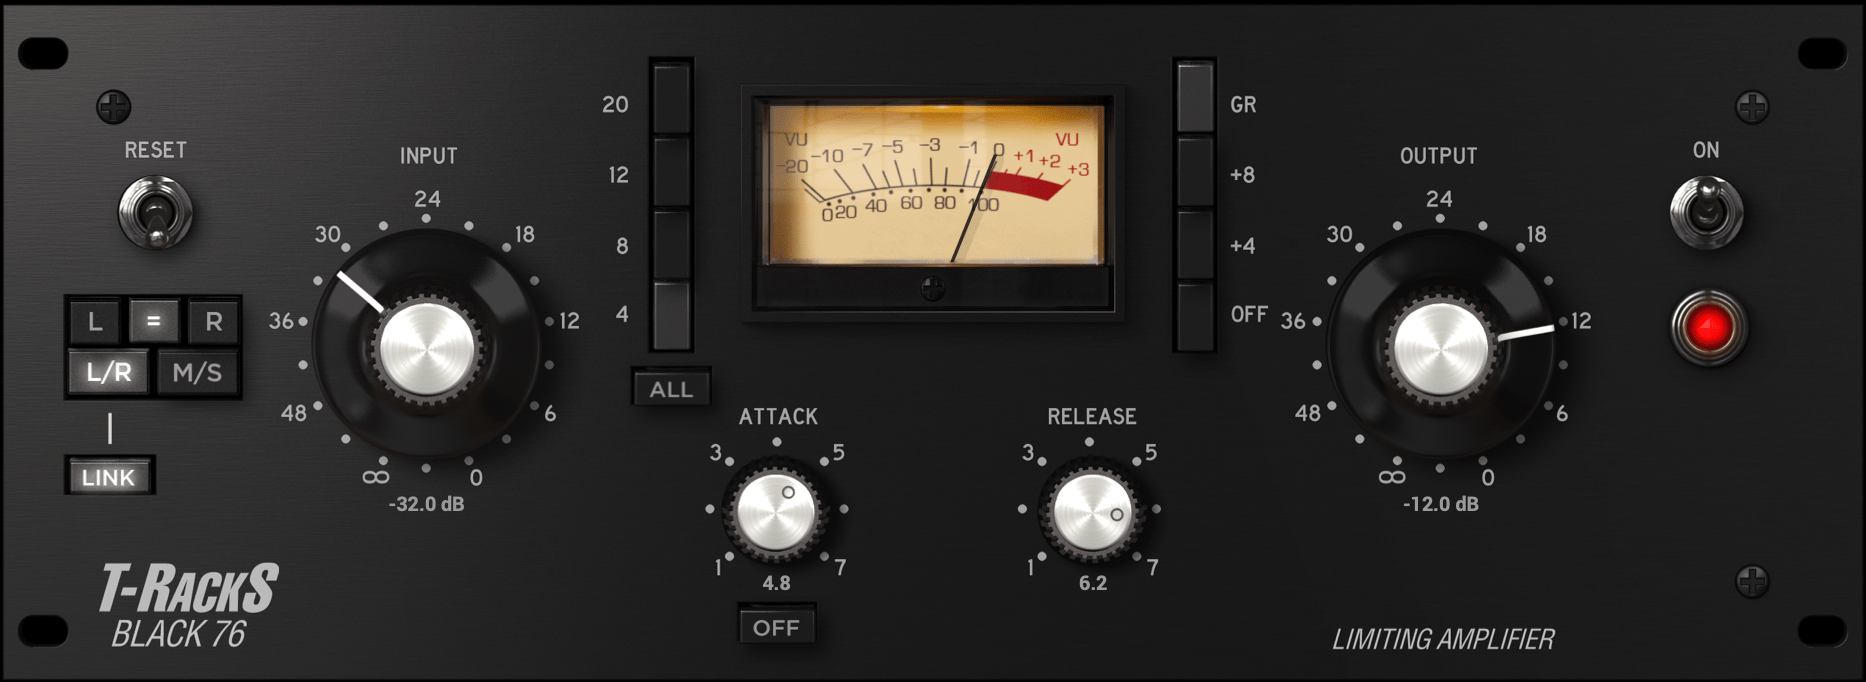
There are different types of compressor plugins that you can invest in. If you are not applying these compressors in the appropriate situation then your investments won't bear good results. Different types of compressors sound different in the same situation. Depending on the different types of compressors we are using, harmonic saturation may or may not be added to our signal. There are four main types of compressors plugins namely; VCA, FET, Opto, and Tube. VCA compressors are the most flexible among the four because they don't add much harmonics to your signal. They can work on a range of attack and release times and knee values. They serve their purpose irrespective of the situation. FET compressors are not as flexible as VCA's but they are known for adding audible coloration to our signal and quick attack times. Consequently, FETs are not used in mastering or mixing airy vocals, but they are quite sought after for drum busses, aggressive vocals, and fast-paced guitars or bass. Opto compressors also color our signal but to a lesser extent, as a result, they are used widely on vocals and sounds with a medium to long decay. They have a slow attack and release time. Some options don't even have the variable attack or release controls. Tube compressors are the oldest of these four compressor types. They have very slow attack and release times and add the most amount of color among the four types. They are used for gluing different sounds together and applying pressure to our signal. We need to be cognizant as to why we are using any compressor otherwise, we run the risk of playing around with knobs rather than working on a mix.

Step 2: Never Compress without any purpose

Let us analyze the image above where we can see a highlighted sample and a non-highlighted one. If we compare the dynamics of the two, it becomes clear that the highlighted loop is more compressed than the second loop. The second loop has a lot of differences between the louder and softer sections meaning it has a greater dynamic range. The highlighted loop we can tell directly from looking at the waveform, that it has a considerably lower dynamic range. Adding a compressor to further flatten the dynamics of our highlighted loop would be a redundant activity in most cases as it will totally destroy any natural dynamics of our loop. It is important to inspect our sound both visually and by ear to decide whether a compressor is required or not. In a lot of situations, our sample is programmed or performed as such, that the natural dynamics are a major part of the overall expressiveness of the song, then compression would not be required. Many beginners mistakenly compress every track. Compressors were originally meant to be used for solving audio issues relating to dynamics instead of riding our channel fader. If a signal is more or less dynamically consistent or the dynamics sound pleasant then it is better not to compress.
Step 3: Enhancing punch with an attack time
Compression can be used to enhance the attack of or signal, making the output more punchy. Here the compressor is being used to boost dynamics rather than to attenuate. We will have to adjust our threshold and attack time setting for this effect to work.
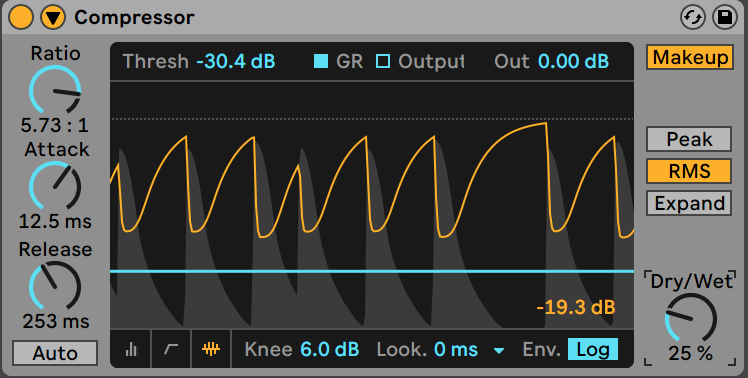
Let us examine the image above. We are feeding a kick drum pattern into our compressor. A kick transient is composed of a short tick sound triggered when the beater hits our drum skin along with the longer body of the kick drum created by the resonating chassis of the kick. We can adjust our threshold such that the compressor attenuates both the punch and a part of the sustain. The attack of a kick is very fast, so we can adjust the attack time of our compressor such that it acts more on the sustain of the kick. Thus sustain has been attenuated, while the attack is not, giving us the perception that we have increased the push of the kick. We will need to adjust our makeup gain so we can compensate for the attenuation.
Step 4: Use the sidechain EQ on your compressor for frequency focused dynamic control
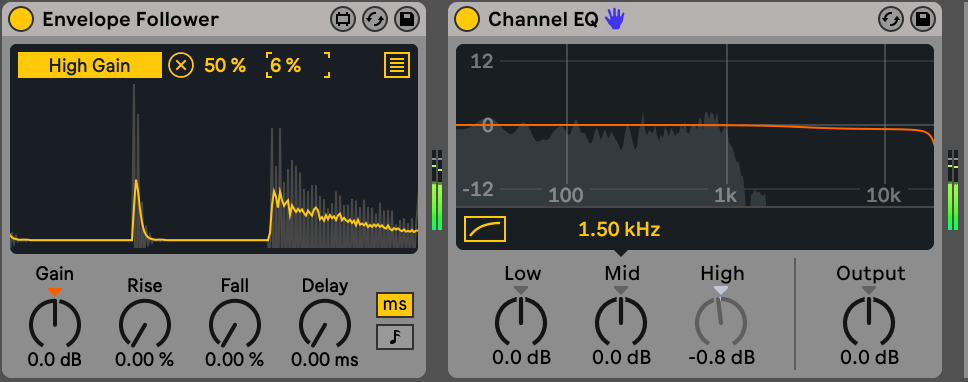
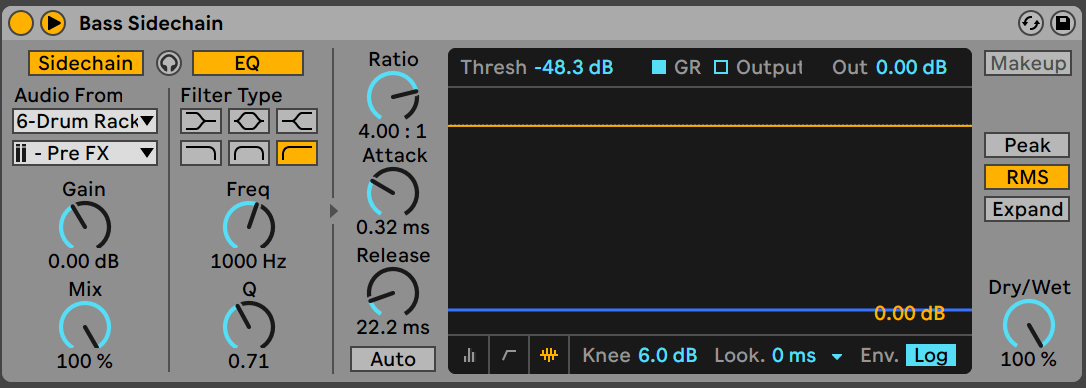
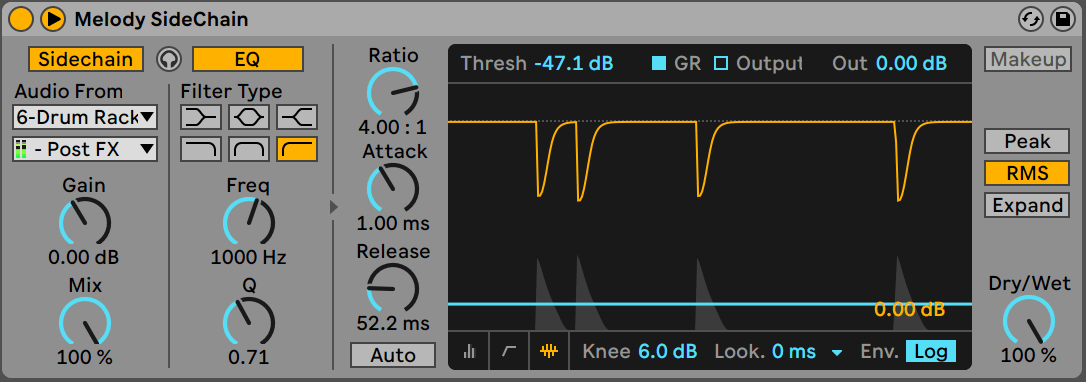
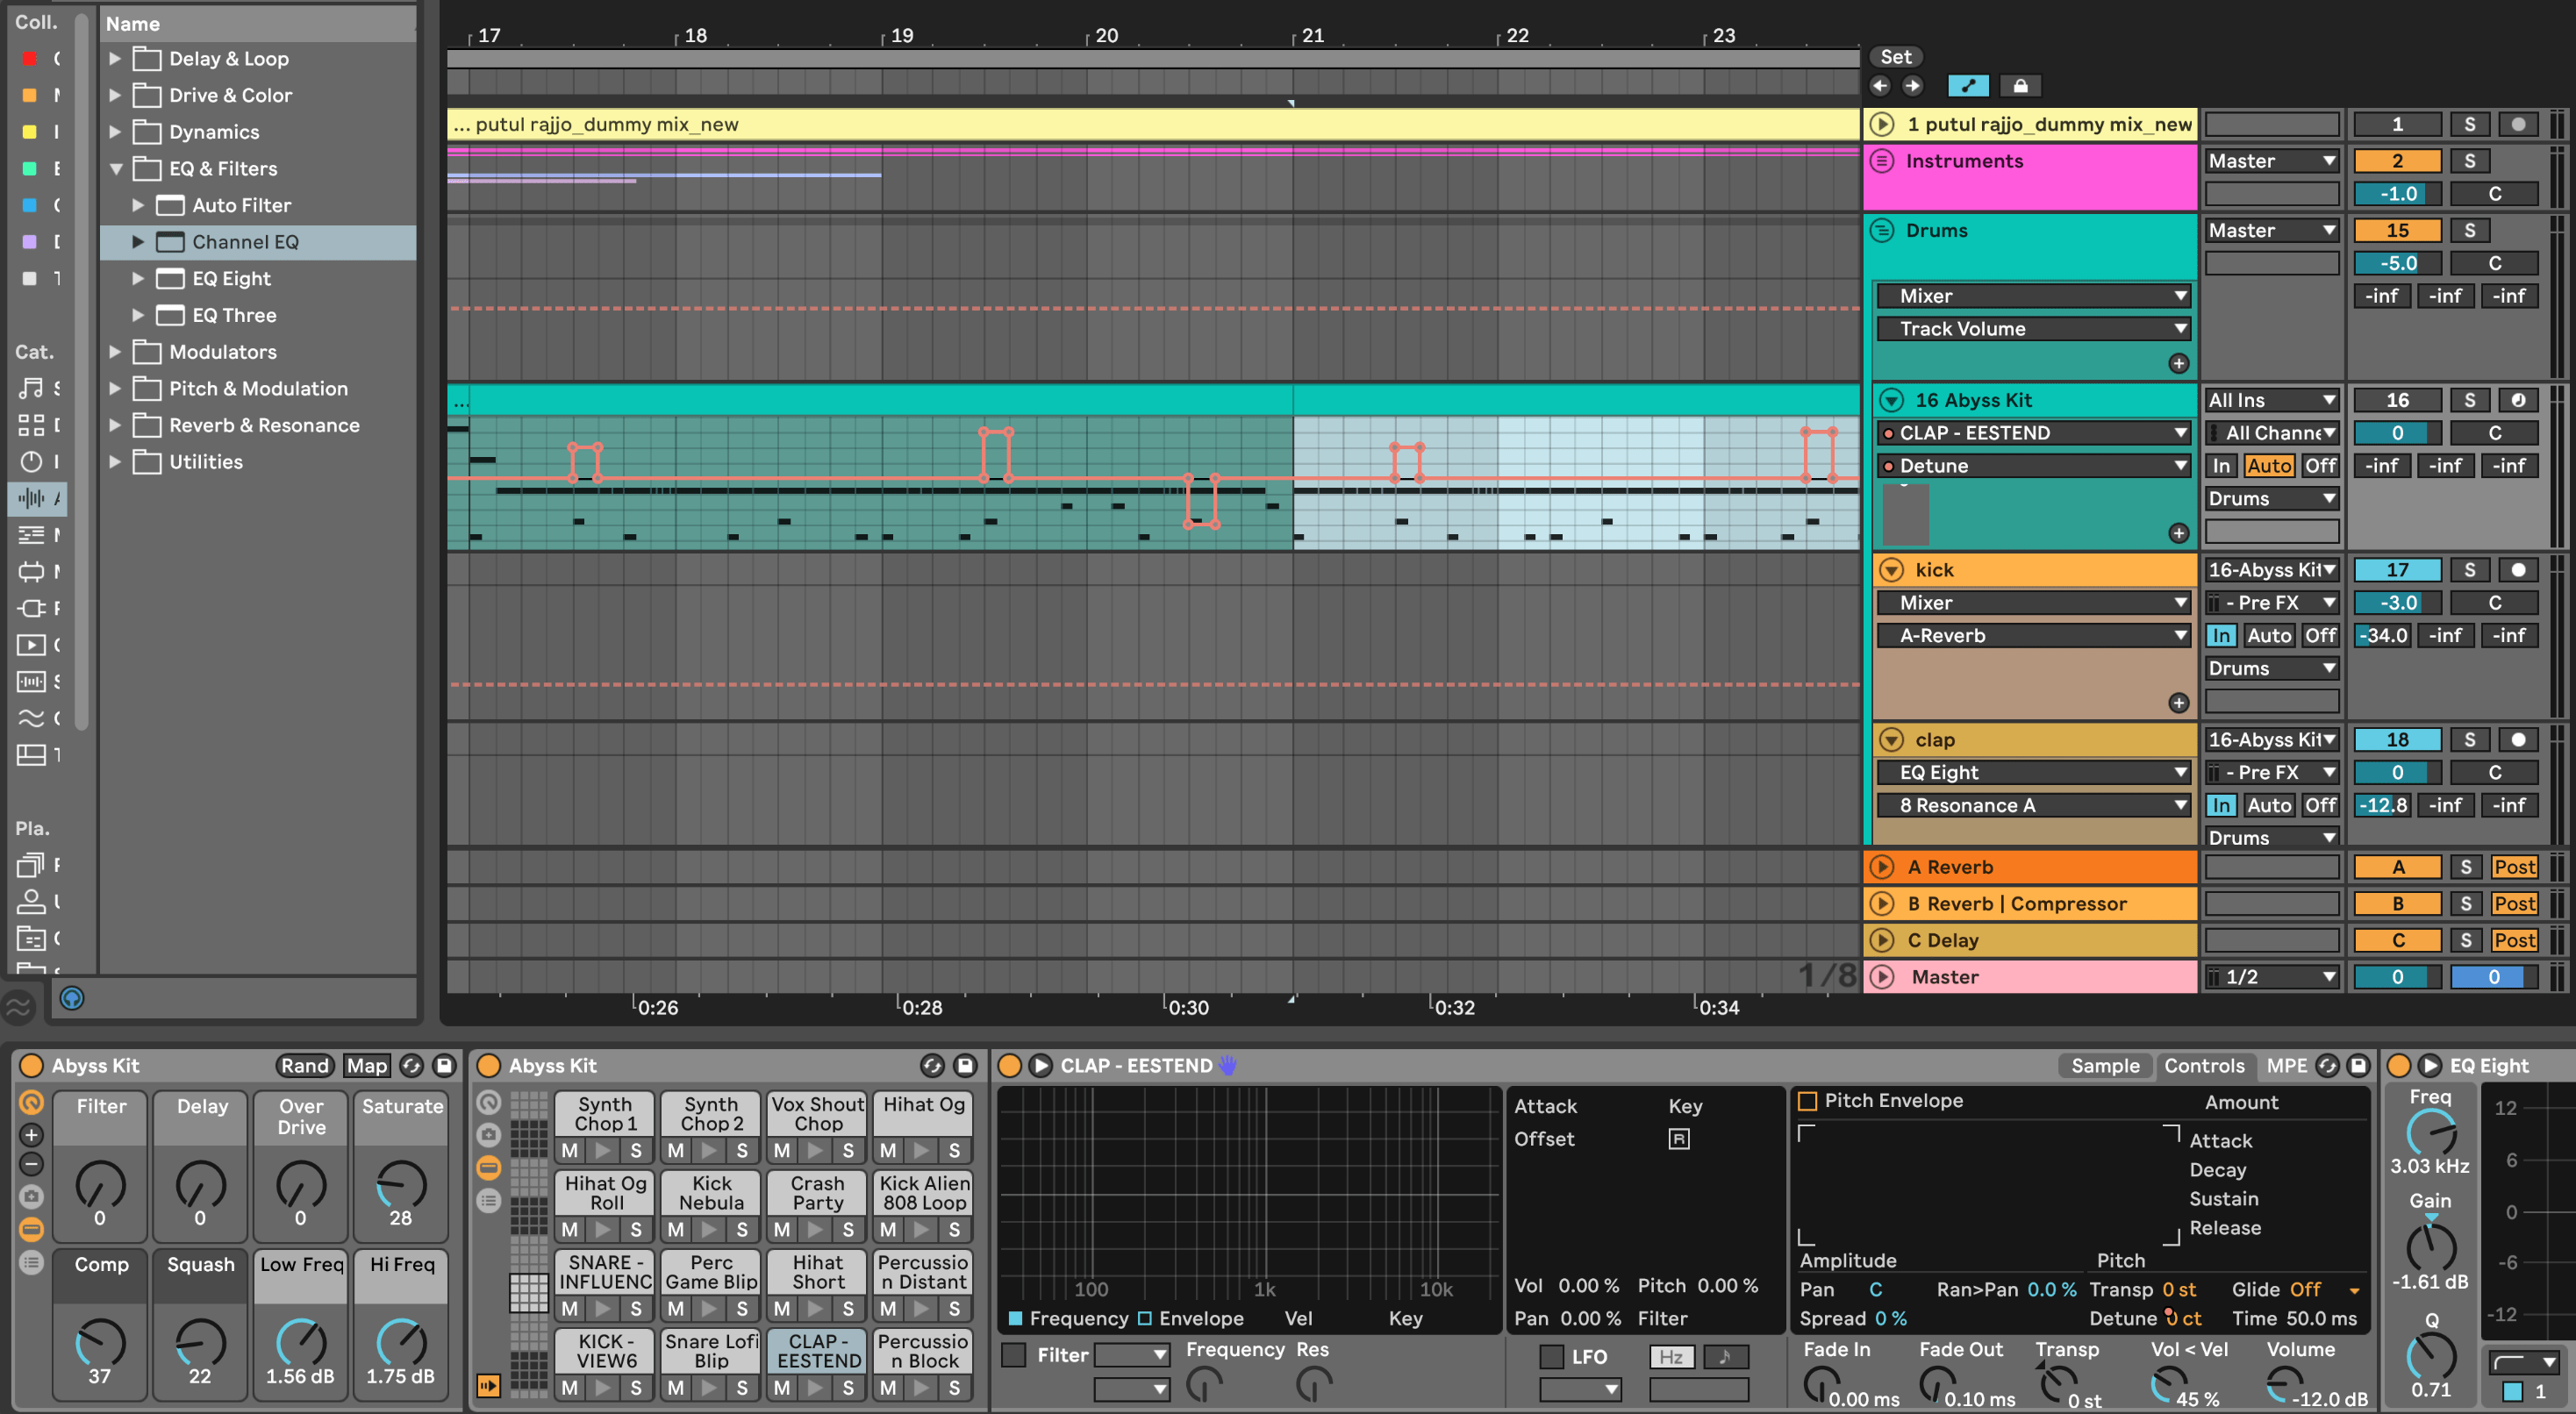
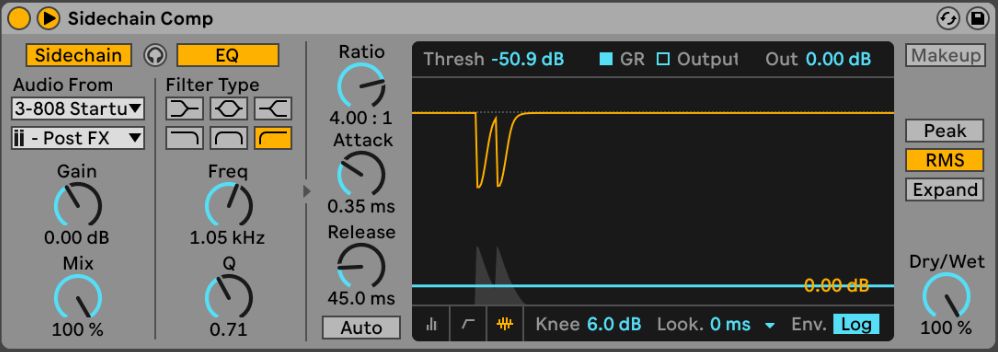
Sidechain equalisers help us to sculpt the frequency spectrum of the sidechain input. The sidechain input triggers our compression. In a traditional compressor, the signal being processed itself is in the sidechain circuit. There are some different types of compressors that also let us select an external input for our sidechain circuit according to which our compression will trigger on the signal being processed. There can be multiple uses for this technique. A common example is controlling the ess-sounds of vocal performance or to tame the harshness of cymbals and hi-hats.
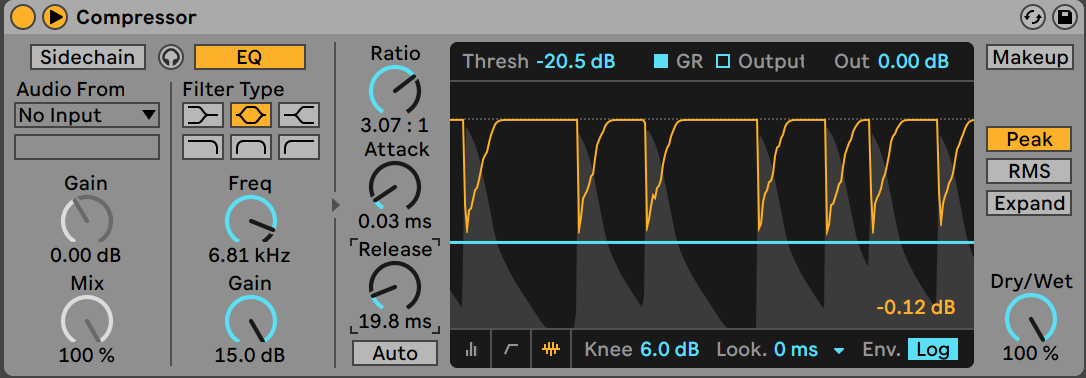
If we look at the image above, we can see that the sidechain EQ has been set to 6.81kHz where we have some sibilance. Now our compressor will react to those sibilant frequencies and turn down the volume whenever the selected frequencies are detected. We can also use our sidechain eq, in a high-pass setting, to mix our bass and kick properly.
In the image above, we are filtering out all the low frequencies from our sidechain input to prevent any unnecessary pumping on the bass.
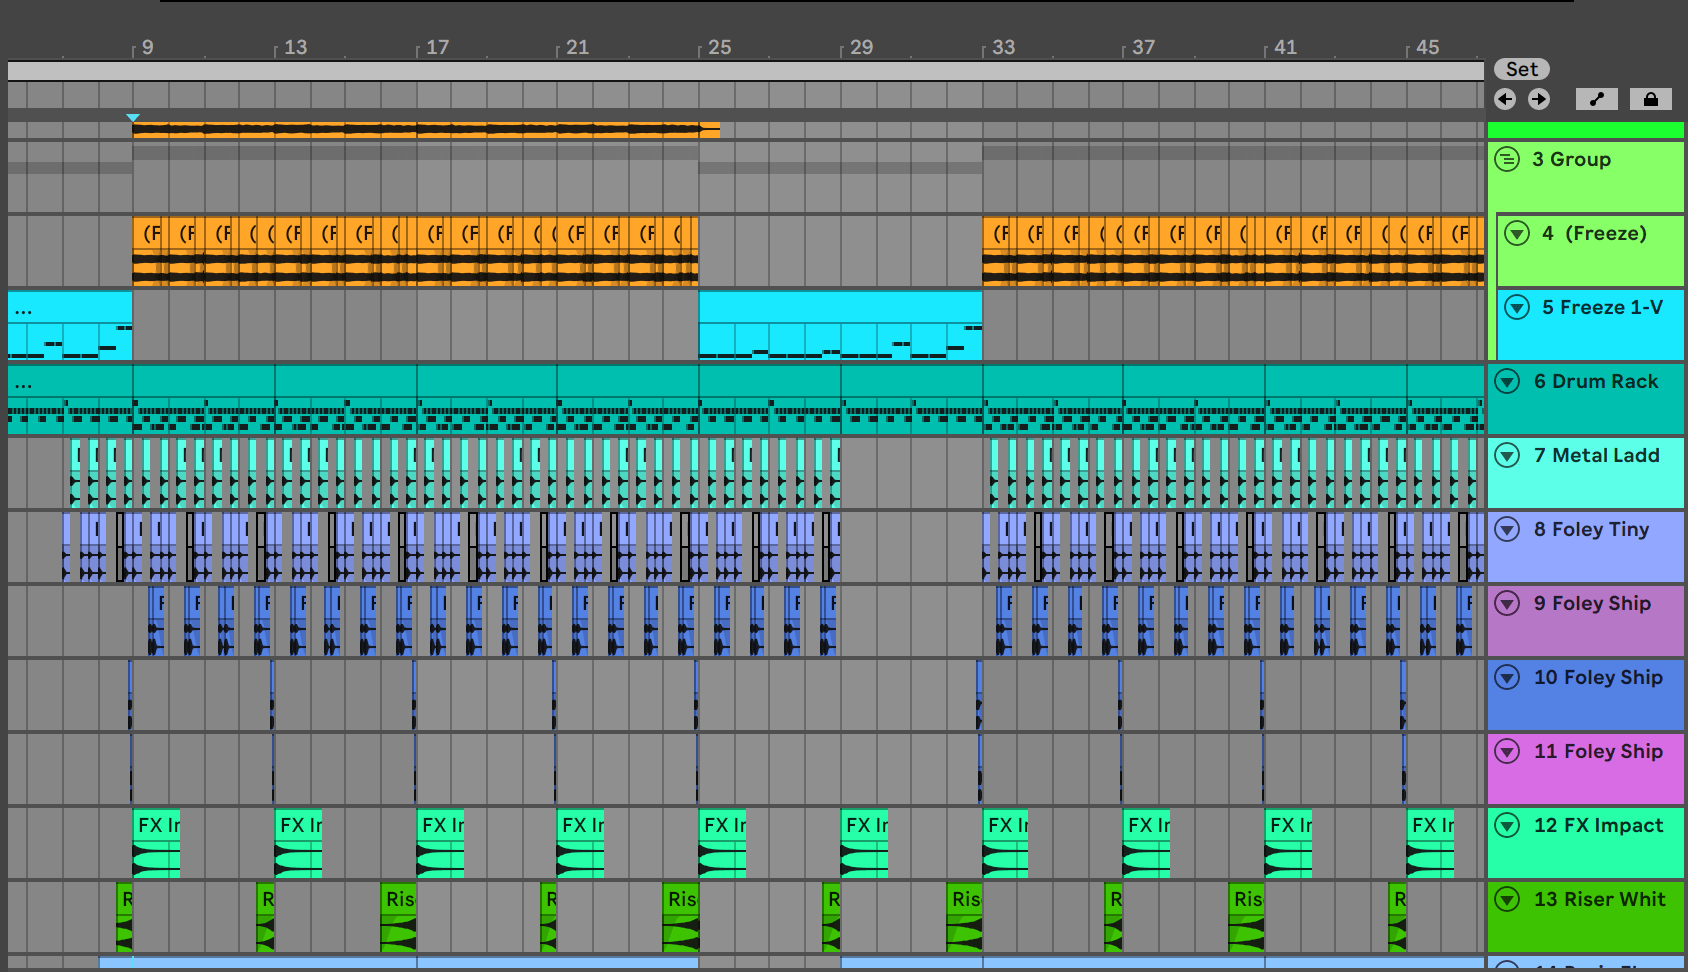
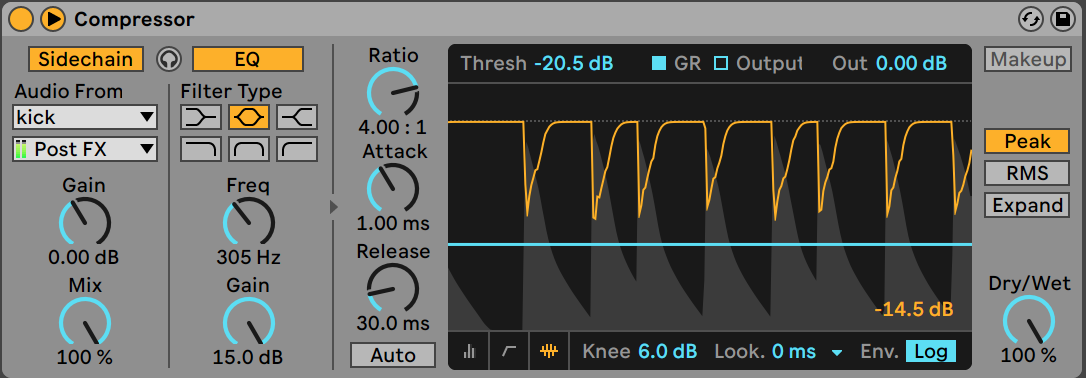
Step 5: Compressing to create Rhythm
We can also use different types of compressors to create different rhythmic effects. A common example is sidechaining your synths with a hat sample that is muted. This is used a lot in EDM genres where the release of our compressor can be adjusted to fine-tune the swell of our synths.
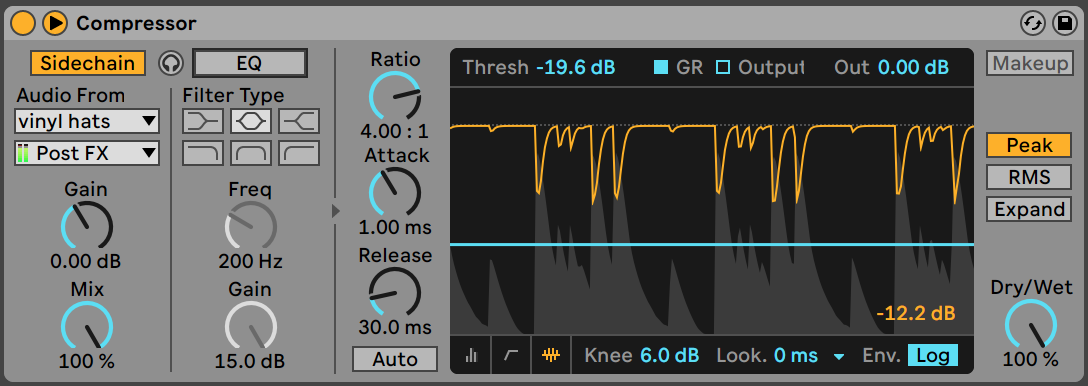
In the image above, our sidechain input, Vinyl Hats is muted on the channel. While our bass has a compressor with a sidechain on. A pumping effect is created on the bass according to our hat groove. We have further deactivated certain parts of our muted hat track to improve the groove.
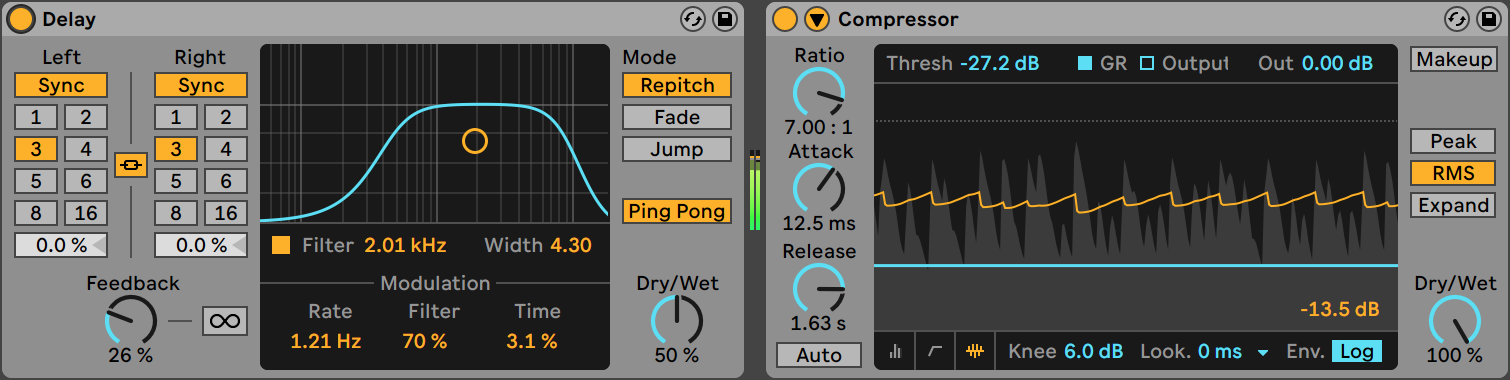
Step 6: Compressing Delay and Reverb FX
Reverb and Delays are time-based effects. Producers always sync their delay and reverb settings to the project tempo. This technique alone sometimes isn't enough to mix our fx to the rest of the track. The slope in which our reverb/delay decays also has a major impact on the overall feel. A common example is making our delay tail more audible so that the initial sound continues into its next phase. With a linear decay, we will not be able to hear the delay signal at the end might be inaudible. We can use our compressor to bring out the delay more in our mix. We can apply the same concept to reverbs as well. Room reverbs are often compressed to add some fullness to our signal without the reverb having to sustain another phrase. This technique is used on vocals that require a natural room sound.
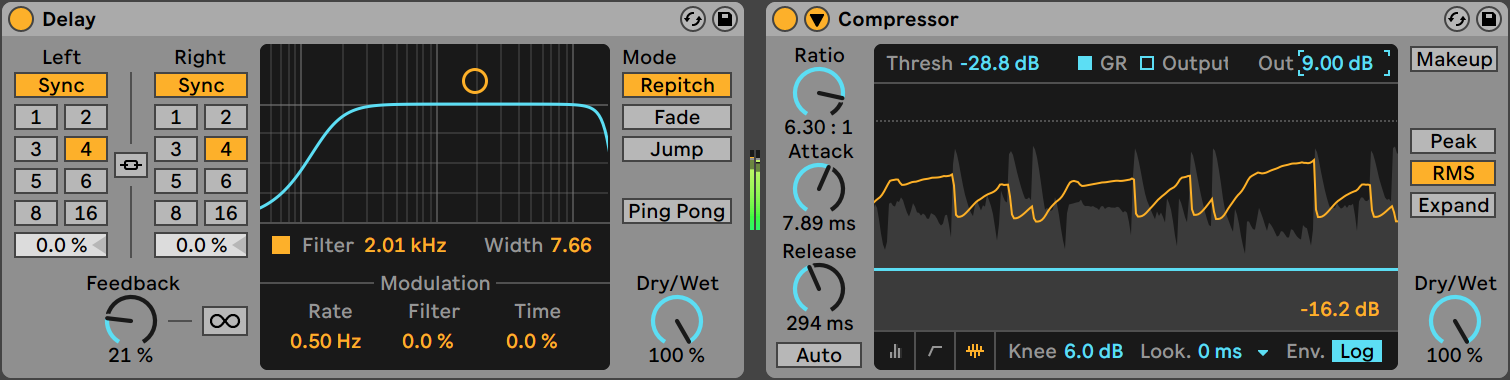
Look at the image above, we are enhancing the tail of
our delay using the compressor to create a reverb-like sound.
Step 7: Compression or EQing: Which comes first?
Both EQs and compressors are considered to be the basic building blocks of any mix. Music Producers often debate which comes first in the FX chain. In reality, there is no set rule. It completely depends on our source material and what we want it to sound like. If a vocal performance has very inconsistent dynamics, it is important to compress the vocals to correct the performance and then EQing. Similarly, there may be a situation where a certain frequency band might be more prominent in the frequency spectrum, as a result, they will reach the compression threshold before the other frequencies, triggering compression. In this case, you will need an EQ first in your chain to attenuate the problematic frequencies and then compress. You can further experiment with adding more EQ's and compressors rather than just the initial one, perhaps to smooth out some peaks created by our post-compression EQ.

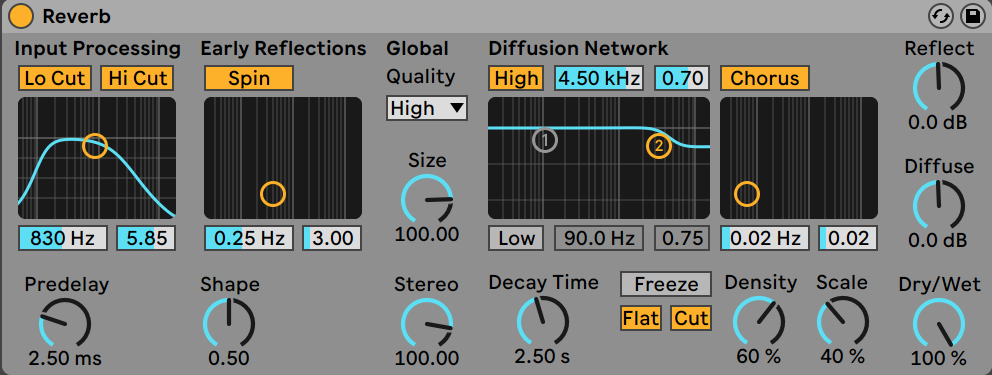
Reverbs are an important part of mixing. We often hear people refer to a signal as dry or wet, referring to the type of reverb. Shorter reverbs can sound dry as they are perceived, rather than heard. Longer reverbs are audible in the mix and they are often referred to as a wet sounding. In this article, we will look at a few techniques of using reverb as an effective mixing tool.
1. Using Your Reverb Post-EQ
Producers use reverbs both as inserts and returns. EQing our signal before it comes to our reverb has a lot of benefits. We can use a low cut or low shelf to reduce the amount of reverb applied on the lower frequencies to prevent unwanted muddiness in the low mids. Similarly, a high cut or high shelf to reduce the reverb on some sibilant frequencies so that they are not amplified in the mix. Always use your ears and check how your signal sounds with and without the EQ. Another important point to consider is that nothing is stopping you from EQ the signal after the reverb as well. Although we are using an EQ to sculpt our signal into the reverb effect, it does not mean that other problems will not be introduced in the areas reverb is being applied. You can use a separate EQ for this role or you can also use your Reverb's own EQ, provided it has that feature, to sculpt your input signal for the reverb.

In the image above we are using the Reverb on a return track. We are sending a drum loop to our return and creating a room sound for it. We are using an EQ before our reverb in the return to control the amount of reverb applied on the kick and frequencies above 7000Hz.
2. Compressing the Reverb Tail
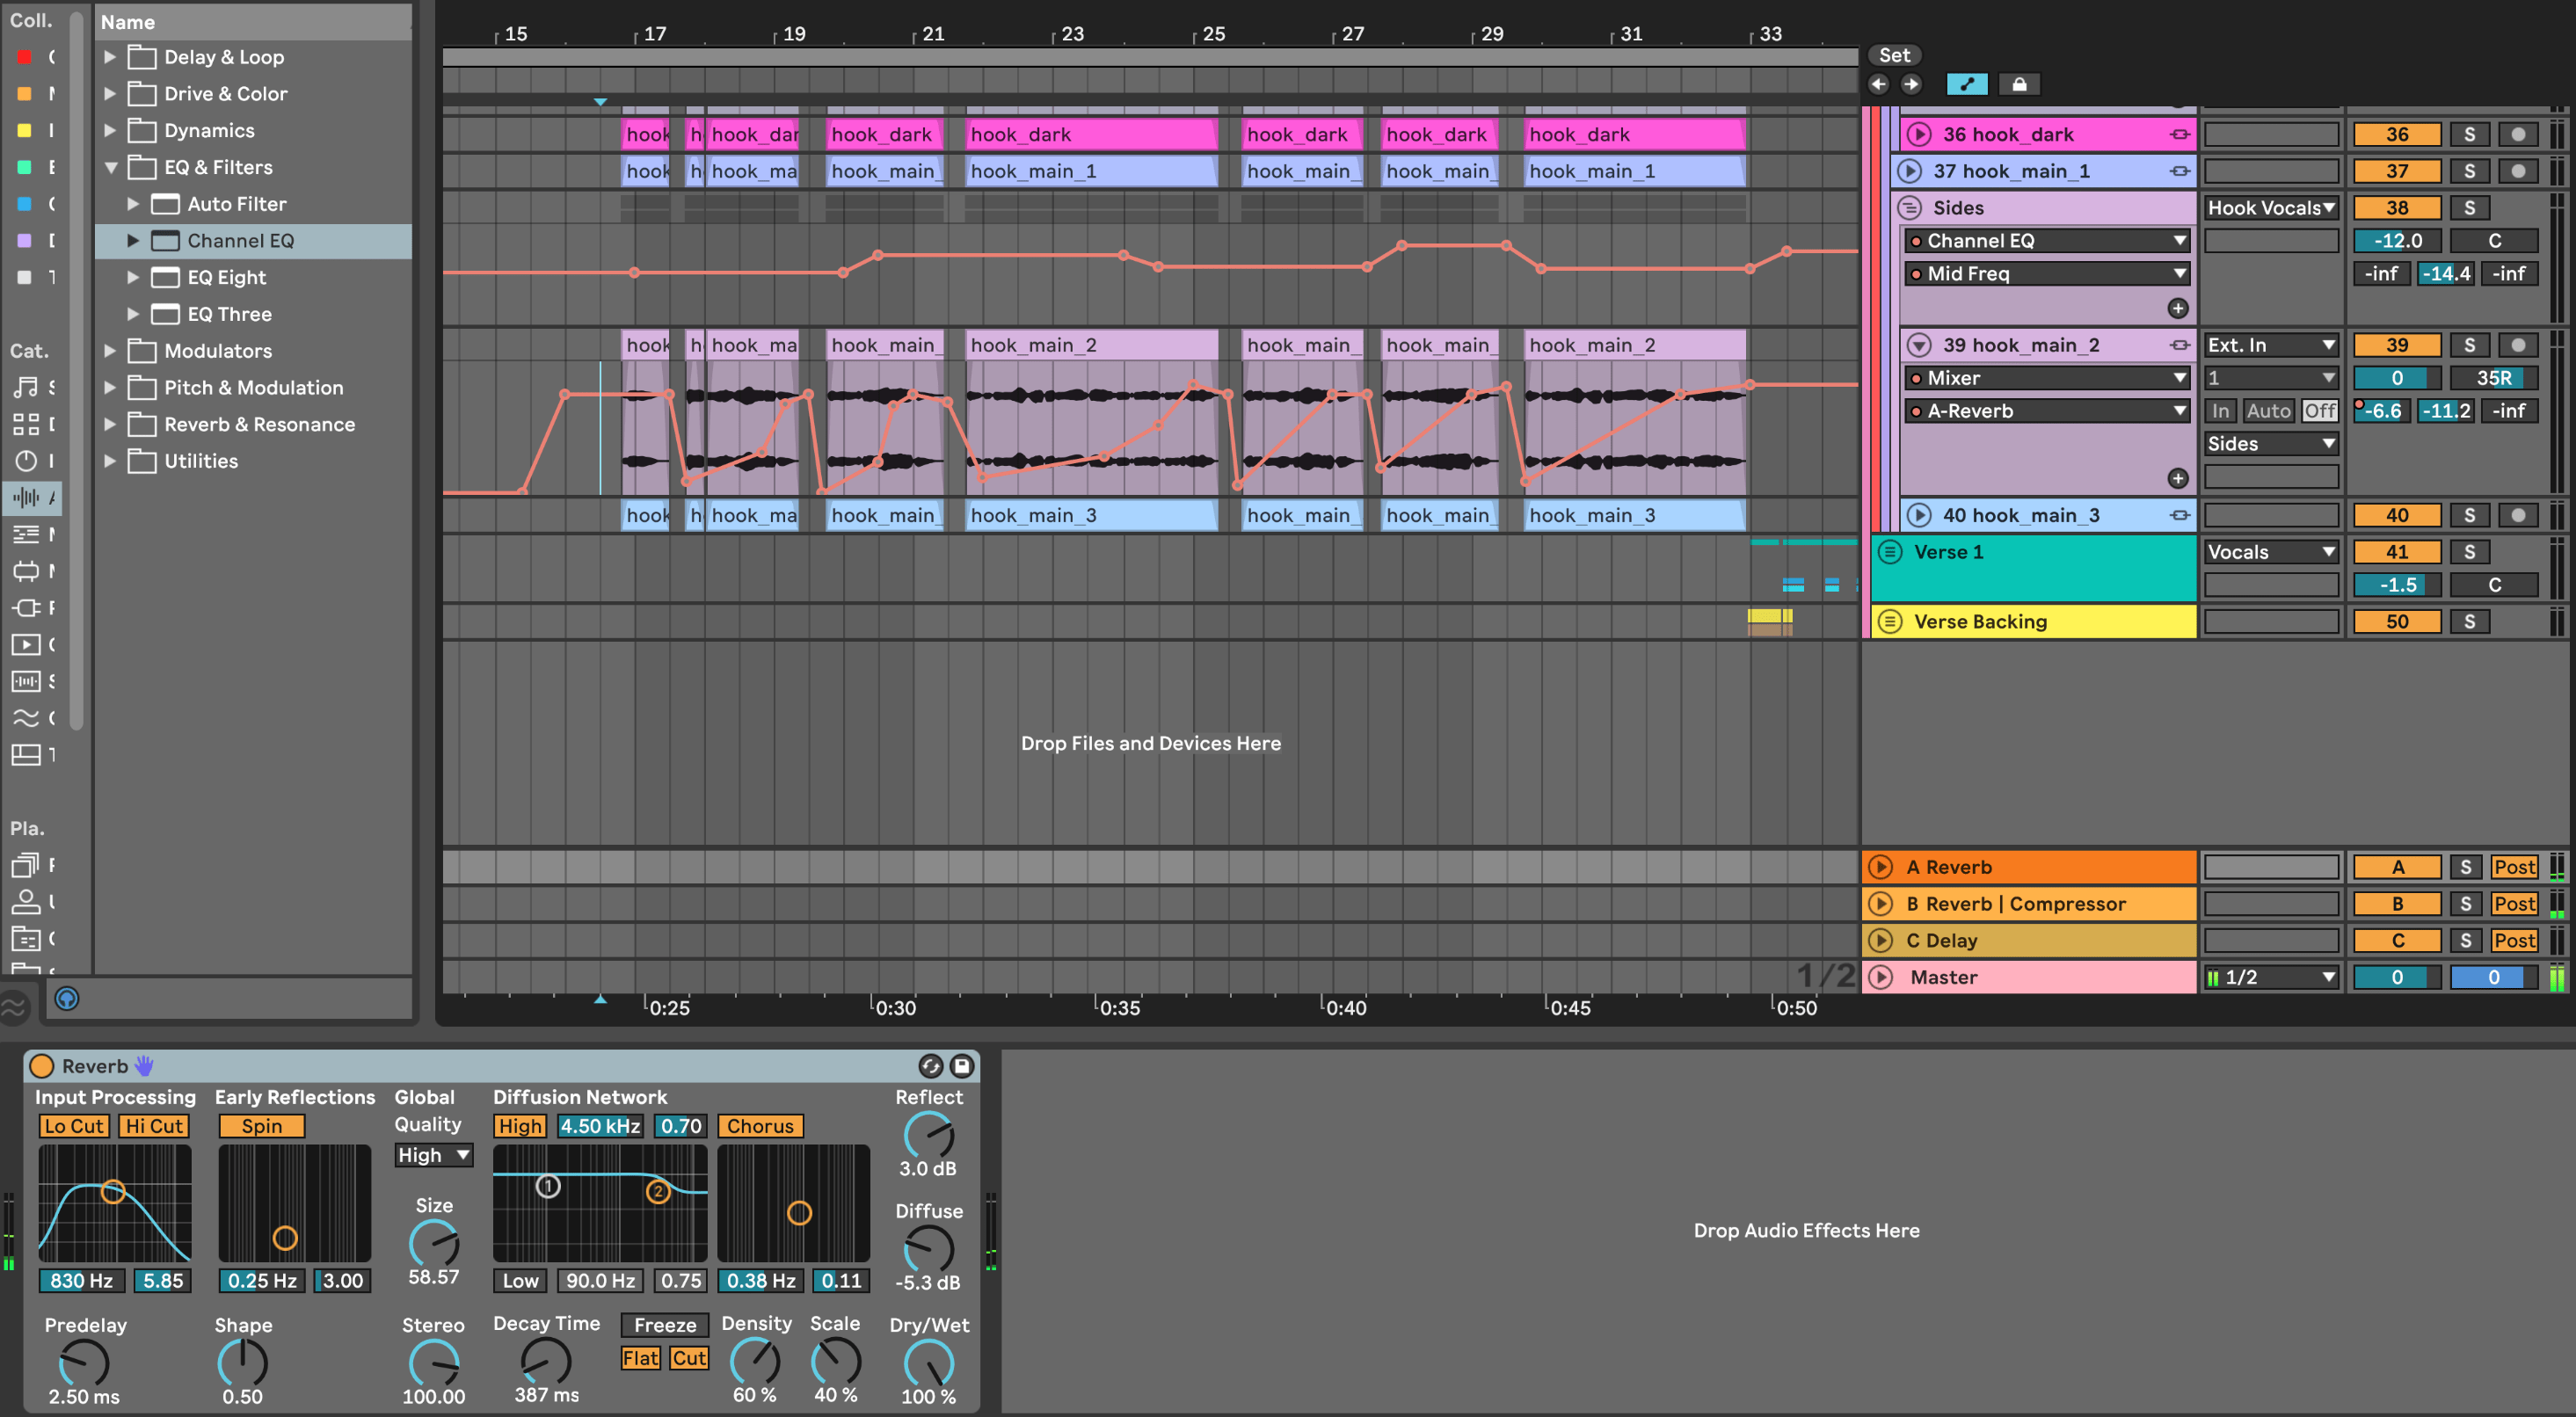
When using longer decay times on a reverb plugin to create lush soundscapes, we run the risk of drowning important musical phrases in a performance. It can create a lack of clarity when used on quick vocals or melodic runs. Compressing the reverb tail gives us greater control over the decay so that it ducks whenever our lead sound is playing. In our example, we will use the sidechain function on our compressor to duck the reverb tail according to our sidechain input.
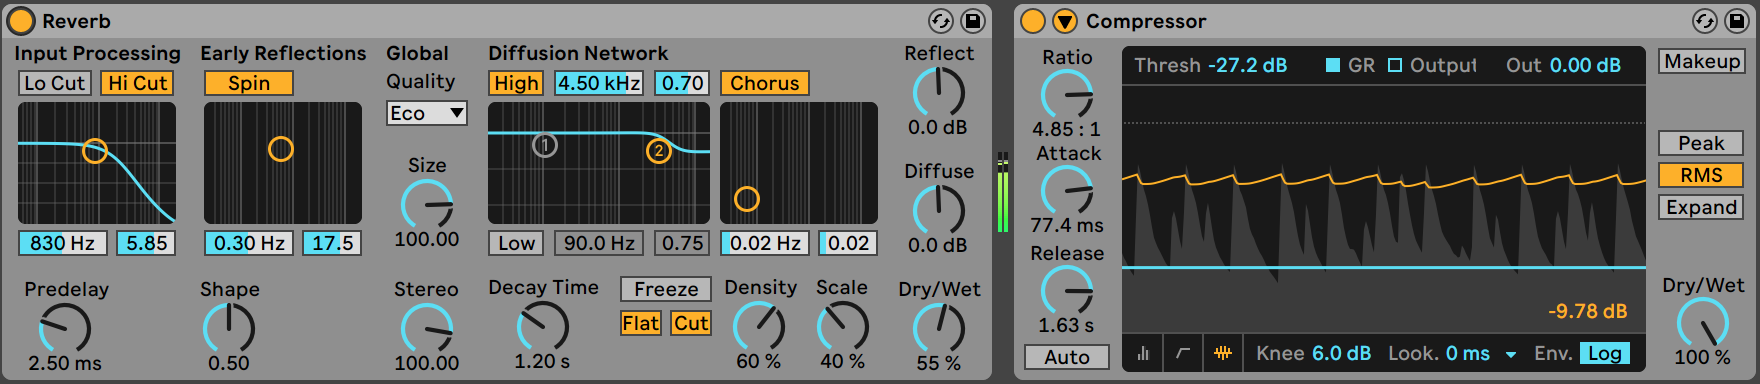
As you can see in the image above we have selected the Vocal Chop track for our sidechain input so that our reverb ducks down every time the vocals cross the threshold we have set. We are also using the release time of the compressor to shape the recovery of the reverb signal after our vocal chop has ended temporarily.
3. Avoiding too many Different Reverbs
Reverbs essentially refers to the space in which your mix exists. If you want an intimate feel in your sound, then you should stick to shorter room reverb. If we suddenly add another sound with a lush hall reverb, then it might mess up our mix's focus in a lot of cases. It is important to think of reverb as an effect that adds context to the mix. It makes the listener feel like they have been transported to a certain environment meant, the music is being performed. This should not sway you away from using multiple reverbs if your intention is to create a certain vibe or effect. A lot of producers use two reverbs for their mixing session, a shorter one to add body and depth, and a longer one to add some wetness to an otherwise dry sound. Always visualize the space the listener would feel they are in. If we are applying Reverb to a snare drum then we have to think would it should be like it's being played in a church or perhaps a warehouse or any other space. This pattern of thinking will help us make better decisions during our mix.
4. Creating Stereo Width with Reverb
We can use reverbs to enhance the stereo field of a mix. A common technique is to keep the main sound in the center while the reverb is panned back and forth by automation. This can be used to create some stereo detail in our mix to make sounds stand out from the rest. Another way reverb panning can be helpful is in those situations where there is panned sound but our reverb is centered, thus not giving a sense of space to our main sound. We can pan our reverb in this case to the position of our main sound so that we can reinforce the panning. We can also create our own wide stereo Reverb by sending a signal into two return tracks with similar-sounding reverbs and panning one hard right and hard left. The main sound will remain in the center creating a pleasant ambiance.
5. Automating Reverb Parameters
Most often producers dial in their desired reverb setting and leave them static throughout the mix. This can lead to a boring mix. To elevate our mixes it is important to obsess over the details. A common pitfall of using longer delays is sometimes one phrase will have its reverb tail overlapping on the next phase in the performance resulting in dissonance. This can also happen when we are transition from one section of a song to another, while the reverb tail from the preceding section continues to sustain. An easy fix is to automate our dry and wet settings so we can create clearer transitions between musical phrases and song sections. You can also automate your reverb to create swells and impacts in your mix. Always use your ears to see where the reverb tail is creating problems and address them immediately.
6. Less is More
Overuse of reverbs can notoriously lead to muddy mixes. The presets or samples we use often have reverb built into the sound from the plugin itself. It is useful to think about whether we require that reverb if we are going to create our own spatial location with our own reverb settings anyways. There is no creativity in drowning the details of performance with the overuse of reverb. On a lot of occasions, it is more beneficial to be conservative with our reverb to avoid any undesirable fogginess. If we let a set reverb tail color every section of our mix, then chances are it will not sound as good in certain sections as it does in other sections.
7. Having our Reverb Decay Time Synced With the Project BPM
It is important to remember that reverb is a function of space. So the size of your space or environment determines the decay time of your reverb. The decay time of a small room reverb will be considerably shorter than that of a chamber reverb. To make our mixes sound tighter, we like to have our reverb decay time match the BPM of the song. This lets us dial in the exact number of note duration we want our reverb tail to sustain. You can use a Reverb and Delay Time Calculator on the internet to calculate what decay time setting will be ideal for your project tempo. You will simply have to enter your project BPM and let the calculator do the work. There is also a small hack for calculating the time manually. If we divide the value 60,000 by our project BPM, then it will give us the decay time for 1/4 note duration in that BPM. So now we can manipulate this number depending on what kind of ambiance we want. If we want the decay to sustain a full bar then multiply your result by four. If we take 100 BPM as an example, then 600ms (60000/100) will be the decay time for a 1/4 note in 100 BPM. Now if we want our tail to last a full bar in 100BPM, then our timing will be 2.4 seconds (600 x 4 = 2400ms = 2.4s). Now we have a clear idea as to how long our reverb will sustain in the mix.

Delays keep our production from sounding boring. Delays create an echoing effect according to a set delay time and feedback control. The delay time determines the space between the repetitions of our signal in the echo and the feedback controls how long these repetitions last. In this article, we will look at a few tips with delays to create detail and liveliness in your track.
1. Sidechaining the Delay
Delays like reverbs can easily create overlap among two melodic phrases in a performance. If this overlap is not intentional then it might create dissonance or ruin the clarity of the phrase. A simple compressor side-chained to our main lead inserted after the delay can resolve this problem. In this case, the delay will duck under the main lead when notes are being played and the delay level will swell up when there is a silence in the playing. We can sculpt the swell of our delay using the release of the compressor.
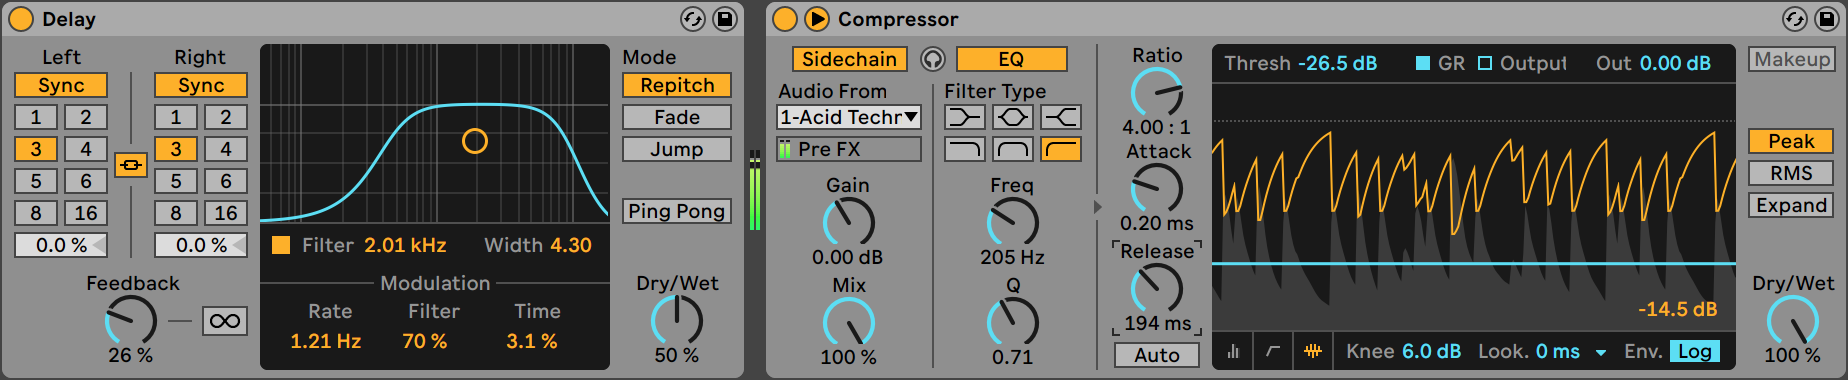
In the image above, we are using the sidechain compressor to make the main bell melody clearer and then adding a slow-release so the delay has almost a fade-in effect.
2. Compressing the Delay
There might be a situation where we are trying to use a delay to add some subtle detail to our sound. These details can get easily lost in a busy mix. Using a compressor on our delay helps us to add more presence to the delay tail by lowering the threshold and adjusting the ratio as required. Always remember to use your ears and not overdo the fine-tuning. Another situation that comes to mind is when we have a delay with high feedback but the decay ends a few beats before the next section begins. You can use a compressor here to slightly increase the amplitude of your delay tail so that we can hear it sustain to the next section in the mix.
In the image above we are compressing the delay tail of some glitchy blips and bloops to make it more present in the mix, especially in the busier sections.
3. Filtering the Delay
This tip will hold for most delays and reverbs. When we feed the full harmonic spectrum of our sound into the delay input, a lot of problematic frequencies that were previously quite in the mix might get boosted. If we are applying a delay on our drum loop to create an interesting groove, then you should use a highpass filter pre-delay so that all the lows are prevented from going into our delay. This will keep our track clean and not throw off the groove because of the kick being affected by the delay. Similarly, we might want to tone sculpt our delay tail so that it stands out from the original sound in the mix. In that case, an EQ inserted post delay can help us achieve our goal. You can also use the internal pre/post EQ in your delay plugin, provided it has that feature.
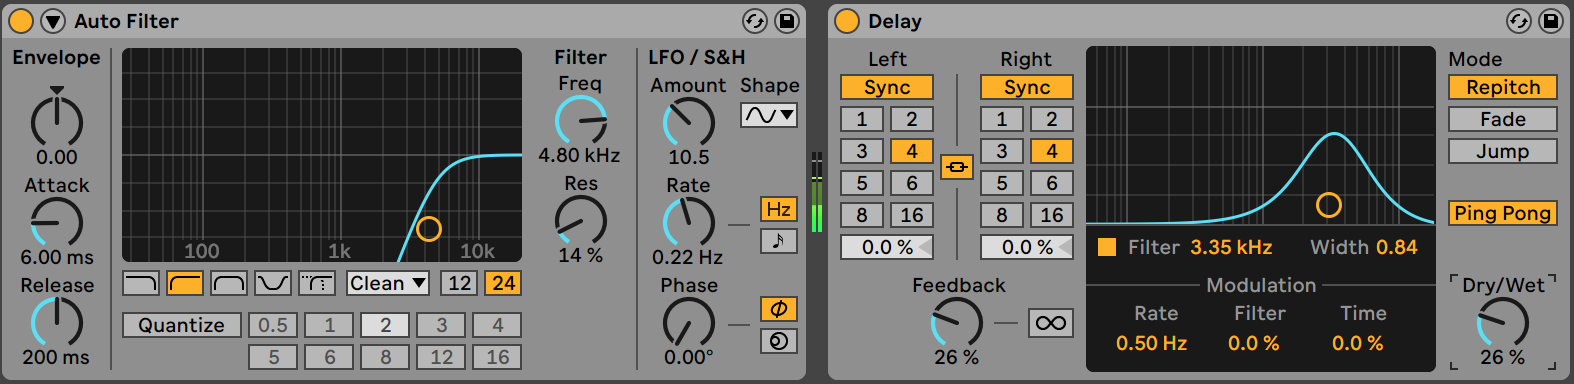
In the image above we are sending a drum loop to delay inserted in a return track. As you can see we are using a highpass filter pre-delay to remove all the low and mid information being affected by the delay. Then we are also using a modulated bandpass filter provided in our delay to further shape our sound. This setup is being used to create subtle ghost notes to enhance the groove of our drum loop.
4. Using Multiple Delays
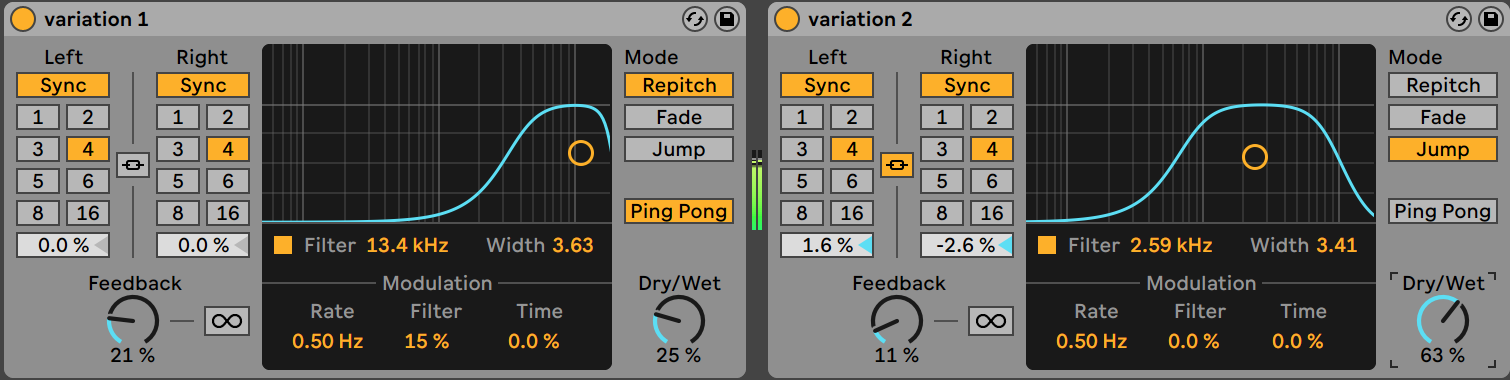
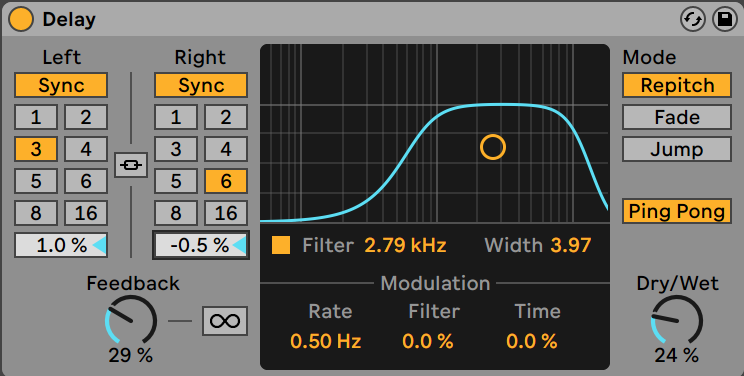
Delays can be timed according to a note duration or a frequency. Most mixes employ a few delays with different delay timings. This is done because a 1/4 note delay might sound good on our synths but it might create some unclear sounding overlaps on our vocals because of the way the phrases have been composed. Perhaps a 1/8 note delay would sound much better on the vocal. In this situation, we will require two separate delays, one with a 1/4 note setting and the other with 1/8 settings. Another perspective can be using two delay timings on the same sound to create interesting patterns. We can have one delay timed at 1/4 note while the other at 1/6 which is a triplet note duration to create an interesting polyrhythmic groove (shown in the image below).

5. Creating Stereo Width with Delays
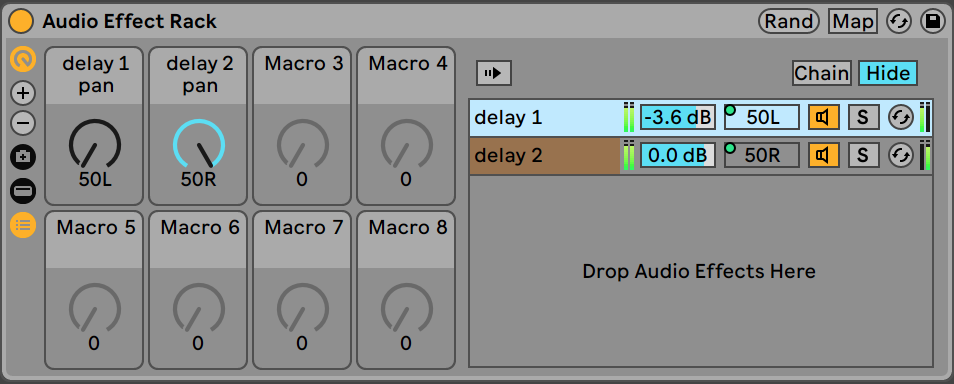
Delays can be used to create a stereo effect. If we are using multiple delays, we can pan these delays in various ways to add width to our sound. The simpler technique is to use a traditional delay plugin and have the left delay and the right delay set to trigger at different note durations. Another variation of this technique is to use the same delay timing in both left and right but offset them from each other by different values (both variations are represented in the image below).
Another technique for creating a stereo width effect with our delays is to use two similar-sounding delays and pan them left and right. You can achieve this by using two return tracks, hard-panned left, and right or an audio effect rack with a delay in each chain. Then we can pan one chain hard left and the other hard right.
One more simple technique for creating stereo width with our delay is simply using a ping pong delay. In a ping pong delay, the first repetition will occur in the left channel and the next repetition on the right.
6. Adding Delay Throws
Delays are often used to fill up empty spaces in a mix. One common technique for filling up space is a delay throw. We do this effect by inserting a delay in a return track and then automating the level of our delay send to emphasize the last note or word in performance perhaps in a pre-chorus leading up to the chorus. This will create a smooth delay swell and the word on which we raised the send level will ring out in the mix, reinforcing the meaning and filling up some empty space at the same time. You can use automation curves to really sculpt the volume envelope of your throw.
7. Using a Reverb on the Delay

Sometimes the repeats created by our delay can sound dry or lack a sense of space. Using a reverb in conjunction with our delay can be very useful here. The reverb adds ambiance to our delay repetitions and puts them in the same spatial environment as our original sound provided we are using the same reverb for both. You can directly insert a reverb plugin after your delay or you can also send the signal from the delay return to a reverb return by enabling the delay return to send control (you will have to enable it first by right-clicking in Ableton).
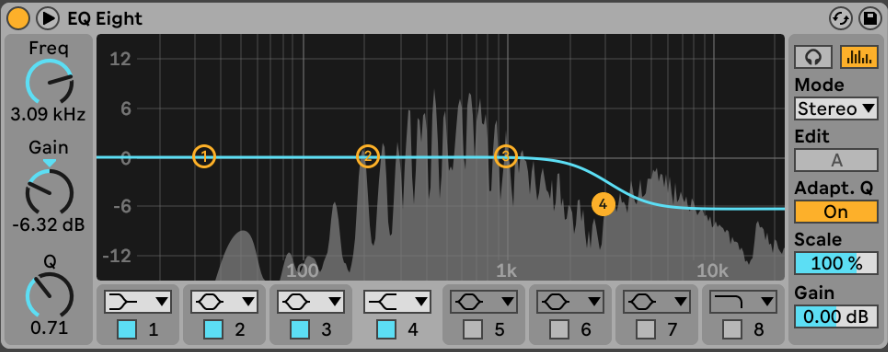
Equalizers have always been one of the main tools that are used in mixing and mastering. Their role is to control the harmonic spectrum of our sound. An Equalizer employs various types of filters to attenuate, boost or remove a range of frequencies. The common DAW Equalizer is a parametric equalizer that would have a few filters that can be applied and controlled independently of each other. Thus we can use these filters to control multiple frequency bands at the same time. In this article, we will take a look at 7 steps that will help us to bypass a lot of confusion and get good results. These techniques are not absolute in their applications. Feel free to experiment with these tips to get different results.
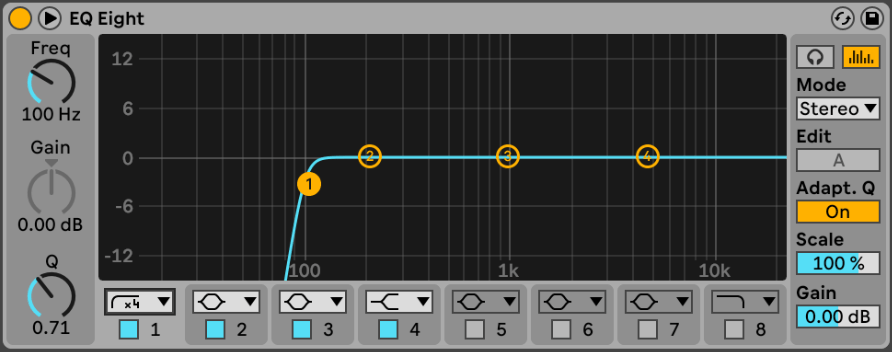
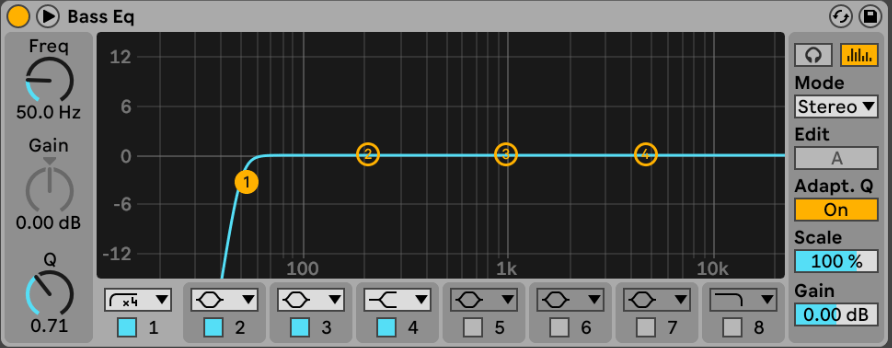
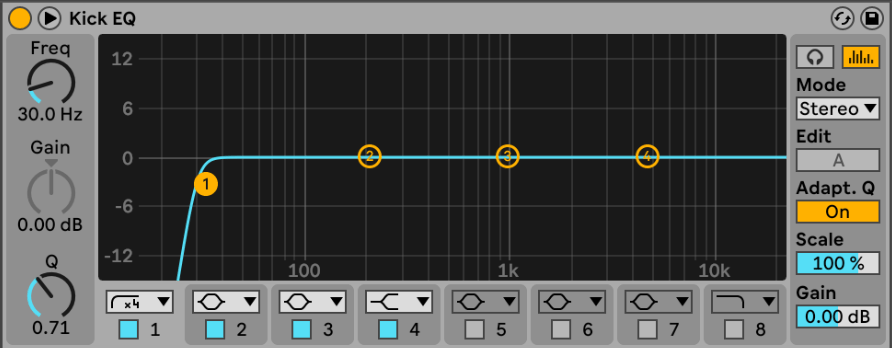
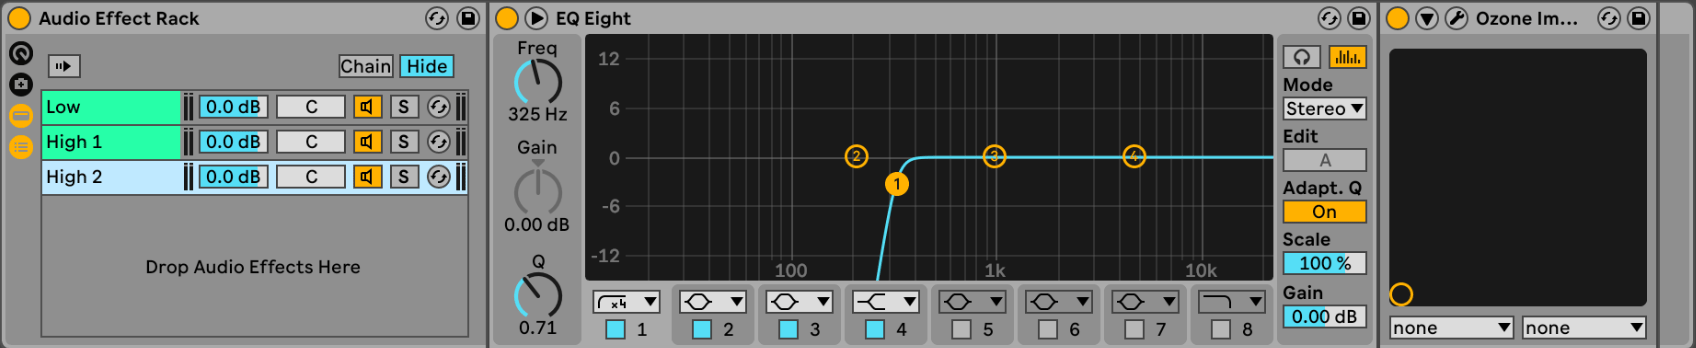
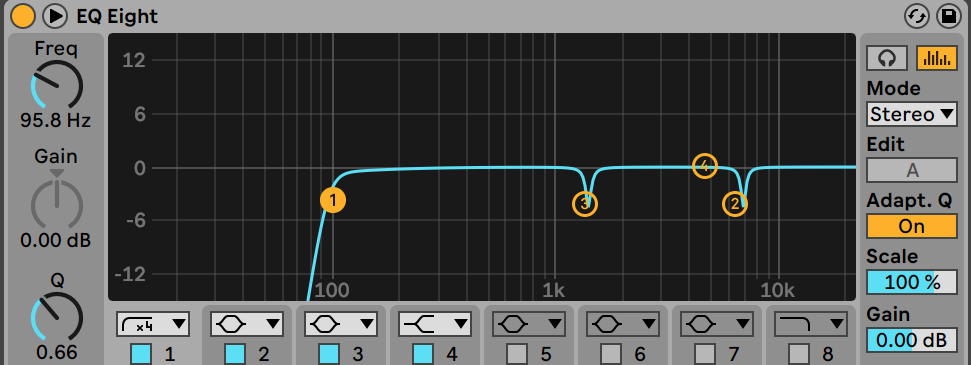
Step 1: Rolling off undesirable bass frequencies
It is important to EQ out all the low rumble of certain instruments with a high pass filter. In the picture above we can see an Equalizer with a high pass filter engaged, filtering out all the frequencies below 140Hz on a mid-frequency dominant percussion hit. This will help our sound sit better in the overall mix because the unwanted low frequencies will not clash with our bass or kick. Making our low end as tight as possible helps us to achieve better results on mediocre speakers that struggle to produce bass frequencies cleanly. Background vocals, claps, guitar melodies can muddy up our lows and low mids if we don't roll off their low end. Moderation is key here we do not want to overdo this bass roll-off. Check where the fundamental frequency of your instrument lie. If we filter out our fundamentals then the character of our sound will change. If this is not desired then only filter up to the point where you can hear the signal audibly changing from there onwards.
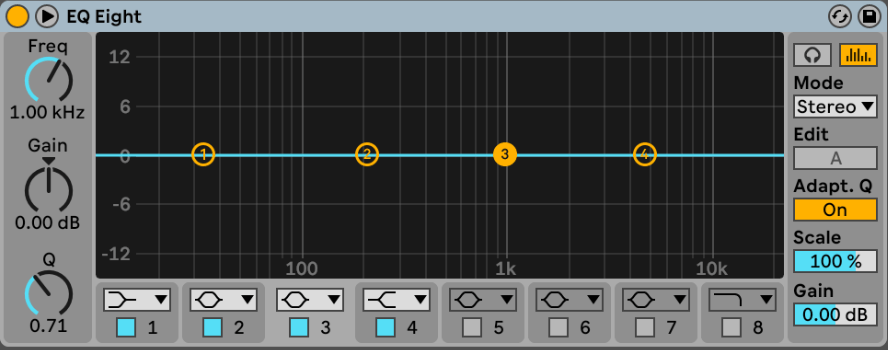
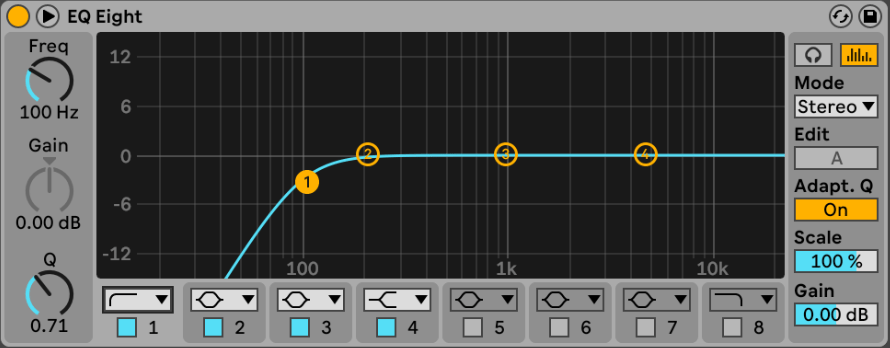
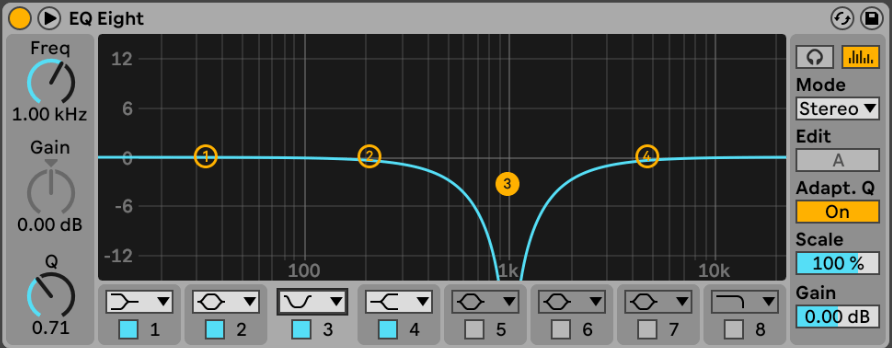
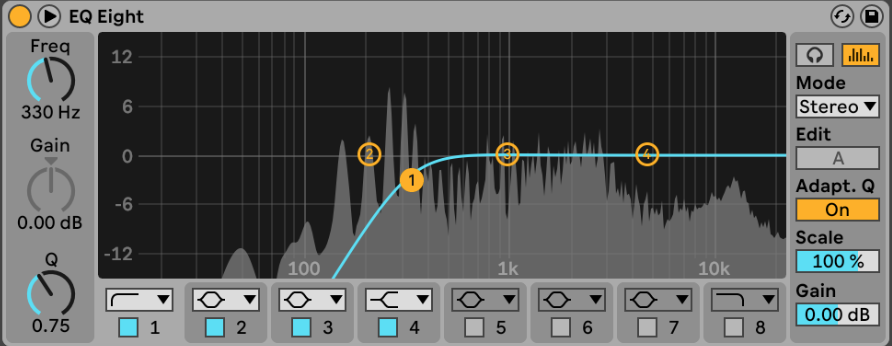
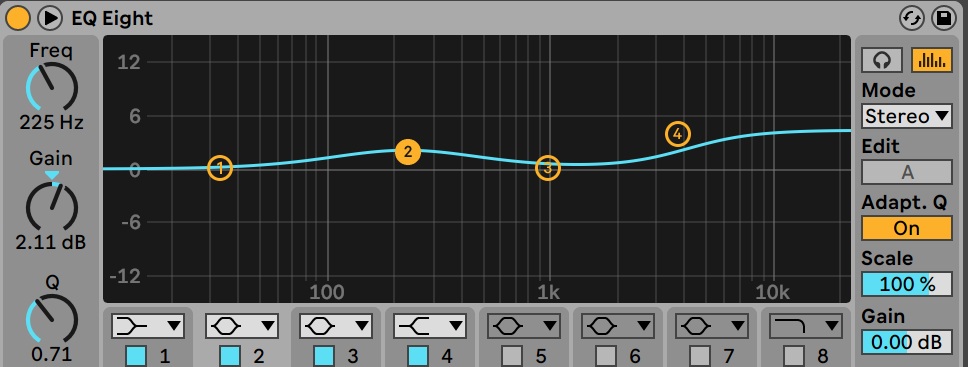
Step 2: Find troublesome frequencies and remove them
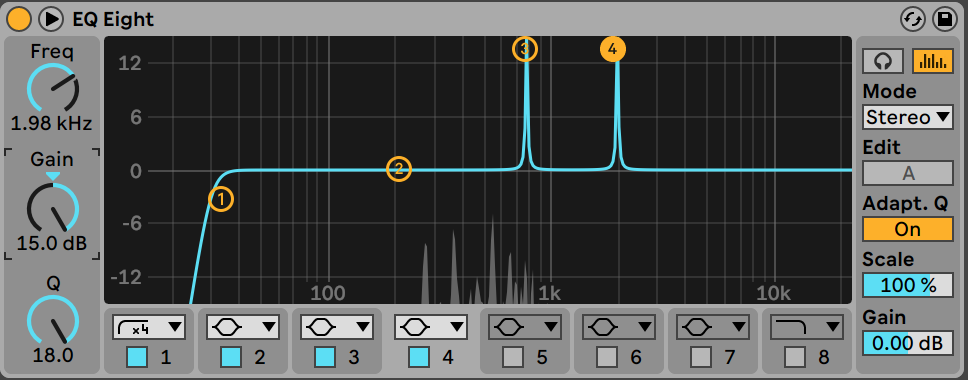
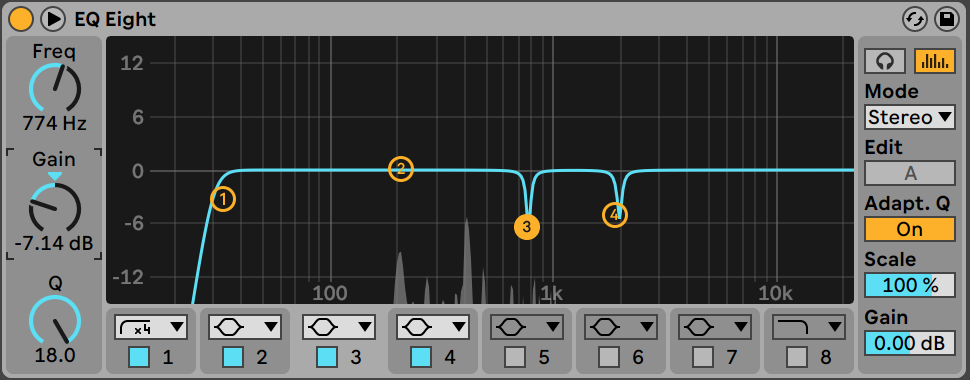
A sound will usually not have nice sounding frequencies all across the frequency spectrum. There will be certain frequencies that create harshness or muddiness in our tone. If we look at the images above, the Equalizer at the top is highlighting unpleasant frequencies in our signal. In the EQ on the bottom, we are attenuating these frequencies in a controlled manner to make them quieter in the mix. To detect problematic frequencies you will need to use a bell curve with a high Q value so that we can pinpoint them and control them without affecting other frequencies. You can always lessen the Q value to broaden it once we have identified them. We need to keep ourselves in check because it is very easy to overdo the number of cuts. This might lead to a thin-sounding tone, lacking in character.
Step 3: Boosting with a broad Q and Cutting with a narrow Q
As a general rule of thumb, cuts work better than boosts in an Equalizer for many reasons. Boosting can harm our headroom if we don't have much to spare initially. In that case, we would have to turn the volume of our signal down. Boosting can also add distortions and artifacts while reducing the resolution when pushed. Provided we have enough headroom, it is wise to boost with a lower Q value so that the frequencies are boosted along with their neighboring frequencies, giving us a more natural-sounding result. Cutting with a broad Q does not work as well. A wide-cut can attenuate a lot of frequencies in our mix that are required for the character of the sound. It can also make our instrument much quieter in the mix. As a result, narrow EQ cuts work much better as it preserves the tonal characteristics of our signal.
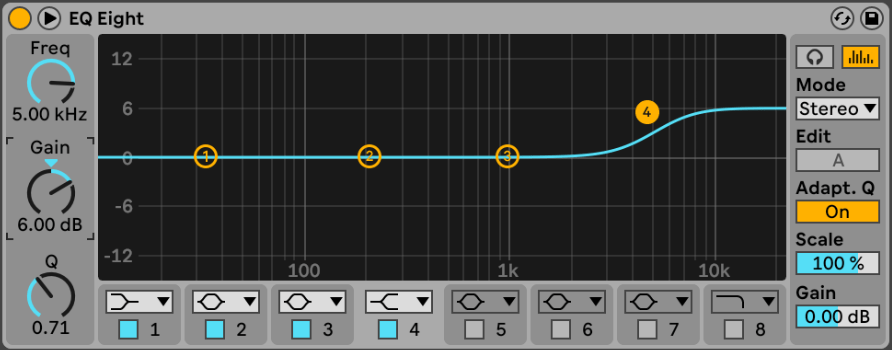
Step 4: Don't let high-frequency harshness get too overwhelming
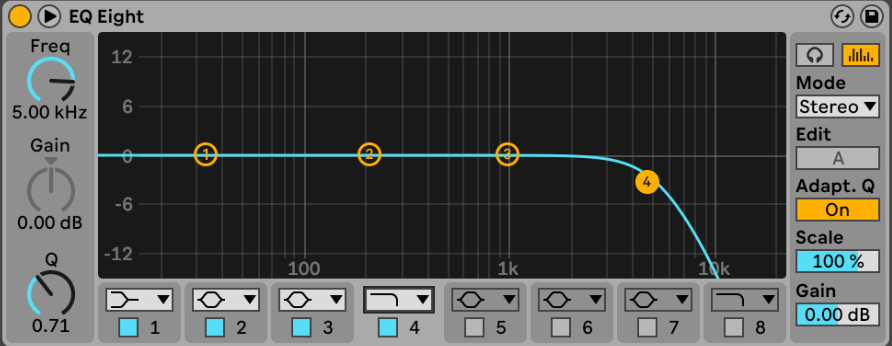
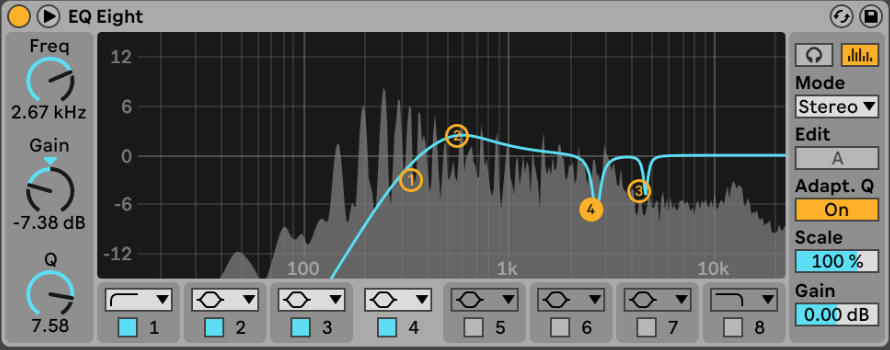
Certain instruments do not require top-end presence in our mix. Sub-bass for example does not require an abundance of high frequencies. A lot of noise can creep into our mixes if we do not control the top end of every instrument. Clearing out the highs will make space for our cymbals, hi-hats, and crashes. No listener never appreciates ear-piercing sounds in a song. Using a low-pass filter in every situation is also not a feasible solution because a scenario might arise where the maintenance of the tonal characteristic of a signal would mean that we cannot use a low-pass, as the same time the sound might be conflicting with perhaps a hi-hat; in that case, we would need a high shelf to attenuate the high-end of our sound, while not completely eliminating it.
As we can see in the image above, we are using a high shelf to attenuate the high mids and highs of the signal. We are not using a low pass because then the frequencies from 3KHz to 5KHz might be removed. This is the area in the spectrum where a very important tonal characteristic is lying, that is why we wanted to preserve it.
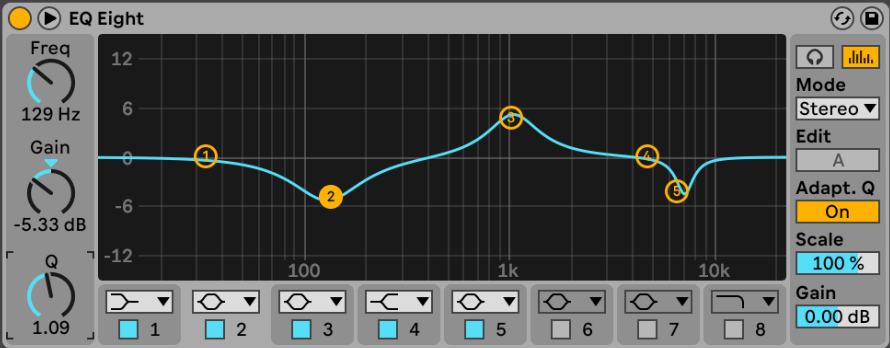
Step 5: Using different Equalizers together
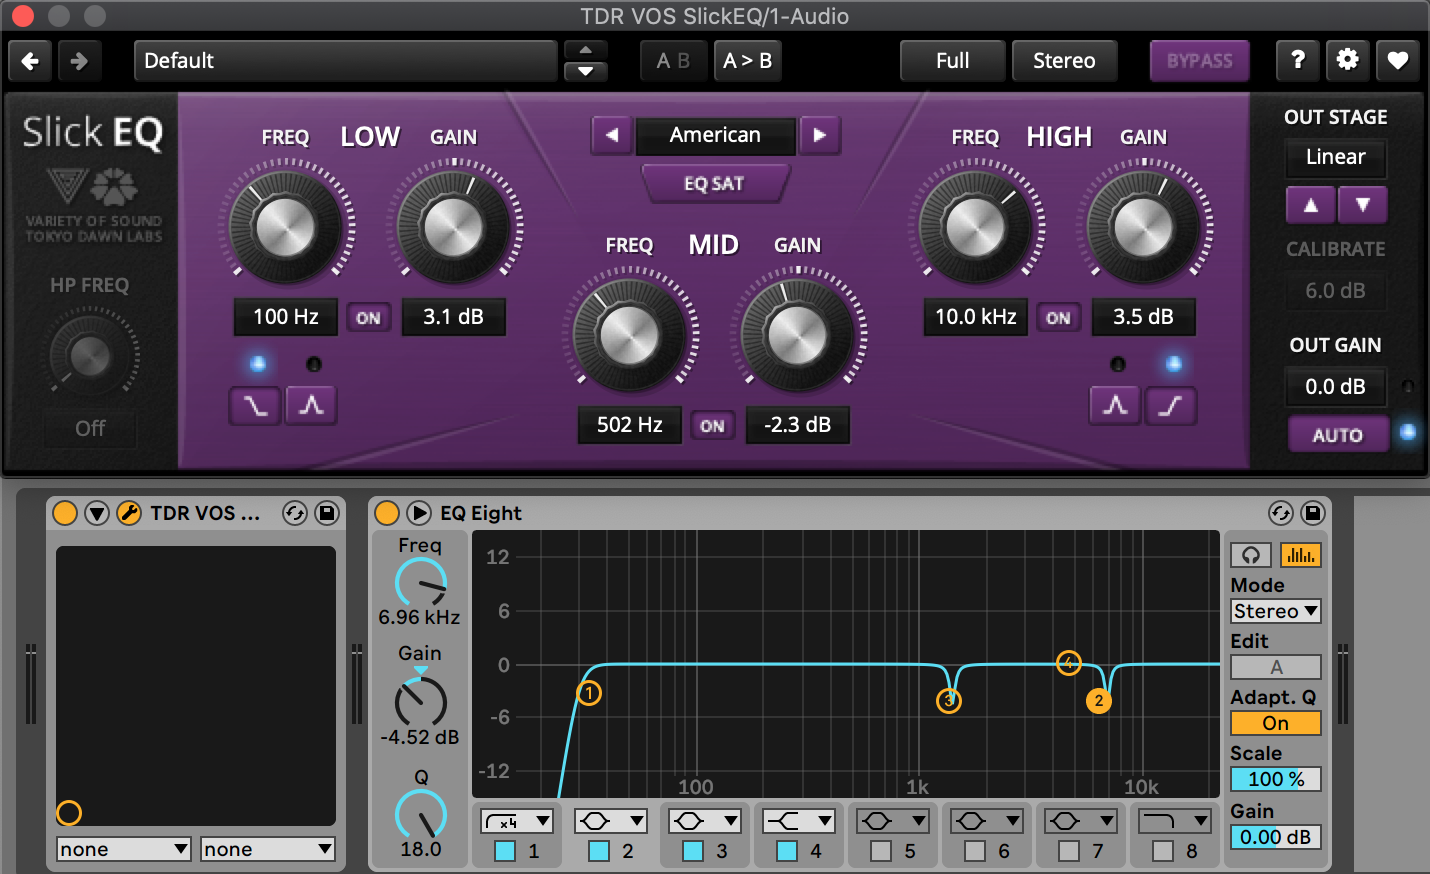
Different types of Equalizers have different characteristics. Our stock EQ plugin sounds absolutely different from a plugin emulation of an EQ. Instead of using different types of curves on a single EQ, you can do the narrow cuts with your stock Equalizer and your wide boosts with plugin emulation. This technique can add a lot of subtle details to our sound.
In the images above, we are using the first Equalizer to do all the correctional work, while the second EQ is just gently boosting the top end overall so the signal is more present in the mix.
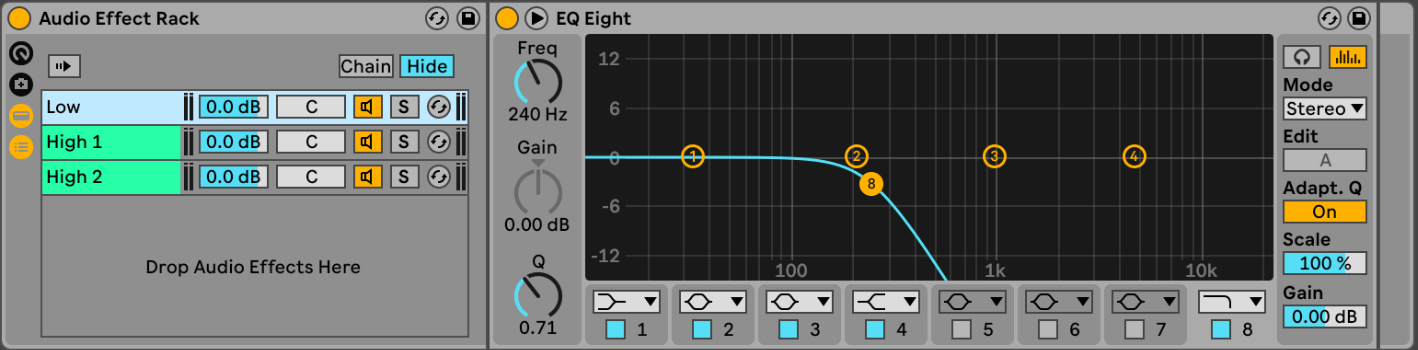
Step 6: EQing on the Bus
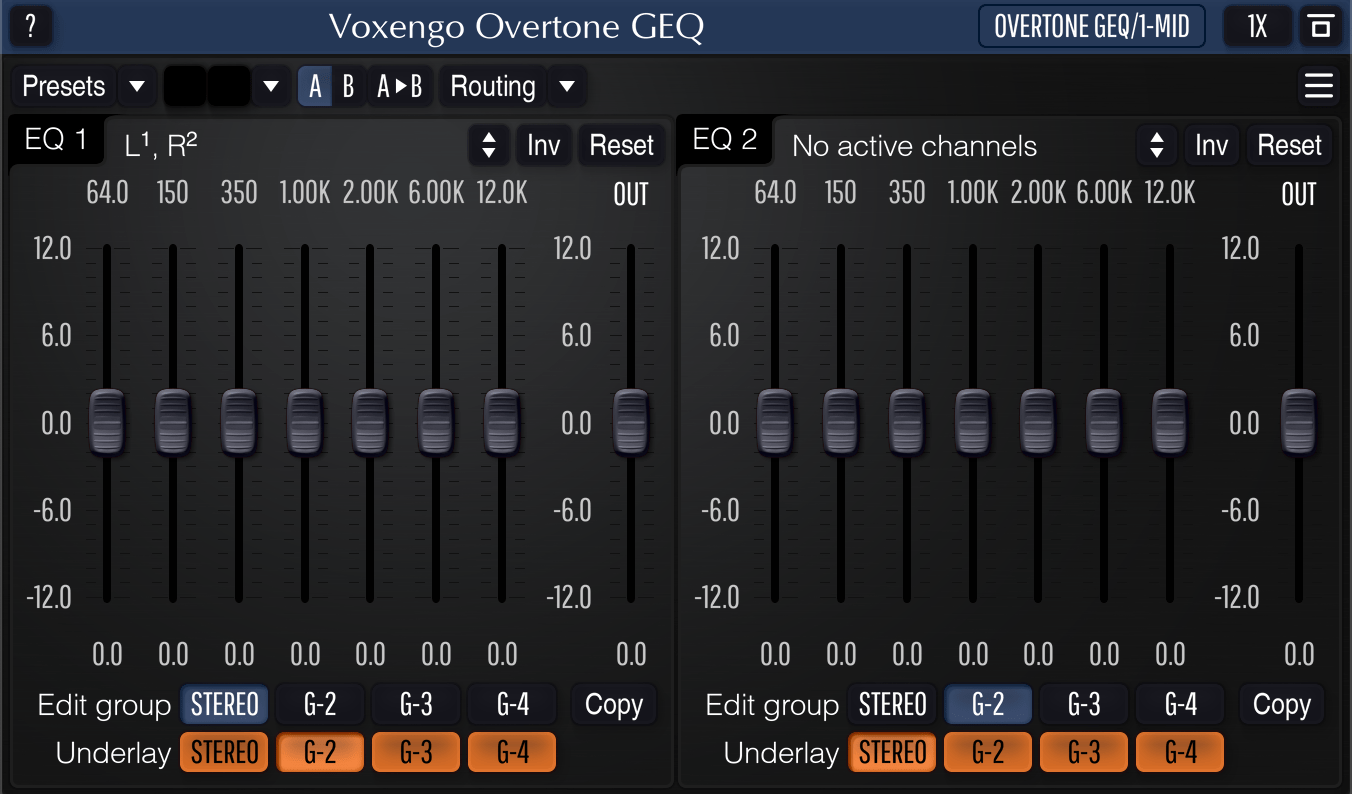
Equalizers can add a similar sound profile to a group of instruments that are being sent to a bus. This technique helps us to maintain the tonal characteristics of each layer/instrument along with adding a similar overall frequency spectrum so that they sound related to each other and work better in the mix. EQing your FX bus is also important so that you can control any low-end issues or frequency masking issues with your dry sounds. Automations work great on Bus EQs because it adds a layer of extra tone sculpting abilities. For example, we can have a higher presence for our vocals in the chorus and then we can roll back the presence in the other sections of the song.
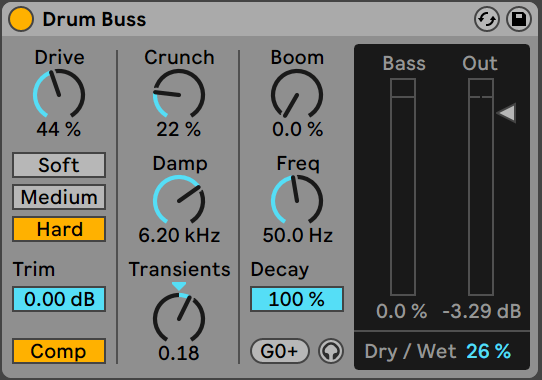
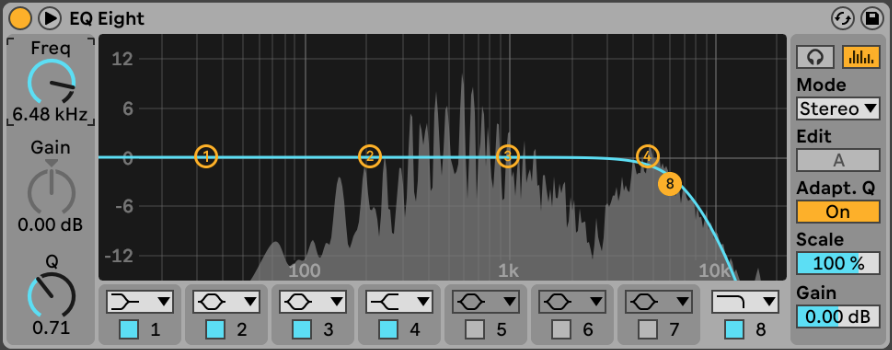
As you can see in the image above there is an EQ placed on the drum bus that is being used to boost and attenuate certain frequencies, so everything in the group sounds better in relation to the other instruments. The change in the EQ is very mild (less gain and low Q value) because we do not want to drastically change the sound of our drums. Think of this EQ as a Fine-tuning EQ which will help us to set the right values.
Step 7: EQing your FX
A reverb placed on a return track can make your instruments/drums sound muddy. Adding an EQ on the return after your Reverb can help us attenuate the problematic frequencies, thus making space for our dry sounds. Similarly, you can use your EQ as an insert FX after distortion in your tack to control any nasty frequencies being added. You can also experiment with adding your EQ before the FX to shape the sound going in. This can be useful to sculpt a signal going into perhaps an autotune effect so that only the required frequencies are tuned. This will greatly increase the accuracy of your Autotune plugin.
In the images above, you can see that we have added an EQ after our reverb. This gives us an extra level of control and sculpting opportunities for our sound.
