


Crypto Cipher Newsroom
Different types of Compressors and Compressions | 7 Steps to Understand Compressors and Compression

Different types of Compressors and Compressions | 7 Steps to Understand Compressors and Compression
There are different types of Compression techniques for different types of Compressors. Mentioned few useful steps to enhance the control over your Mix. There are 7 tips to understand different types of Compressors and Compression in context to variety of Mixing situations. They are discussed as follows:
There are different types of Compression techniques for different types of Compressors. Mentioned few useful steps to enhance the control over your Mix. There are 7 tips to understand different types of Compressors and Compression in context to variety of Mixing situations. They are discussed as follows:
Step 1: Using different types of compressors appropriately
There are different types of compressor plugins that you can invest in. If you are not applying these compressors in the appropriate situation then your investments won't bear good results. Different types of compressors sound different in the same situation. Depending on the different types of compressors we are using, harmonic saturation may or may not be added to our signal. There are four main types of compressors plugins namely; VCA, FET, Opto, and Tube. VCA compressors are the most flexible among the four because they don't add much harmonics to your signal. They can work on a range of attack and release times and knee values. They serve their purpose irrespective of the situation. FET compressors are not as flexible as VCA's but they are known for adding audible coloration to our signal and quick attack times. Consequently, FETs are not used in mastering or mixing airy vocals, but they are quite sought after for drum busses, aggressive vocals, and fast-paced guitars or bass. Opto compressors also color our signal but to a lesser extent, as a result, they are used widely on vocals and sounds with a medium to long decay. They have a slow attack and release time. Some options don't even have the variable attack or release controls. Tube compressors are the oldest of these four compressor types. They have very slow attack and release times and add the most amount of color among the four types. They are used for gluing different sounds together and applying pressure to our signal. We need to be cognizant as to why we are using any compressor otherwise, we run the risk of playing around with knobs rather than working on a mix.

Step 2: Never Compress without any purpose

Let us analyze the image above where we can see a highlighted sample and a non-highlighted one. If we compare the dynamics of the two, it becomes clear that the highlighted loop is more compressed than the second loop. The second loop has a lot of differences between the louder and softer sections meaning it has a greater dynamic range. The highlighted loop we can tell directly from looking at the waveform, that it has a considerably lower dynamic range. Adding a compressor to further flatten the dynamics of our highlighted loop would be a redundant activity in most cases as it will totally destroy any natural dynamics of our loop. It is important to inspect our sound both visually and by ear to decide whether a compressor is required or not. In a lot of situations, our sample is programmed or performed as such, that the natural dynamics are a major part of the overall expressiveness of the song, then compression would not be required. Many beginners mistakenly compress every track. Compressors were originally meant to be used for solving audio issues relating to dynamics instead of riding our channel fader. If a signal is more or less dynamically consistent or the dynamics sound pleasant then it is better not to compress.
Step 3: Enhancing punch with an attack time
Compression can be used to enhance the attack of or signal, making the output more punchy. Here the compressor is being used to boost dynamics rather than to attenuate. We will have to adjust our threshold and attack time setting for this effect to work.
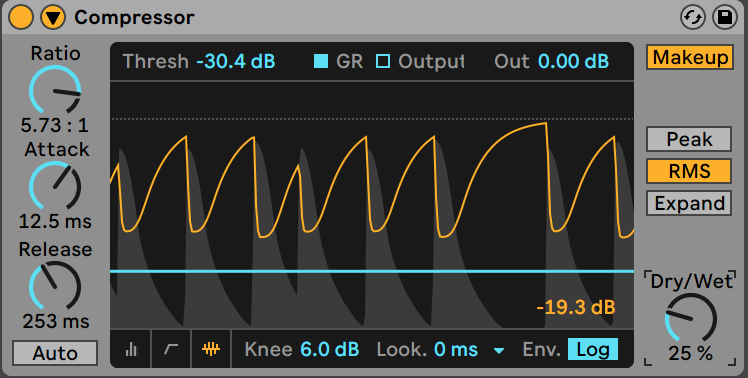
Let us examine the image above. We are feeding a kick drum pattern into our compressor. A kick transient is composed of a short tick sound triggered when the beater hits our drum skin along with the longer body of the kick drum created by the resonating chassis of the kick. We can adjust our threshold such that the compressor attenuates both the punch and a part of the sustain. The attack of a kick is very fast, so we can adjust the attack time of our compressor such that it acts more on the sustain of the kick. Thus sustain has been attenuated, while the attack is not, giving us the perception that we have increased the push of the kick. We will need to adjust our makeup gain so we can compensate for the attenuation.
Step 4: Use the sidechain EQ on your compressor for frequency focused dynamic control
Sidechain equalisers help us to sculpt the frequency spectrum of the sidechain input. The sidechain input triggers our compression. In a traditional compressor, the signal being processed itself is in the sidechain circuit. There are some different types of compressors that also let us select an external input for our sidechain circuit according to which our compression will trigger on the signal being processed. There can be multiple uses for this technique. A common example is controlling the ess-sounds of vocal performance or to tame the harshness of cymbals and hi-hats.
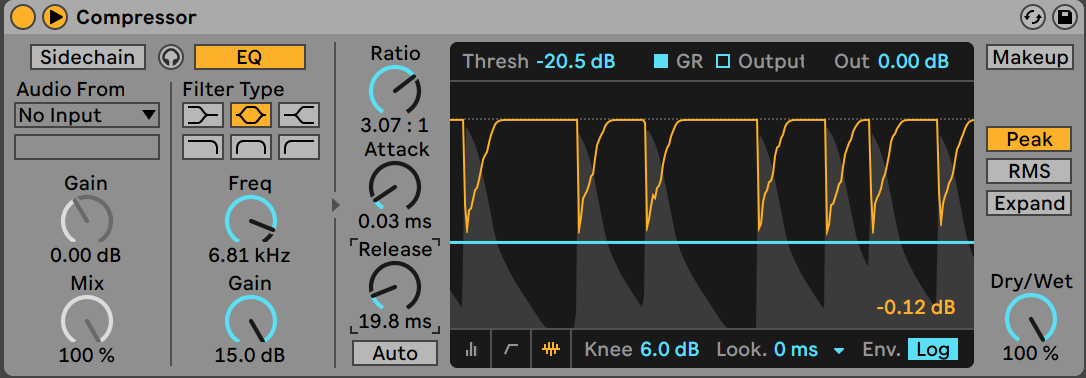
If we look at the image above, we can see that the sidechain EQ has been set to 6.81kHz where we have some sibilance. Now our compressor will react to those sibilant frequencies and turn down the volume whenever the selected frequencies are detected. We can also use our sidechain eq, in a high-pass setting, to mix our bass and kick properly.
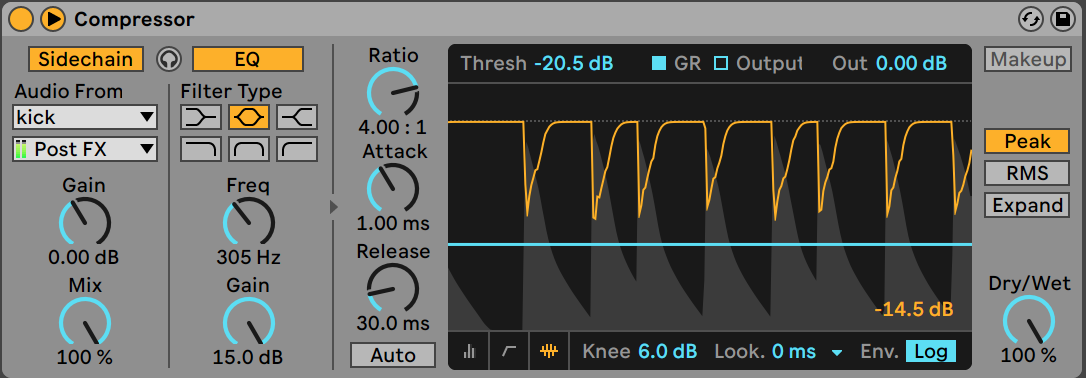
In the image above, we are filtering out all the low frequencies from our sidechain input to prevent any unnecessary pumping on the bass.
Step 5: Compressing to create Rhythm
We can also use different types of compressors to create different rhythmic effects. A common example is sidechaining your synths with a hat sample that is muted. This is used a lot in EDM genres where the release of our compressor can be adjusted to fine-tune the swell of our synths.
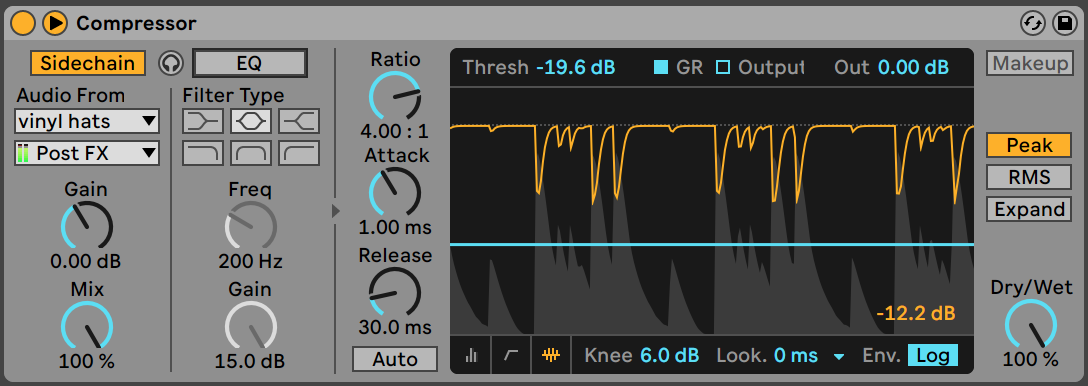
In the image above, our sidechain input, Vinyl Hats is muted on the channel. While our bass has a compressor with a sidechain on. A pumping effect is created on the bass according to our hat groove. We have further deactivated certain parts of our muted hat track to improve the groove.
Step 6: Compressing Delay and Reverb FX
Reverb and Delays are time-based effects. Producers always sync their delay and reverb settings to the project tempo. This technique alone sometimes isn't enough to mix our fx to the rest of the track. The slope in which our reverb/delay decays also has a major impact on the overall feel. A common example is making our delay tail more audible so that the initial sound continues into its next phase. With a linear decay, we will not be able to hear the delay signal at the end might be inaudible. We can use our compressor to bring out the delay more in our mix. We can apply the same concept to reverbs as well. Room reverbs are often compressed to add some fullness to our signal without the reverb having to sustain another phrase. This technique is used on vocals that require a natural room sound.
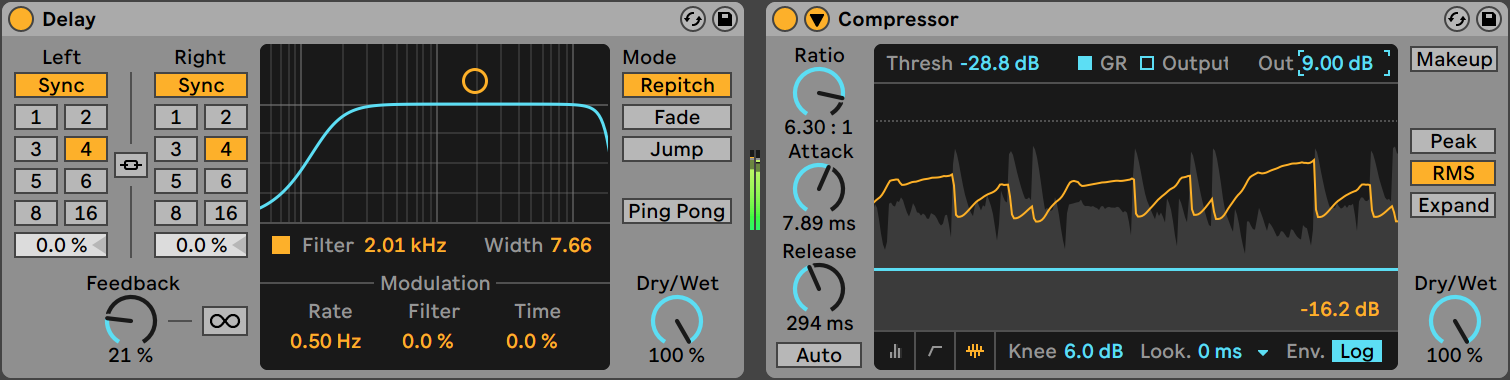
Look at the image above, we are enhancing the tail of
our delay using the compressor to create a reverb-like sound.
Step 7: Compression or EQing: Which comes first?
Both EQs and compressors are considered to be the basic building blocks of any mix. Music Producers often debate which comes first in the FX chain. In reality, there is no set rule. It completely depends on our source material and what we want it to sound like. If a vocal performance has very inconsistent dynamics, it is important to compress the vocals to correct the performance and then EQing. Similarly, there may be a situation where a certain frequency band might be more prominent in the frequency spectrum, as a result, they will reach the compression threshold before the other frequencies, triggering compression. In this case, you will need an EQ first in your chain to attenuate the problematic frequencies and then compress. You can further experiment with adding more EQ's and compressors rather than just the initial one, perhaps to smooth out some peaks created by our post-compression EQ.
